Cozy Greenhouse Interior Ideas: Make It Functional, Not Fussy
A greenhouse can be more than a place to stash seedlings, it can feel like a small retreat that still earns its footprint. The secret is not fancy décor, it’s a layout that supports real work, keeps mess contained, and leaves enough breathing room for a chair and a quiet moment.
The plan below treats the interior like a practical little room. You’ll set up three clear zones, choose surfaces that tolerate moisture, then finish with comfort touches that won’t turn into clutter by next weekend.
Begin with three quick decisions
1) What happens here most days?
Seed trays, potting, overwintering, cuttings, or a mix, each one asks for different surfaces and storage. A “seed-starting first” setup needs even light and easy watering access. A “potting first” setup needs a wipeable counter, bins for mix, and a spot for muddy tools.
2) What feels comfortable to you?
Some people love shelves packed with plants, others want a calm path and open sightlines. Decide whether you’d rather see green everywhere, or keep plants grouped so the space feels quieter.
3) What are your conditions?
Humidity, hot sun, and wet floors change what lasts. Materials that thrive outdoors usually cope better than anything meant for a dry living room, particularly near the entry and the work area.
Create a layout that works
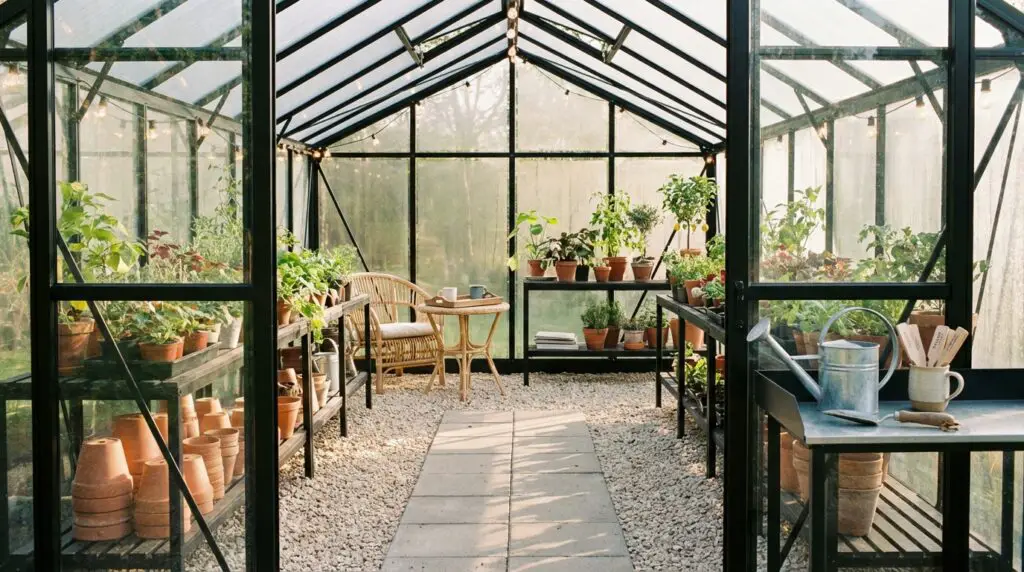
A greenhouse interior looks “finished” when the path is clear, the work surface is obvious, and plants look intentionally placed rather than scattered. Aim for a route that lets you walk in, turn, and reach the far end without weaving around pots.
The three-zone approach
Work zone: where soil, tools, and water live.
Place it near the door if you track in grit, or close to the water source if you carry cans. Keep it out of the harshest mid-day sun so bags of mix and labels don’t bake.
Grow zone: shelves, benches, staging, and trays.
Use walls for vertical growing space, then reserve the center for taller plants or a narrow bench if you have width to spare.
Pause zone: a seat and a small surface.
A greenhouse sitting area can be one chair and a café table, or a compact bench with a narrow ledge beside it. The point is a defined corner, not furniture sprinkled along the walkway.
Walkway rules that prevent chaos
- Keep the main aisle wide enough for a tray or watering can.
- Put heavy planters on the perimeter, not on the path edges.
- Give every loose item a home, hooks, bins, or a drawer, so the counter stays open.
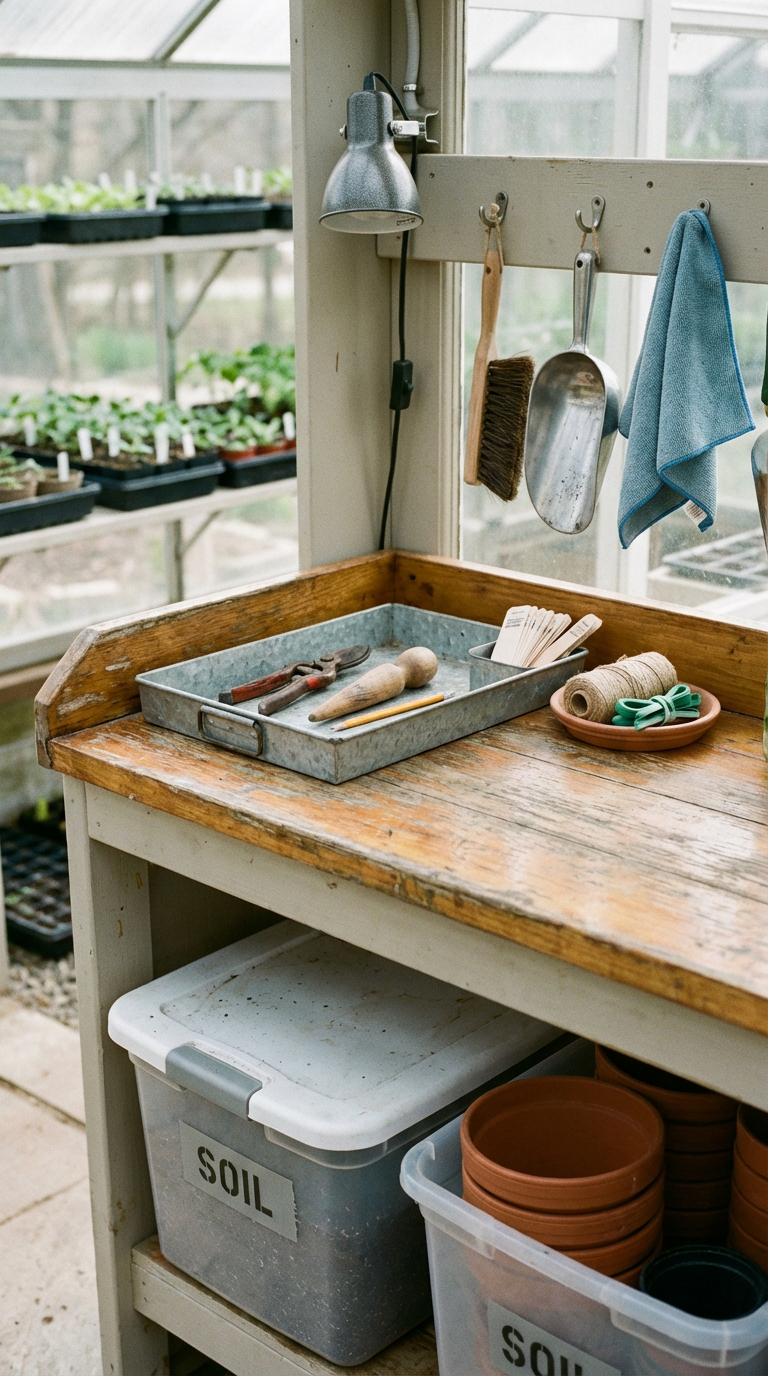
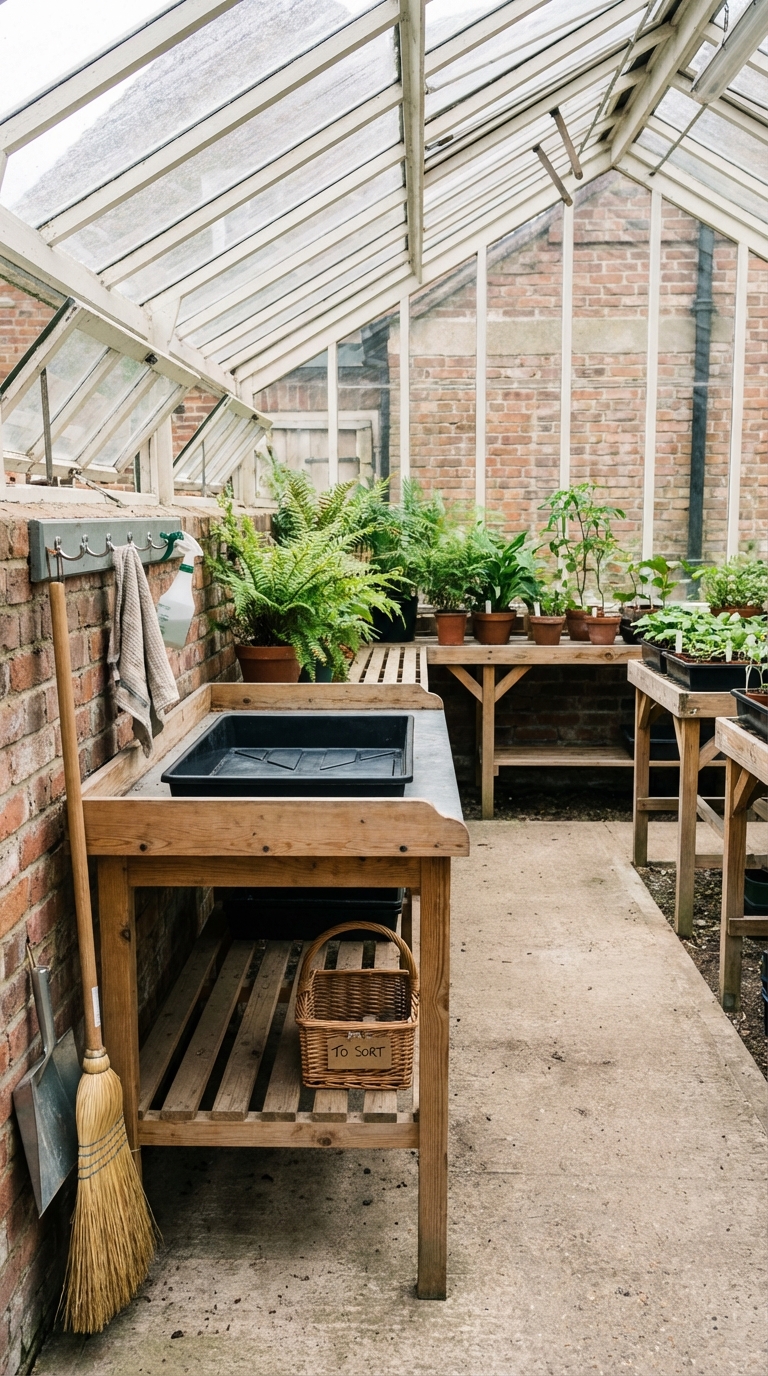
Build a work station you’ll actually use
A potting bench is the heart of most greenhouse interiors. It doesn’t need to be built-in, yet it should feel stable, comfortable, and easy to wipe down.
What makes a good potting bench
- Height you can work at without hunching, usually close to kitchen counter height.
- A water-tolerant top such as sealed wood, stainless, resin, or tile.
- A small lip that keeps spilled mix from sliding off.
- Storage directly below for items you grab daily.
If you already own a sturdy table, improve it instead of replacing it. Add a washable mat, mount a short tool rail on the wall, and slide two lidded bins beneath. Small changes create that “ready to work” feeling.
Keep the counter clear with a micro-kit
Give yourself a tiny set of tools that stays on the bench. A hand trowel, snips, a dibber, a pencil, plant ties, and labels cover most tasks. Store refills elsewhere, so the surface doesn’t become a parking lot.
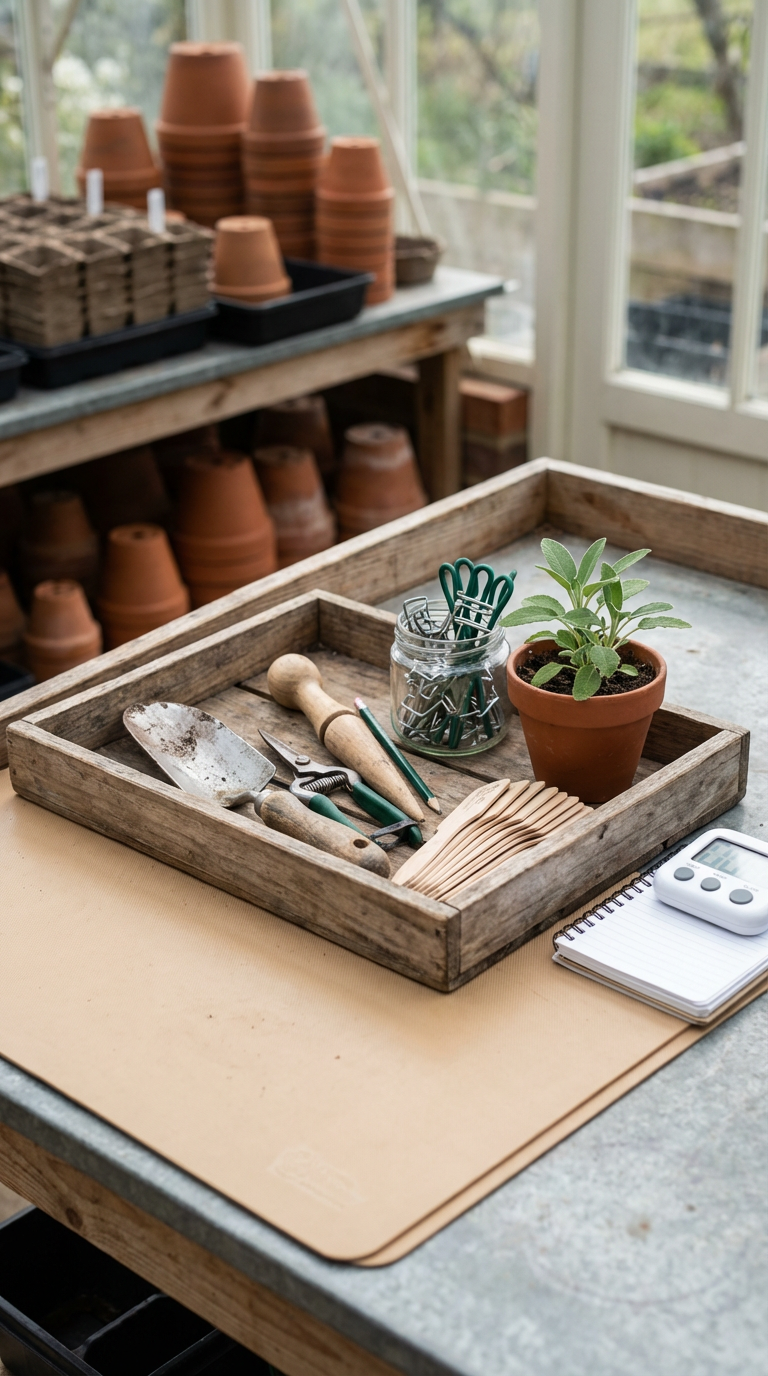
A shallow tray helps, too. Drop daily tools into one tray, then put the tray away when you’re done. The bench looks tidy in seconds.
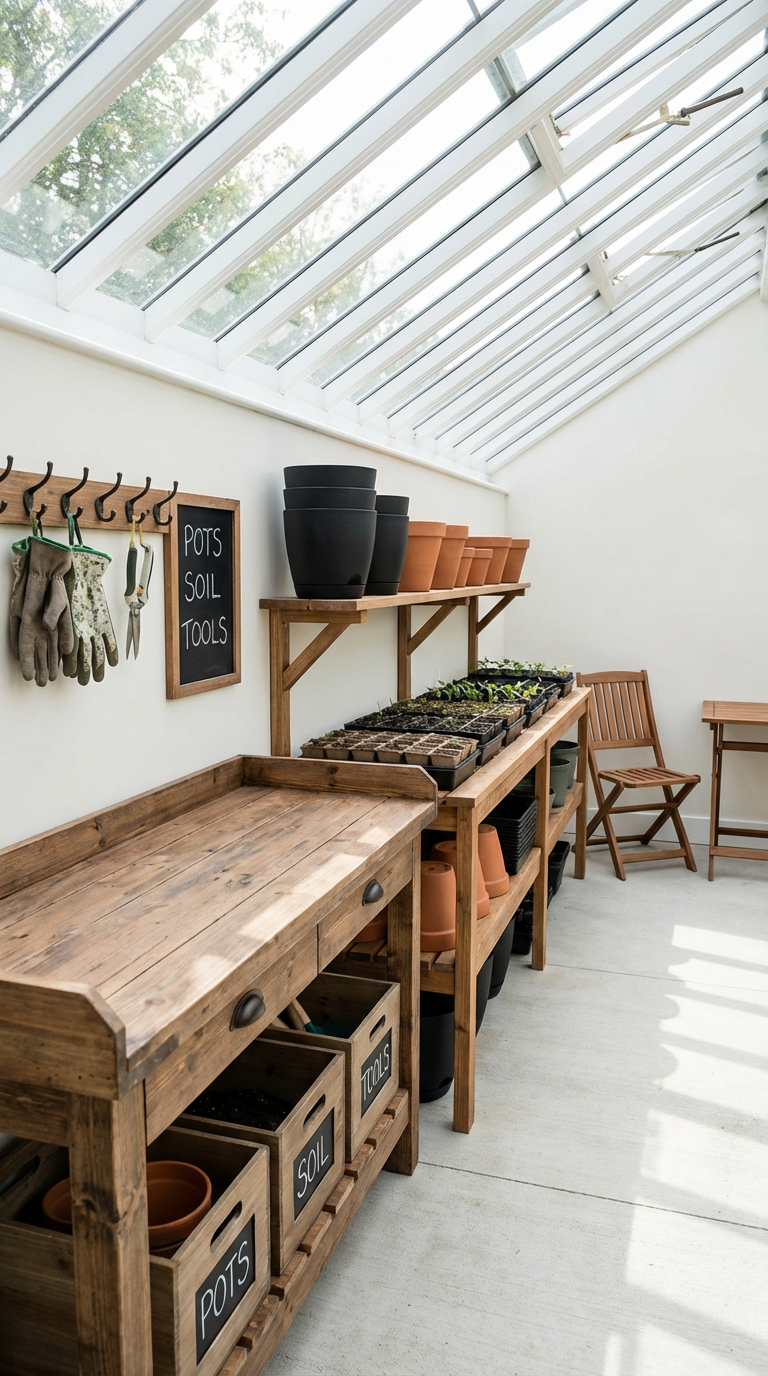
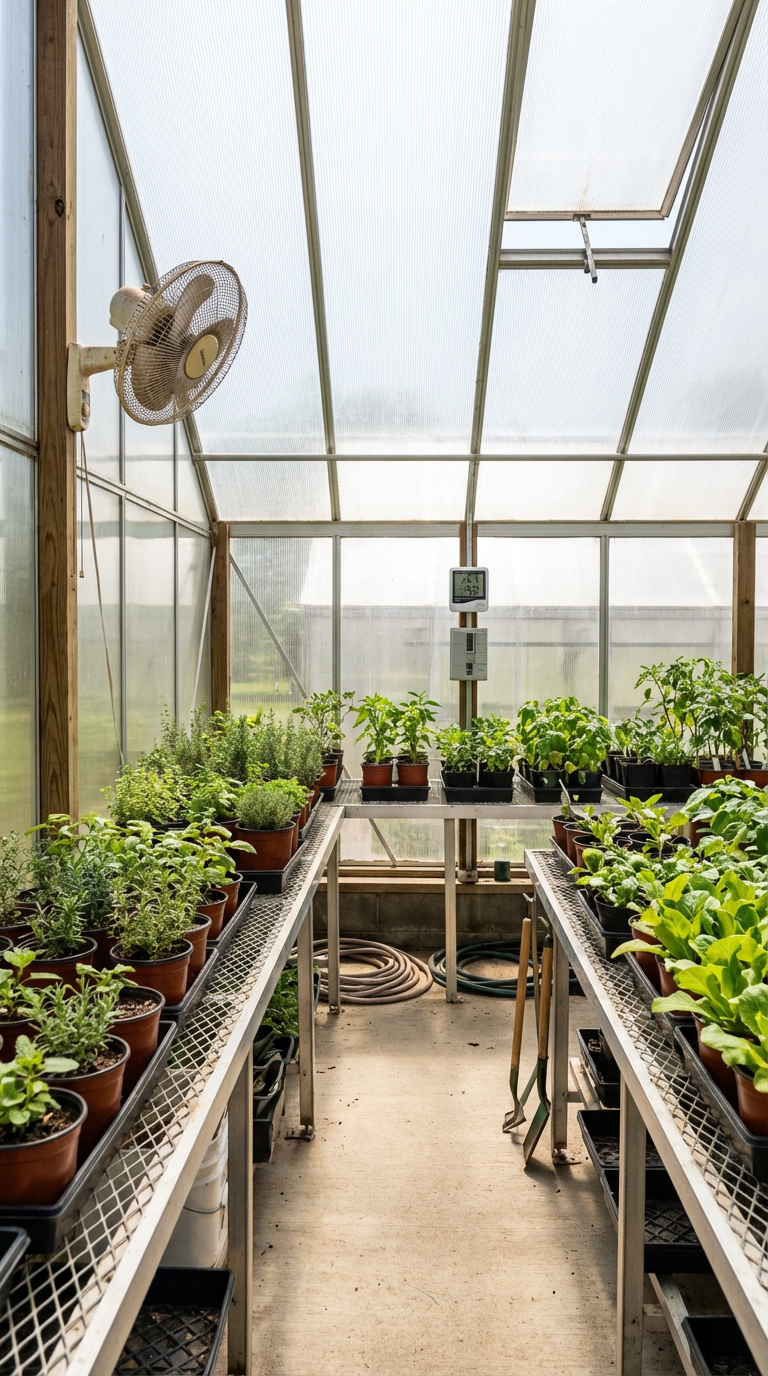
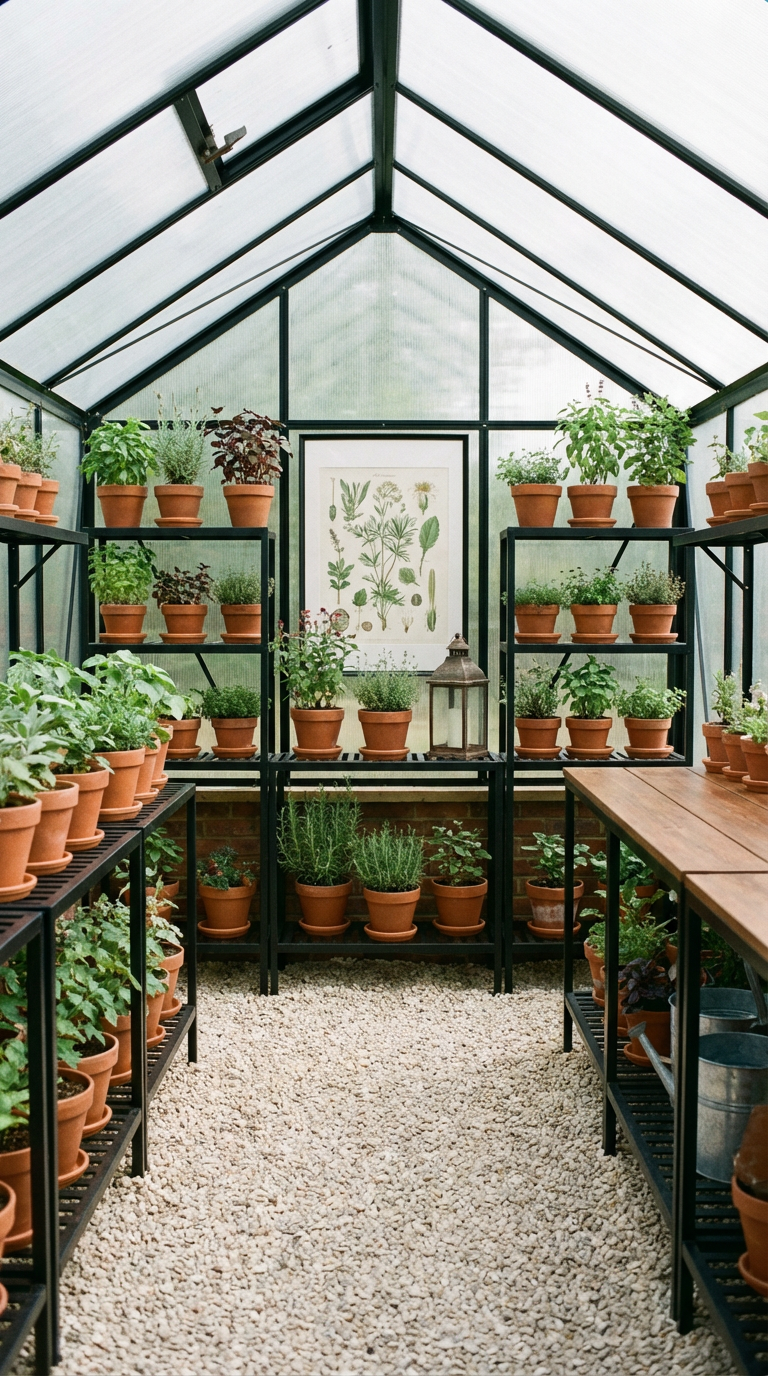
Use shelving to double growing space without crowding
Shelving turns air into usable real estate. Done well, it also makes the greenhouse look orderly because plants sit in defined rows rather than drifting onto the floor.
Shelf styles that suit greenhouse life
- Wire racks: great airflow and easy cleanup, yet some can rust in damp conditions.
- Metal mesh shelves: sturdy and practical, especially for heavier pots.
- Wood shelves: warm and attractive, yet they need sealing and occasional checks.
- Slatted benches: classic look, water drains, pots stay stable.

Arrange shelves for light and access
Put the most light-hungry plants where light is strongest. Keep tender seedlings away from the door draft. Taller plants belong behind or toward the center so shorter trays still get light.
Leave a hand-width gap behind trays for airflow. Plants pressed against a cold wall tend to sit in damp pockets, and leaves stay wet longer.
Under-bench storage is your calm-maker
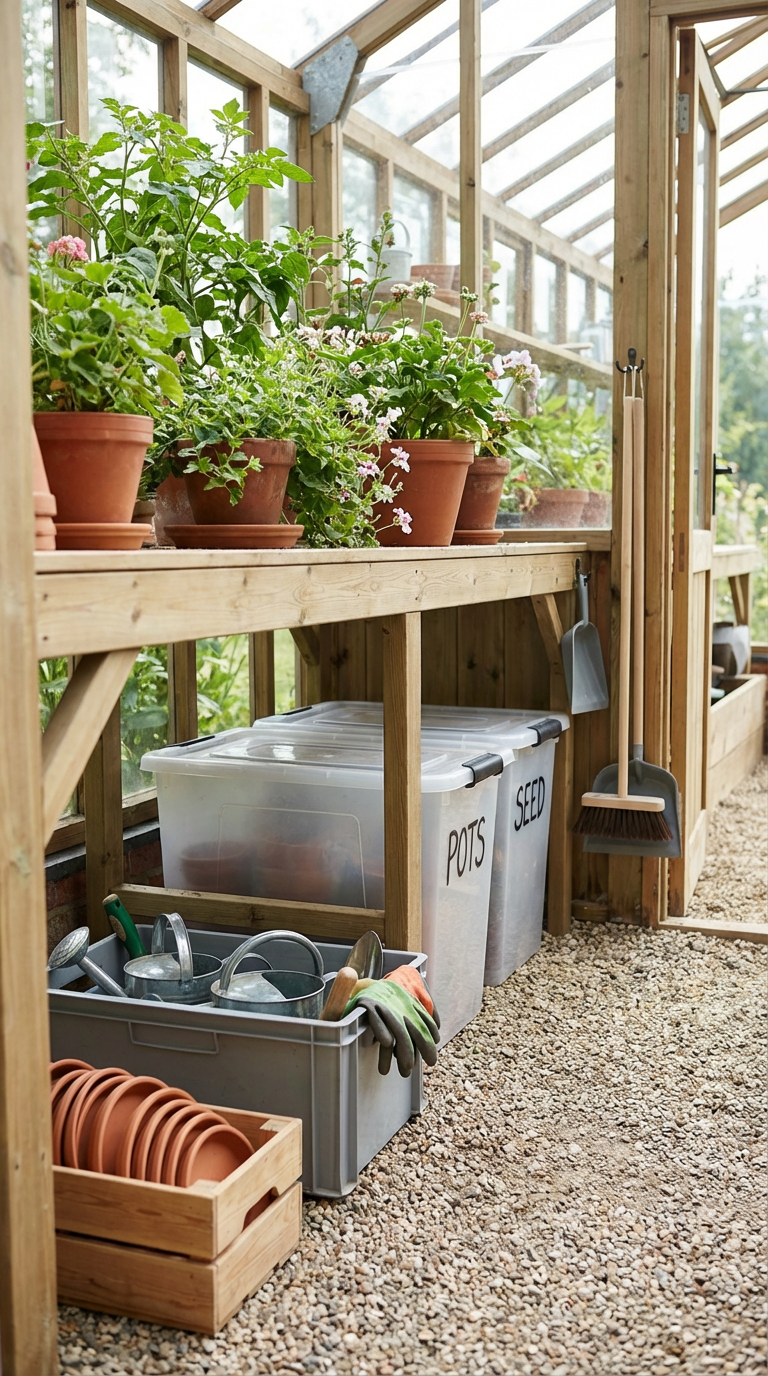
The space beneath benches is perfect for bagged mix, empty pots, cans, and seed-starting supplies. Use lidded bins for anything that can get soggy. Clear bins make inventory easy, opaque bins look calmer in the background of photos, pick what suits your style.
Label bins in a simple way. One-word labels like “SOIL,” “POTS,” “SEED,” and “TOOLS” prevent weekend rummaging.
Flooring that stays easy to clean and safe to walk on
A greenhouse floor takes a beating. Water splashes, soil spills, and every season brings debris. The goal is a surface that drains, feels stable, and can be cleaned without drama.
Gravel: practical and forgiving
Gravel drains well and often costs less than hard surfaces. Pair it with a weed barrier underneath, then keep the layer deep enough to cover the fabric completely. A rake becomes your quick reset tool.
Choose a smaller gravel grade if you plan to roll carts. Pea gravel can shift under wheels, so a firmer, angular gravel often feels steadier.

Pavers: a tidy path that feels intentional
Pavers create a clean lane, making the space feel put-together the moment you step inside. Combine a paver path with gravel between, and you get drainage plus a stable walkway for chair legs and carts.
Keep pavers level. Uneven stones look charming in a garden, yet they can be annoying when you carry trays.
Concrete: best for permanent, heavy-use setups
Concrete is easy to hose down and stable for shelving. It can feel colder underfoot, so many people add removable rubber mats in the work zone. Plan for drainage, especially near the door.
Seating that feels cozy without turning into a dumping ground
Comfort helps you use the greenhouse more often, especially in shoulder seasons. A seat also creates that magazine-friendly “garden room” vibe, as long as it stays simple.
Pick furniture that tolerates moisture
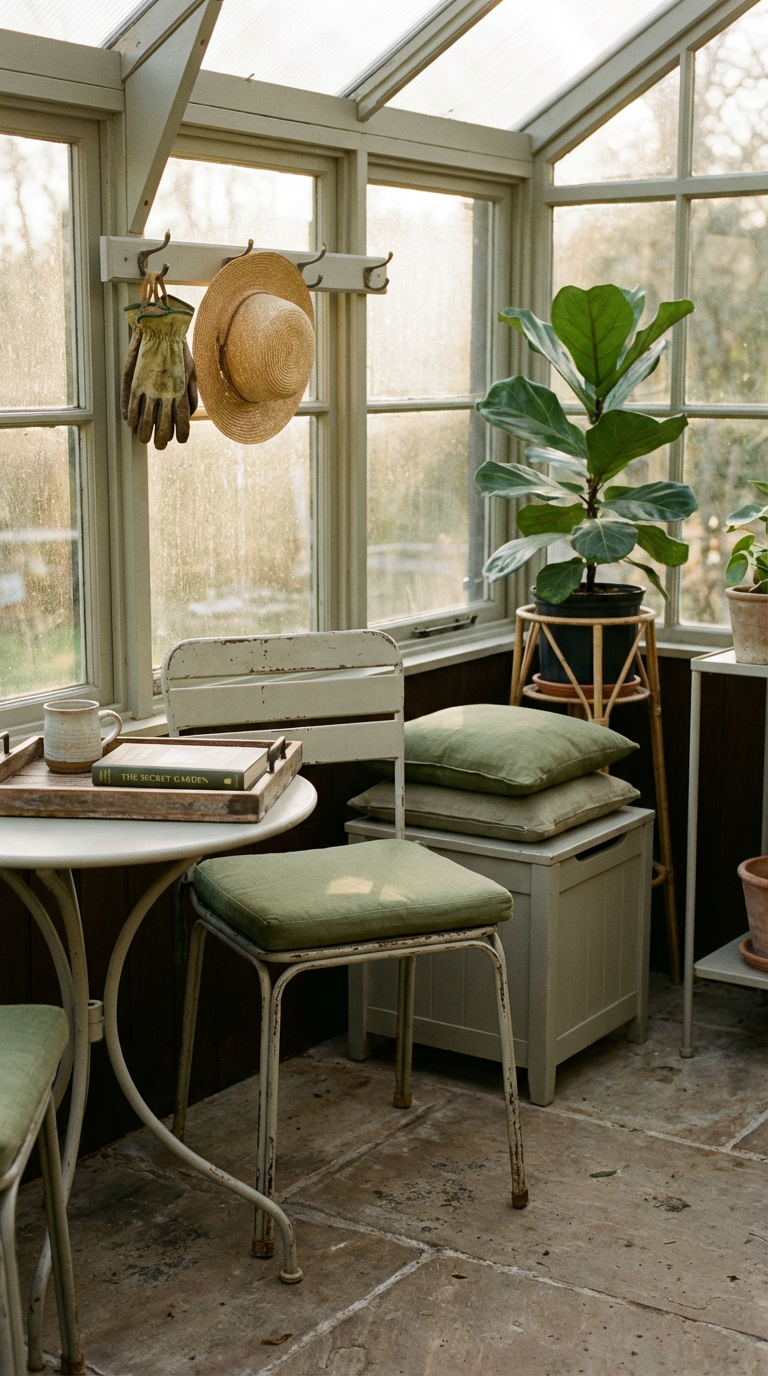
Outdoor-rated materials handle humidity better. Powder-coated metal, sealed wood, and resin are reliable choices. If you bring in a cushion, choose outdoor fabric and store it in a lidded bin when you’re not using it.
A single chair is often enough. Add a small table that can hold a mug or notebook, then stop there.
Style the corner with function-first details
- A hook for gloves or an apron
- A narrow tray for a timer or plant tags
- One lantern-style light, or a simple sconce
- A stand that lifts one statement plant off the floor
Keep textiles minimal. Humidity can make throws smell musty, so treat them as occasional comforts, not permanent props.
Lighting that supports work and still feels warm
Greenhouses are bright in daytime, yet evenings and cloudy days can make details hard to see. Layer light with a practical beam for tasks and a softer glow for atmosphere.
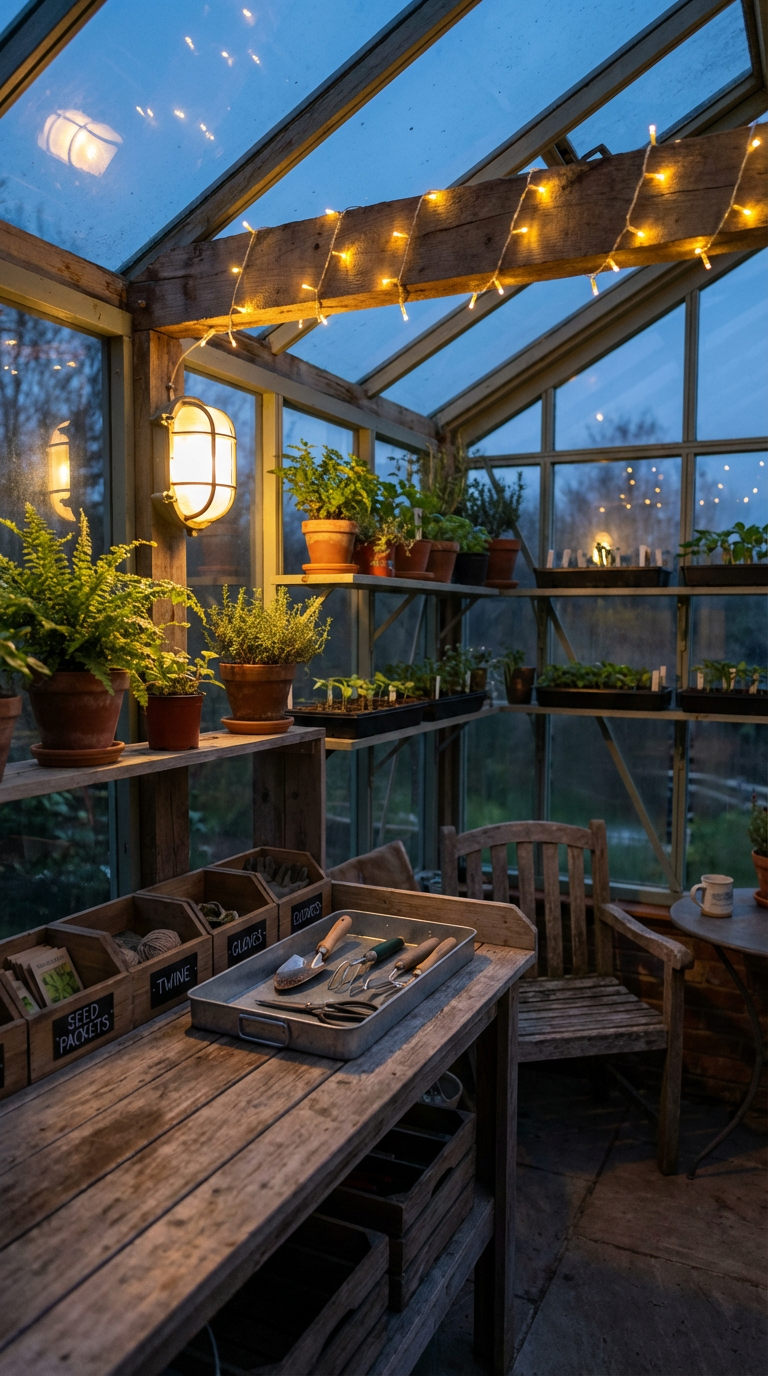
Task light: a moisture-safe fixture over the potting area helps with sowing, labeling, and leaf checks. Aim the light toward the counter, not into your eyes.
Ambient glow: a warm bulb in a protected fixture makes the space inviting at dusk. Keep cords off the floor, route cables along walls, and avoid trip hazards.
Airflow, humidity, and condensation
Moist air is normal in a greenhouse, yet stale dampness causes headaches, for plants and for comfort. Small habits often make a big difference.
A ventilation rhythm that reduces foggy mornings
Open vents early enough to prevent overheating. Close them before the evening cool-down traps warm moist air against colder surfaces. In cooler seasons, a short burst of late-day venting can cut night condensation.
Gentle circulation beats a blast
Fans work best when they keep air moving through the whole space, not when they hammer one shelf. Space trays so air can move under and around plants, and avoid pushing foliage hard against walls.
Watering timing helps, too
Water earlier when possible. Excess moisture has more time to leave the air before temperatures drop and surfaces cool.
Materials that look good and survive greenhouse life
Think of the interior as a wet utility room with plants, then add warmth through a few durable finishes.
- Galvanized or powder-coated metal for shelves, hooks, and small tables
- Sealed wood for a bench top, stool, or one accent shelf
- Terracotta and ceramic planters for warmth and weight
- Resin or composite for stools and side tables
Skip anything that warps easily. Unsealed softwood, cheap particleboard, and paper-based storage boxes rarely last in high humidity.
Keep the look “not fussy” with a few styling rules
A magazine-worthy greenhouse interior is usually simple, consistent, and lightly edited. Plants do the heavy lifting, the styling supports them.
Rule 1: repeat a limited palette
Pick two neutrals and one accent. Example: soft white, warm wood, and muted green. Or black metal, pale gravel, and terracotta. Repeat the same finish in a few spots, then stop before it looks staged.
Rule 2: give each zone one star moment
- Work zone: a tidy bench with a tray and labeled jars
- Grow zone: an even run of shelves with grouped pots
- Pause zone: a chair angled toward the plants, plus a tiny table
Keep the rest quiet. Empty space is part of what makes the greenhouse feel calm.
Rule 3: hide the awkward items
Bags of mix, spare plastic pots, fertilizer tubs, and half-used rolls of ties can live under benches or inside bins. If you love open shelves, place the “pretty” utility items up top, then tuck the messy essentials below.
Advice corner for real greenhouse living
Perfect photos rarely show the messy parts. Real use brings mud, algae, and a surprising amount of plastic. The goal is not perfection, it’s a system that resets quickly.
If the bench keeps disappearing under stuff
Create a “landing bin.” Anything that doesn’t belong on the bench goes into the bin, then you sort it once a week. A single container prevents the counter from becoming a pile.
If you feel cramped no matter what you do
Try removing one item rather than adding storage. One extra shelf, one extra table, or one extra plant stand can shrink the path. Keep the biggest items on one side only, so the space reads longer and calmer.
If puddles and slippery patches show up
Look at where water lands. A drip tray under the watering area, a mat you can lift and rinse, or a small shift in where you water can solve most slippery zones. For gravel floors, rake and top up as needed so low spots don’t become puddles.
If morning condensation is constant
Vent late in the day when temperatures allow, then keep air moving gently overnight. Reduce crowding near cooler surfaces. Water earlier so the greenhouse air dries a bit before night.
If the “cozy corner” becomes a storage chair
Give the chair one job: sitting. Add one hook nearby for a sun hat, then refuse to pile supplies on the seat. If you need overflow space, tuck a lidded bin under the chair or use a narrow shelf beside it.
A 30-minute seasonal reset that keeps it enjoyable
A quick reset at the start of each season prevents the slow creep of clutter and algae. Set a timer and keep it light.
- Clear the path, move anything on the floor into its home.
- Wipe the bench, empty the tray, restock labels and ties.
- Sweep or rake the floor, especially along edges.
- Check vents and fan screens, dust can build up fast.
- Group plants by needs, rotate trays so light hits evenly.
- Toss tired leaves and empty pots, then wash a few trays if you can.
A screenshot-friendly checklist for the cozy, practical interior
- Potting bench with wipeable top
- One tray for daily tools
- Labeled bins under the bench
- Shelving or benching that lifts plants off the floor
- Clear walkway from door to back wall
- Gravel, pavers, or another stable floor plan with drainage in mind
- One chair plus a small table
- Moisture-safe task light
- Simple airflow plan, vents and/or fans
- A couple of warm textures, terracotta, sealed wood, woven basket
Closing thoughts
Greenhouses can feel welcoming without becoming fussy. Start by protecting the path and the work surface, then build storage that keeps daily tools close and messy supplies out of sight.
Once the bones are right, comfort becomes easy. A single chair, a soft glow at dusk, and a tidy bench can turn a growing space into the spot you reach for when you want a quiet pause, surrounded by plants that look as good as they’re growing.