From Scrap to Sanctuary: 11 Creative Ways to Upcycle Old Items into Planters and Raised Garden Beds
Turning discarded old materials into garden planters or vibrant raised garden beds not only enhances your garden’s aesthetics but also contributes to sustainability. This transformation from obsolete to lush involves creativity and a bit of elbow grease. Metal, often overlooked, offers excellent durability and a unique look for garden projects. From galvanized metal roofing to old metal tubs, the possibilities are endless. Here, we explore inventive ways to repurpose old metal into flourishing garden spaces.
Building a Raised Garden Bed from Galvanized Steel or Weathering Steel
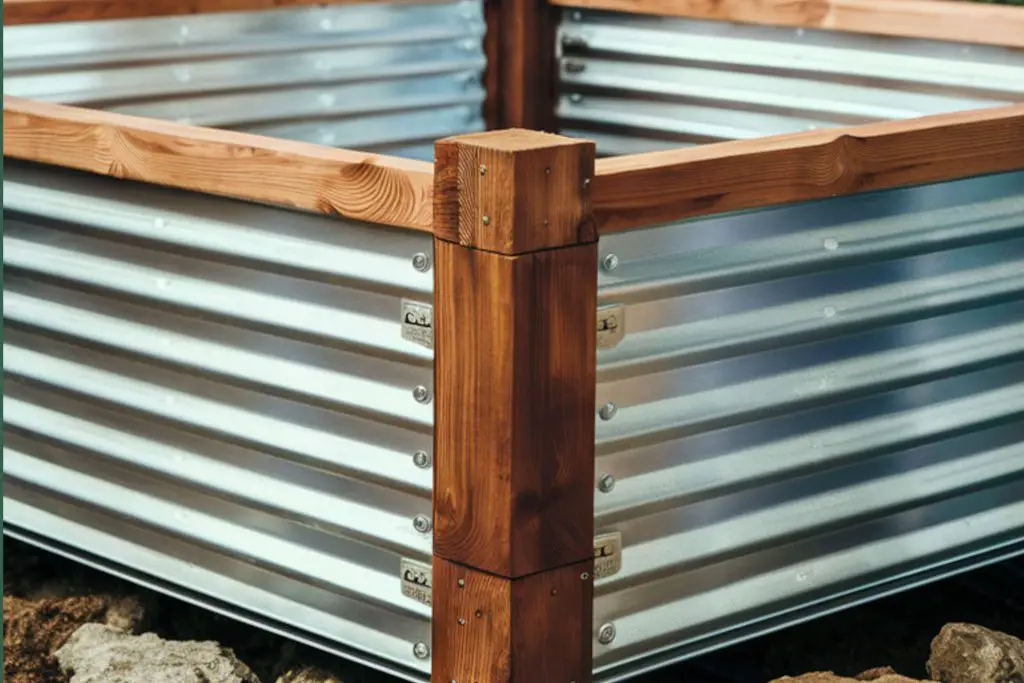
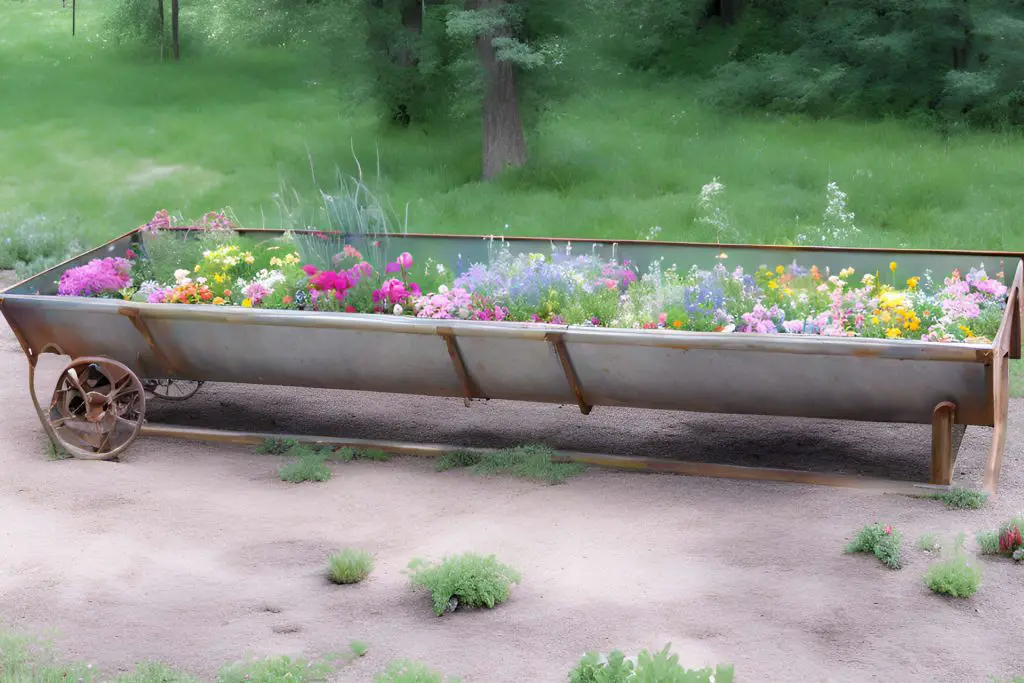
Raised garden beds crafted from galvanized steel or weathering steel, commonly known as Corten, are not just practical but also add an industrial charm to your garden. The corrosion-resistant qualities of galvanized steel make it a superb choice for garden beds, ensuring longevity and durability against harsh weather.
Step-by-Step Guide:
- Measure and Cut: Start by measuring the desired length and width of your garden bed. Cut the metal to size using a metal cutter. For standard beds, aim for a width that allows easy reach to the center from both sides.
- Form the Frame: Bend the metal into a rectangular shape, securing the corners with metal brackets or screws. Ensure that all edges are smoothed to avoid injuries.
- Add a Bottom: If placing over soil, you might skip this step, but for patio or deck installations, attach a metal base with drainage holes to prevent waterlogging.
- Ensure Good Drainage: Drill several drainage holes at the bottom of the bed to promote good drainage and prevent soil contamination.
- Position and Fill: Place the frame in its desired location, fill it with a mix of garden soil, compost, and proper amendments to nourish your plants.
- Planting: Choose plants that thrive in raised conditions. Consider the soil temperatures, which may be higher in a metal bed, and select heat-tolerant varieties.
This DIY raised garden bed idea not only recycles old material but also minimizes weeds and gives your garden a modern, clean look. Plus, the elevated soil warms up earlier in the spring, extending your growing season.
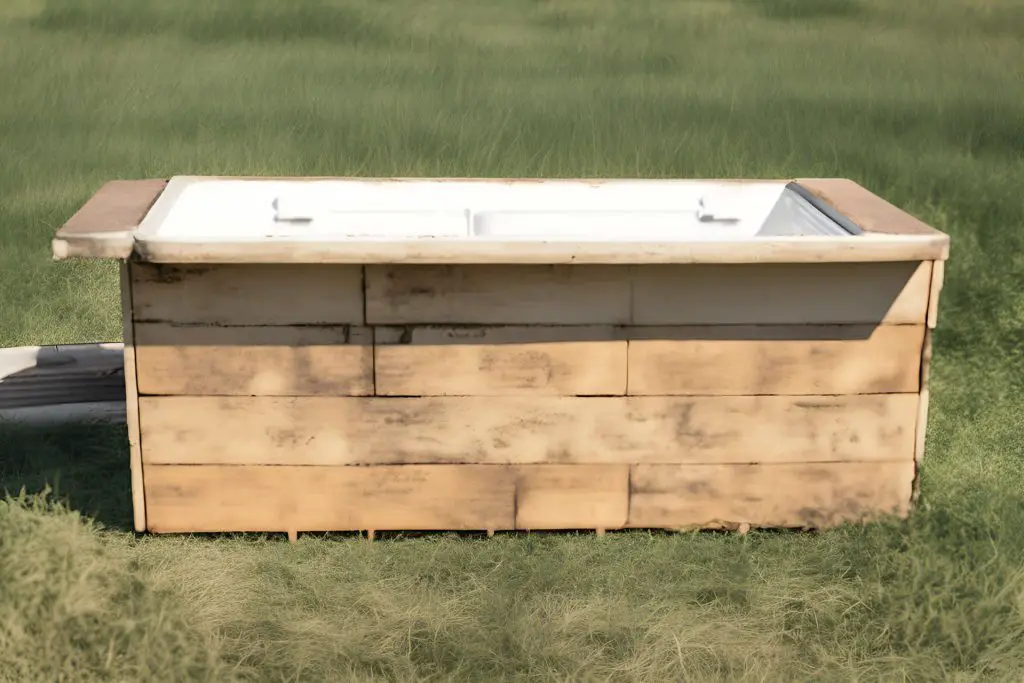
Upcycling an Old Enamel Bath
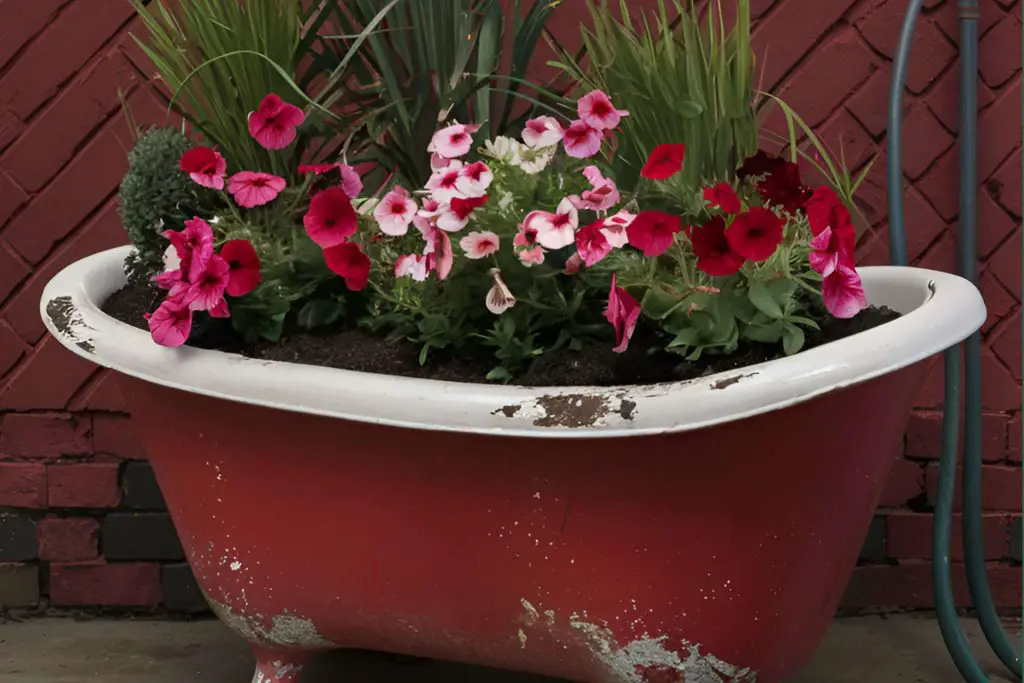
An old enamel bath can be transformed into a quirky and charming raised garden bed. This project not only recycles but also creates a focal point in your garden.
Steps for Transformation:
- Prepare the Bath: Clean the bath thoroughly, removing any rust or peeling paint. Apply a rust-inhibiting primer to protect further deterioration.
- Drill Drainage Holes: Turn the bath upside down and drill several holes in the bottom to ensure good drainage and prevent water stagnation.
- Create a Base: If the bath doesn’t sit flat on the ground, construct a stable base using brick beds or a frame of pressure-treated wood to support it evenly.
- Fill and Plant: Mix garden soil with compost and fill the tub. Plant a variety of herbs, small vegetables, or flowers that do not require deep roots.
- Accessorize: Add external decorations such as painting the exterior or attaching tiles to match your garden’s theme.
This bed will likely become a garden centerpiece, attracting attention and conversation. The smooth, glossy interior of an enamel bath helps in maintaining moisture, making it ideal for plants that thrive in consistent water availability.
Transform an Old Filing Cabinet into a Raised Garden Bed
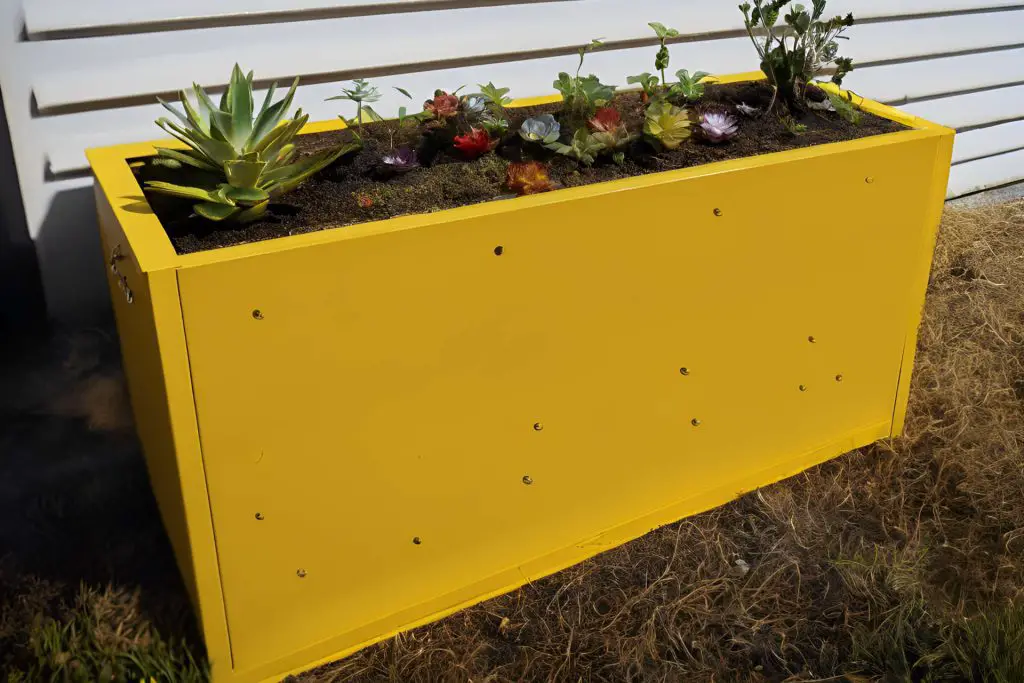
An old filing cabinet can easily be upcycled into a unique and efficient raised garden bed. This clever repurposing idea utilizes a common office staple and turns it into a functional part of your gardening landscape.
Making the Transition:
- Prepare the Cabinet: Remove drawers and any internal hardware. Sand down any rough spots to prevent injuries and apply a rust-resistant paint to give it a fresh look and additional protection.
- Modify for Drainage: Tip the cabinet onto its back, so the drawer openings face upward. Drill several drainage holes at the bottom to promote good drainage, crucial for healthy plant growth.
- Secure and Stabilize: If the cabinet is wobbly, stabilize it by attaching it to wooden stakes driven into the ground or by bolting it onto a solid base.
- Fill with Soil: Mix top-quality garden soil with compost and fill each drawer section nearly to the top. Ensure the soil is loose and aerated to allow roots to breathe and grow.
- Planting: Opt for shallow-rooted plants like herbs, lettuce, or flowers. The individual sections naturally create small square sections, ideal for square foot gardening.
This transformation not only provides a DIY raised garden bed but also adds a modern and industrial aesthetic to your garden. Additionally, it is a perfect example of upcycled raised garden bed materials working to create a highly productive kitchen garden.
Repurposing a Wheelbarrow as a Raised Garden Bed
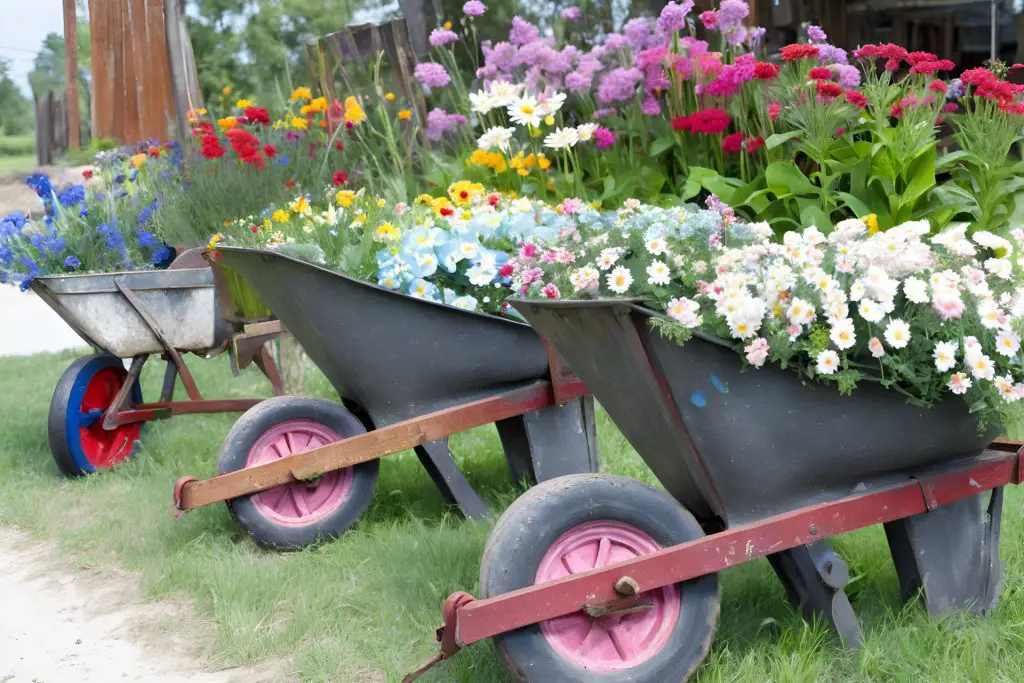
Using an old wheelbarrow as a raised bed planter is a charming way to recycle and enhance your garden space. Wheelbarrows are particularly suited for mobile gardening, allowing you to shift the location of the bed to take advantage of changing sunlight patterns or to rearrange your outdoor space.
Steps to Convert:
- Prepare the Wheelbarrow: Ensure the wheelbarrow is clean and free from rust. Treat with a rust-inhibitor if necessary. Retain the wheel and handles as these will facilitate movement.
- Enhance Drainage: Drill holes in the bottom of the wheelbarrow to ensure adequate drainage. This step is vital to avoid water accumulation and root rot.
- Stabilize: If the wheelbarrow tends to tip, stabilize it with bricks or stones to provide a firm, level base.
- Soil and Plant: Fill the wheelbarrow with a well-draining soil mixture, rich in organic matter. Since metal conducts heat, choose plants that can tolerate or thrive in warm conditions.
- Plant and Maintain: Ideal for annuals, succulents, or herbs that require less soil depth. Regularly water and adjust the wheelbarrow’s position to optimize plant health and growth.
Using an old wheelbarrow in this way not only recycles an unused tool but also introduces a portable element to your garden design, offering flexibility and functionality. Wheelbarrows as raised garden beds symbolize a fusion of practicality and creativity, making them an excellent choice for gardeners looking to optimize their space with temporary or permanent raised beds.
Turning an Old Cattle Feeder into a Raised Garden Bed
Repurposing an old cattle feeder into a raised garden bed is an inventive way to give new life to an agricultural relic. These feeders, typically made of sturdy metal, are perfect for creating a large, durable planting area.
Conversion Steps:
- Cleaning and Preparation: Thoroughly clean the feeder to remove any debris or residues. Apply a rust-proofing treatment to extend its life and enhance its appearance.
- Enhancing Drainage: Adequate drainage is crucial. Drill drainage holes at the bottom of the feeder, ensuring that excess water can escape, which is essential for preventing root diseases and promoting good drainage.
- Site Selection and Setup: Choose a sunny spot for your feeder bed, considering the mature size of the plants and their sunlight requirements. Place the feeder and stabilize it on the ground if necessary with concrete blocks or stones to prevent it from tipping.
- Soil and Planting: Fill with a rich mix of garden soil, compost, and any necessary soil amendments. This setup is particularly well-suited for growing deep-rooted vegetables or perennials.
- Maintenance: Regularly check the soil moisture and nutrient levels, adjusting as needed to support healthy plant growth.
Using a cattle feeder for a garden bed is not just practical but also adds a rustic charm to your garden, making it a focal point of your outdoor space. This approach supports sustainability by recycling and reduces soil contamination through elevated planting.
Transforming an Old Refrigerator into a Raised Garden Bed
An old refrigerator can be transformed into a highly functional raised garden bed, offering excellent insulation for soil and a unique look for your garden.
Conversion Process:
- Preparation: Remove all internal shelving and components. Thoroughly clean the interior and exterior of the refrigerator to ensure it is free from contaminants.
- Drainage and Ventilation: Drill several large drainage holes in the bottom and a few smaller holes along the lower sides for additional air circulation. Good ventilation and drainage are critical for preventing mold growth and maintaining good drainage.
- Insulation Removal: If possible, remove any excess external insulation to prevent unwanted heat retention, especially if the refrigerator will be placed in a sunny location.
- Stabilization and Placement: Place the refrigerator in a chosen location, ideally on a level surface. You can use brick beds or railroad ties for additional stability and elevation.
- Filling and Planting: Fill the refrigerator with a suitable soil mix, enriched with compost and designed for the types of plants you intend to grow. This setup is excellent for plants that benefit from cooler root environments due to the insulative properties of the fridge.
This repurposing not only provides an innovative and eye-catching garden bed but also utilizes the natural properties of the refrigerator to create a distinct microclimate beneficial for certain plants. The insulative quality helps in maintaining consistent soil temperatures, which is advantageous for growing sensitive plant varieties.
Using a Beer Keg as a Raised Garden Bed
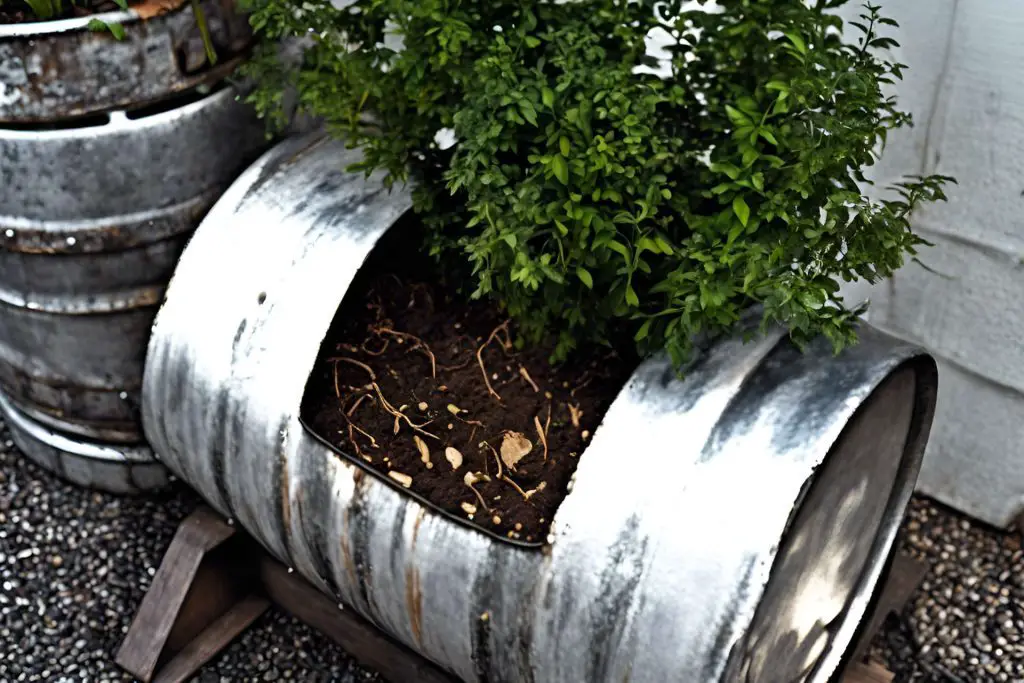
Transforming an old beer keg into a raised garden bed offers a creative and compact solution for urban gardens or small spaces. This unique repurposing project not only recycles an often-discarded item but also serves as a conversation starter in any garden setting.
Steps for Conversion:
- Preparation: Begin by thoroughly cleaning the keg to remove any residues that could harm plants. If the keg is sealed, carefully cut an opening on the top large enough to work with.
- Drainage: Drill drainage holes at the bottom of the keg to ensure good drainage, which is vital for the health of the plants.
- Paint and Personalize: Paint the exterior of the keg to protect against rust and to fit your garden’s aesthetic. This is also an opportunity to personalize your garden bed with designs or patterns.
- Soil and Planting: Fill the keg with a high-quality soil mix, appropriate for the types of plants you intend to grow. This setup is perfect for herbs or small flowers.
- Placement: Position the keg in an area that matches the sunlight needs of your chosen plants. Because metal can conduct heat, placing it in partial shade may be wise during hotter months.
Using a beer keg as a planter is an excellent example of upcycled raised garden bed materials. It’s particularly suited for those looking to add industrial flair to their gardening space, while effectively utilizing limited space.
Converting a Utility Trailer into a Raised Garden Bed
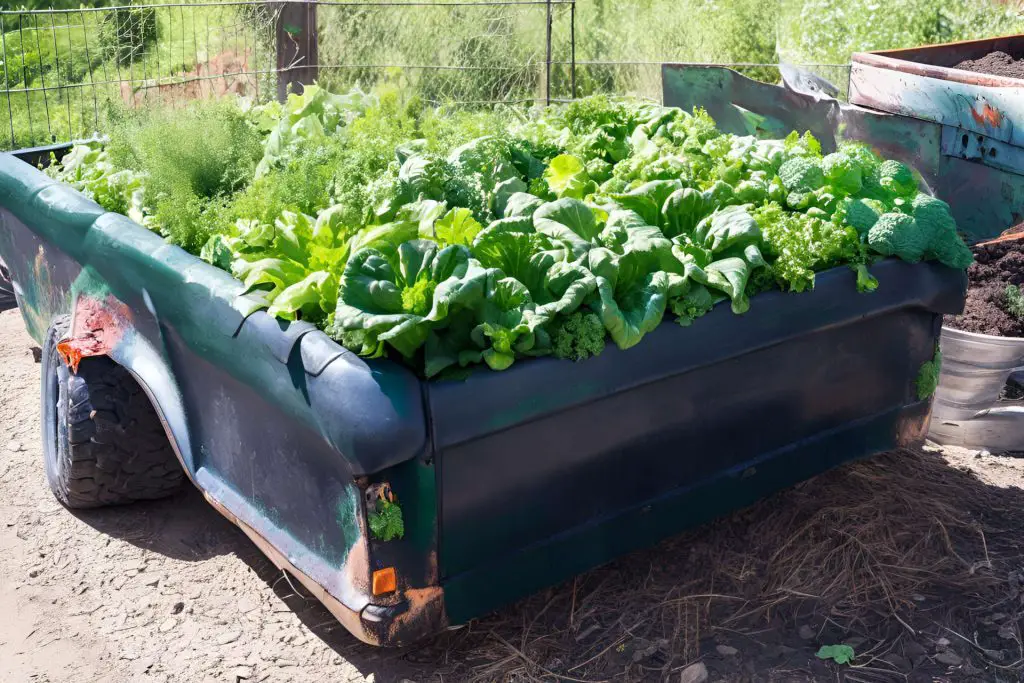
A utility trailer can be converted into a spacious raised garden bed, ideal for those who need a mobile gardening solution or simply want to make use of an old trailer lying around.
Steps to Transform:
- Assess and Prepare: Check the trailer for any sharp edges or rust. Sand these areas down and treat with a rust inhibitor to ensure safety and longevity.
- Enhance Drainage: Since trailers are typically watertight, it’s crucial to drill adequate drainage holes at the bottom. This modification is essential for preventing water accumulation and ensuring good drainage.
- Create Barriers: If the sides of the trailer are not suitable for containing soil, consider installing wooden or metal edges to hold everything in place.
- Soil and Planting: Fill the trailer with a nutrient-rich soil mix, tailored to the needs of the plants you want to grow. This setup allows for the cultivation of a variety of plants, including larger vegetables that require more root space.
- Mobility and Maintenance: One of the biggest advantages of using a trailer is mobility. You can move the garden to optimize sunlight exposure throughout the year or to rearrange your outdoor space as needed.
Turning a utility trailer into a garden bed is not just a practical use of an old item, but it also provides a substantial area for a highly productive kitchen garden. This method is ideal for gardeners looking for flexibility in their planting arrangements and is an excellent example of a custom-designed DIY raised garden bed.
Transforming an Old Truck into a Raised Garden Bed
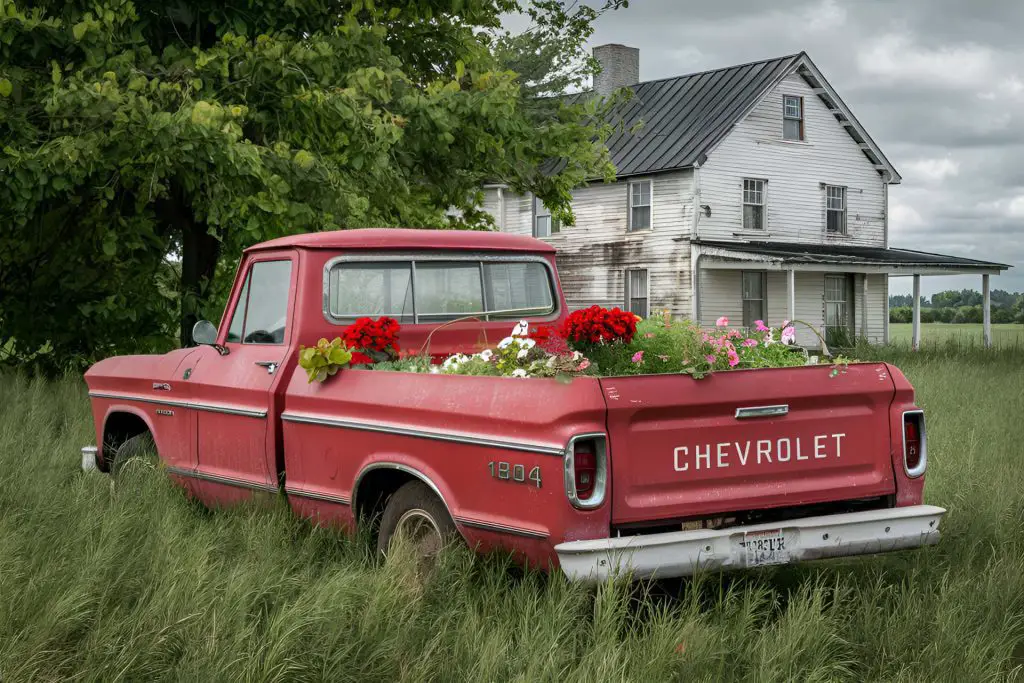
Repurposing an old truck into a raised garden bed is a bold and imaginative approach to gardening that utilizes a large, unused vehicle. This conversion not only saves the truck from the scrapyard but also transforms it into a vibrant part of your garden landscape.
Conversion Guide:
- Initial Preparation: Ensure the truck is cleaned out and free of any hazardous materials. Remove or secure any loose parts that might pose a safety risk.
- Creating Drainage: Drill drainage holes at the bottom of the truck bed to prevent water accumulation. Proper drainage is crucial for maintaining good drainage and plant health.
- Rust Prevention: Treat the metal surfaces with a rust inhibitor to prolong the life of your garden bed and keep it looking good.
- Soil Filling: Fill the truck bed with a mixture of garden soil and compost, providing a nutrient-rich base for your plants.
- Planting: Opt for a mix of flowering plants and edible crops to create a diverse ecosystem. The raised height of the truck bed will help protect against burrowing animals and minimize weeds.
Breathing new life into an old truck by turning it into a raised garden bed i s not only serves as a functional garden area but also creates an imaginative and striking garden feature, offering both aesthetic pleasure and practical benefits.
Repurposing a Trough as a Raised Garden Bed
Converting an old animal water trough into a raised garden bed is an innovative way to recycle a large, durable container into a productive growing space.
Conversion Instructions:
- Preparation: Thoroughly clean the trough to remove any remnants of its previous use. Apply a coat of non-toxic, rust-preventive paint if necessary.
- Ensure Proper Drainage: Similar to other metal conversions, it is essential to drill drainage holes at the bottom of the trough to ensure good drainage and avert waterlogging, which could harm plant roots.
- Positioning: Place the trough in a location that receives adequate sunlight, depending on the needs of the plants you wish to grow.
- Soil Filling: Fill the trough with a rich mixture of garden soil, compost, and appropriate fertilizers to nourish your plants and enhance growth.
- Planting: Ideal for vegetables and deep-rooted plants due to its depth and size, the trough allows for extensive root development, contributing to a highly productive kitchen garden.
Utilizing an old trough for a garden bed not only maximizes the use of available materials but also adds an industrial aesthetic to your garden setting, making it a functional and stylish addition to any outdoor area.
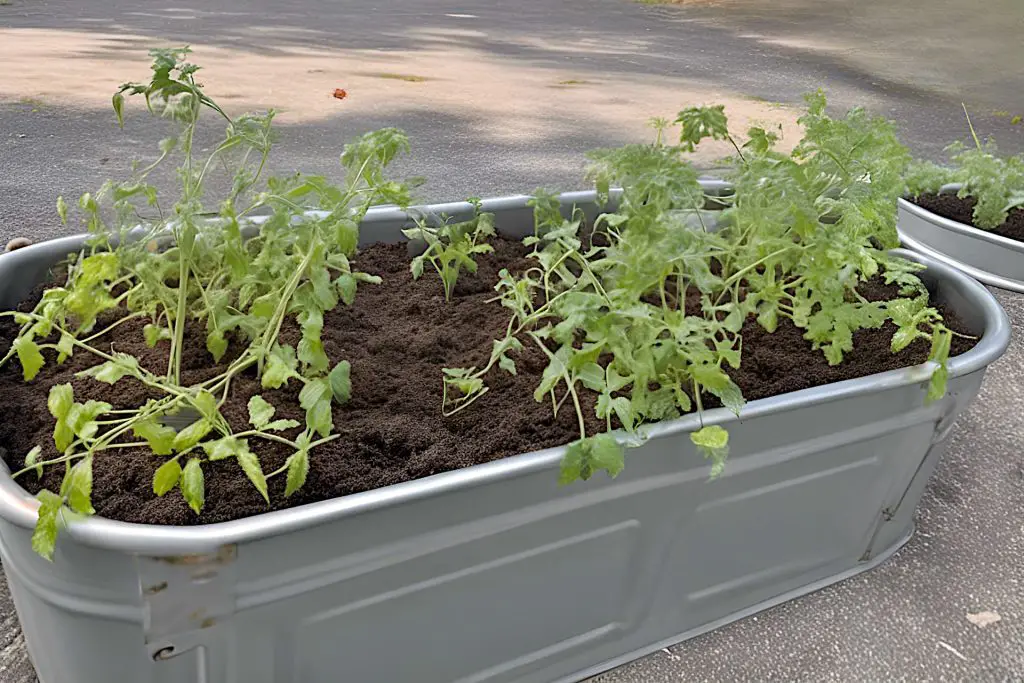
Turning a Large Tub into a Raised Garden Bed
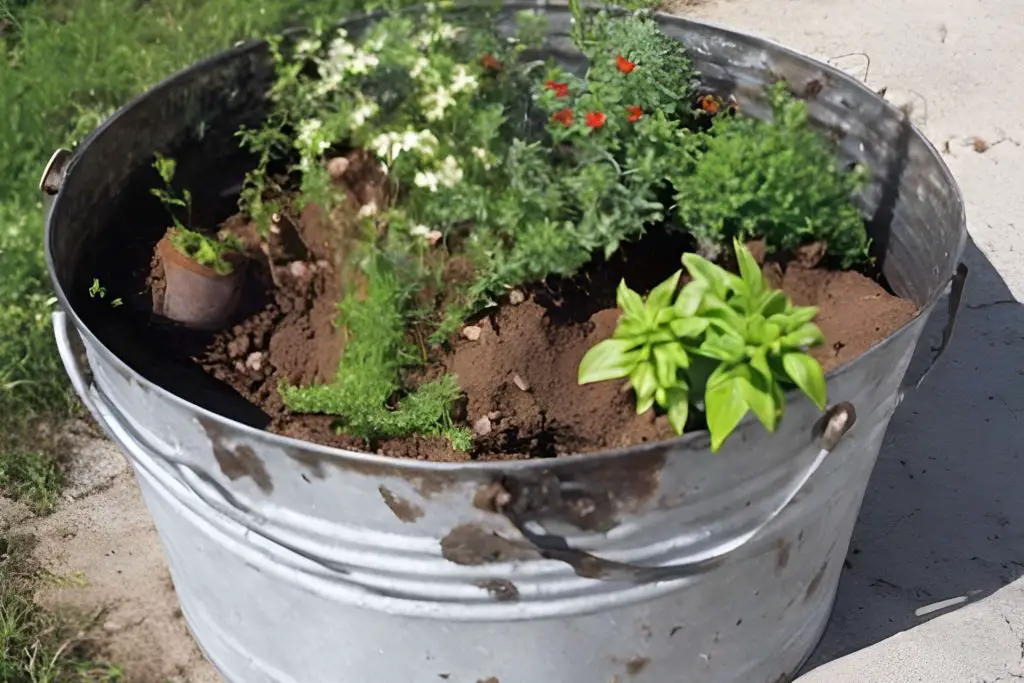
Breathing new life into a large tub by transforming it into a raised garden bed is not only an eco-friendly choice but also a practical way to cultivate a variety of plants. Such tubs, often made of tin or galvanized metal, are sturdy and can add rustic charm to any garden.
Conversion Steps:
- Choose the Right Tub: Select a tub that’s spacious and deep enough to accommodate the root systems of the plants you wish to grow. A galvanized metal tub like the one shown in the image is ideal due to its durability and resistance to rust.
- Prepare the Tub: Clean the tub thoroughly to remove any residues or debris. If there are any sharp edges, smooth them out to prevent injuries.
- Drill Drainage Holes: It’s essential to ensure good drainage. Turn the tub over and drill holes in the bottom to allow excess water to escape, preventing over-saturation of the soil.
- Create a Stable Base: If necessary, place the tub on bricks or concrete blocks to elevate it slightly off the ground. This elevation aids in drainage and can help deter pests.
- Fill with Soil: Use a rich blend of potting soil, compost, and other organic materials to fill the tub. This mix should provide nutrients and proper aeration for the plants.
- Plant Your Garden: Once filled, you can plant a mixture of flowers, herbs, and small vegetables. The tub in the image illustrates how diverse planting can create a beautiful and productive small-space garden.
- Ongoing Care: With the added depth and insulation of the tub, plants can often withstand variable weather conditions better than in traditional garden beds. Water appropriately, and be mindful of the soil temperatures as metal can conduct heat.
Turning a large tub into a garden bed is an excellent way to repurpose an otherwise unused object. This method maximizes growing space, especially in urban settings where ground space may be limited, and provides an attractive feature in your outdoor space.