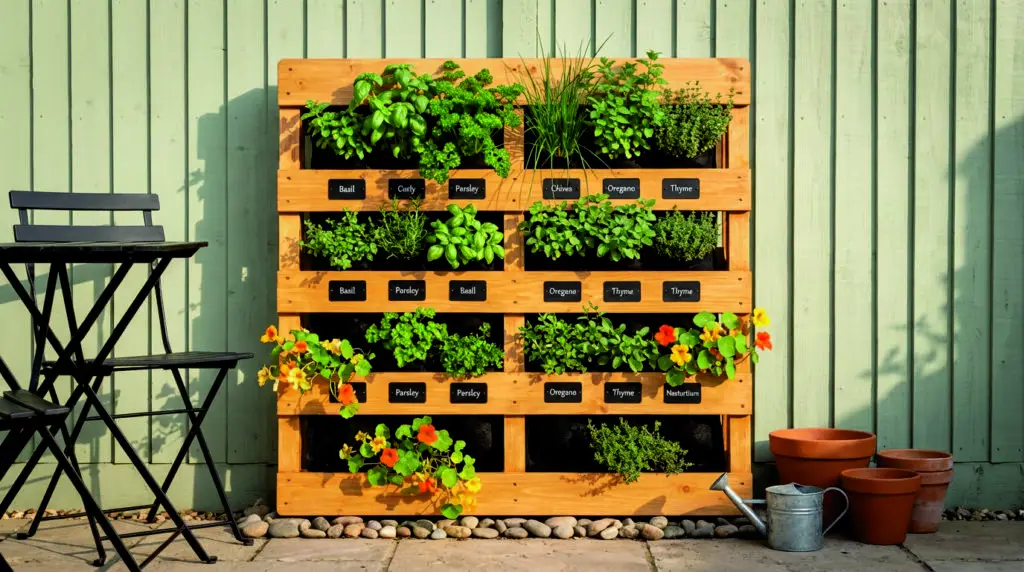
DIY Vertical Pallet Planter: Turn Scrap Wood Into a Living Wall
Blank walls feel wasted once you realize they can grow something. A vertical pallet planter takes a humble shipping pallet and turns it into a tidy, space-saving plant wall, perfect for patios, small yards, and balcony corners. Herbs sit within easy reach, flowers lift the mood, and the whole setup keeps containers off the ground, which makes even a tight outdoor spot feel more designed.
A good build starts with two things, a safe pallet and a clear plan. Get those right, and the rest feels like a satisfying weekend project, the kind that looks far more complicated than it actually is.
Why a vertical pallet planter works so well
Vertical planting solves a common problem, you want more greenery, yet floor space is limited. Lifting plants upward gives you planting room without crowding a walkway, a grill zone, or a small bistro set. Even a narrow side yard can handle a slim plant wall if the base stays stable and watering stays controlled.
Height also changes how you use a garden. Herbs become easier to harvest, flowers sit closer to eye level, and trailing plants soften hard lines on fences and walls. A pallet planter can be functional and decorative at the same time, which suits a homes-and-garden look.
Plan first, your wall will thank you
Pick the location before you pick plants. Sun exposure matters, because a vertical surface can create microclimates, the top dries faster, the bottom stays cooler, and wind hits harder than expected.
A quick planning pass saves frustration later:
- Light check: Note morning vs afternoon sun, watch for shade from eaves or trees.
- Water path: Decide where runoff will go, protect decking and painted surfaces.
- Access: Leave room to water, prune, and harvest without awkward stretching.
- Style: Rustic wood, painted finish, labeled herb wall, or a softer cottage feel.
Plant choices should match the spot, not the other way around. A sunny wall can support basil, thyme, and petunias, while a brighter shade wall suits mint (in a controlled pocket), parsley, violas, and leafy greens.
Choosing a safe pallet, plus quick prep
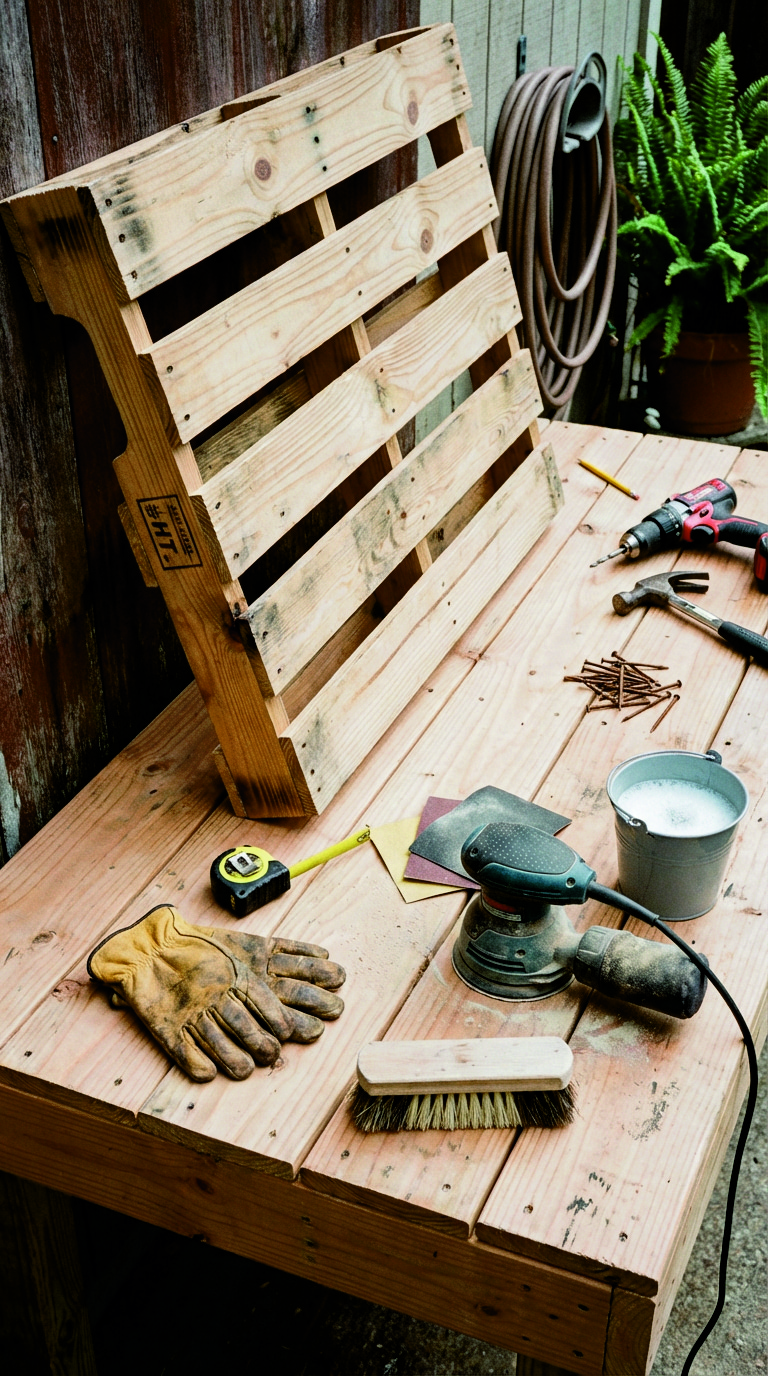
Not every pallet belongs in a garden. Look for pallets stamped HT (heat treated). Skip pallets marked MB, those were treated with methyl bromide, a pesticide fumigant. If no stamp is visible, treat it as unknown and pass.
A solid pallet makes the whole project easier. Check for:
- soft, crumbly wood
- broken stringers (the thicker support boards)
- dark stains with chemical smell
- loose nails, split boards, sharp splinters
Clean the pallet with a stiff brush, mild soap, and water, then let it dry fully. Sand rough spots, especially along edges where hands will grip during planting and watering. A simple exterior sealer or stain helps, yet leaving it unfinished is fine if you accept faster weathering.
Tools and materials you’ll actually use
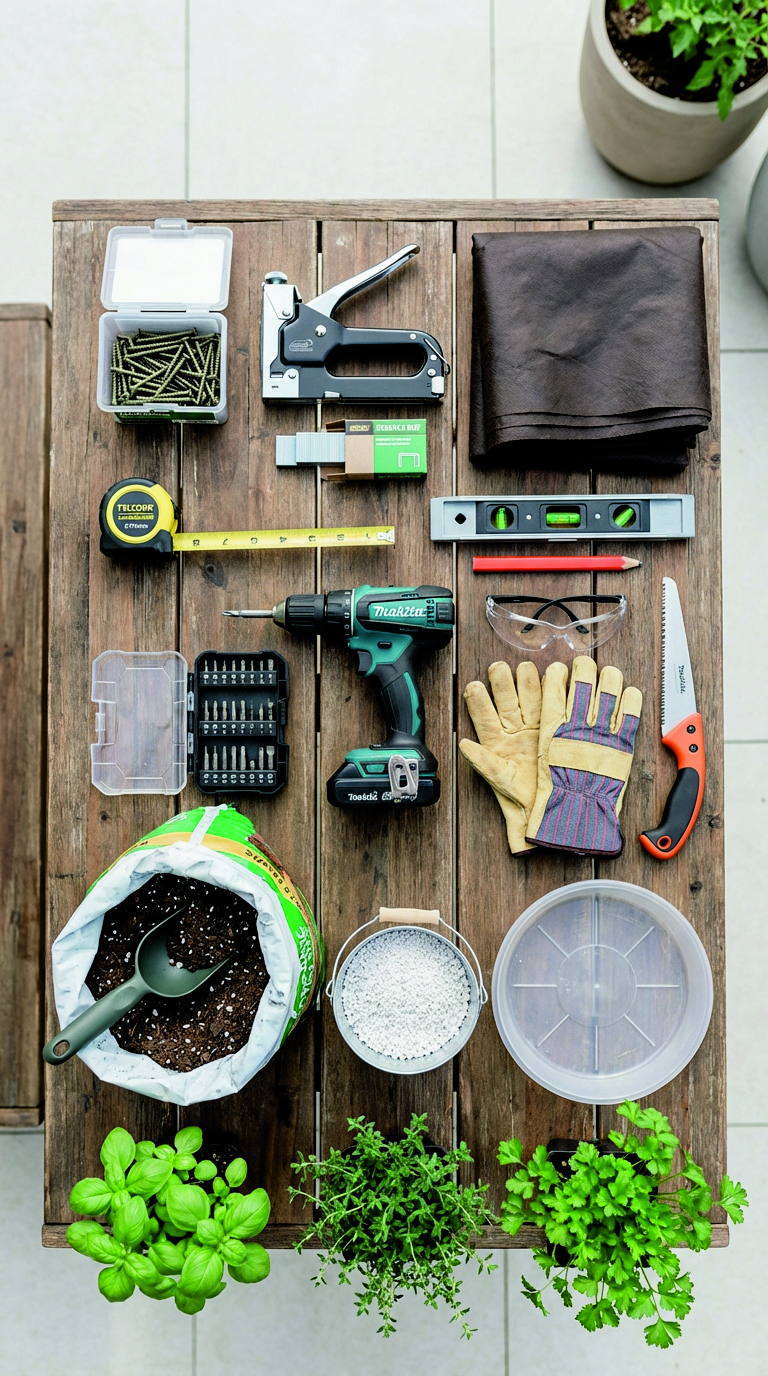
A basic tool kit is enough, no workshop required.
Tools
- drill/driver with bits
- saw (hand saw, jigsaw, or circular saw)
- tape measure, pencil, level
- staple gun, heavy-duty staples
- gloves, eye protection
Materials
- exterior screws (1½” to 2″)
- landscape fabric or breathable weed barrier
- potting mix (lightweight, drains well)
- compost or worm castings (optional boost)
- small plants or herb starts
- hanging hardware or brackets (if mounting)
- a shallow tray or splash guard (if needed)
Pick your build style
A pallet planter can be built three main ways. Choose based on your space, how often you like to change plants, and how much soil volume you want.
Pocket-style pallet planter
Soil sits behind fabric pockets formed between slats.
Best for herbs, compact annuals, small trailing plants.
Shelf-style pallet wall
Simple ledges hold pots, easy to swap plants by season.
Best for renters, frequent refreshes, mixed container looks.
Box-style upgrade
Slim planter boxes attach to the face for deeper soil.
Best for flowers, mixed plantings, longer moisture hold.
The rest of the article focuses on the classic pocket style, because it gives the “living wall” look without complicated carpentry.
Step-by-step: Classic pocket-style DIY vertical pallet planter
Step 1: Decide which side faces forward
Most pallets have a side with wider gaps and a side with tighter spacing. Use the tighter side as the front when possible, pockets hold soil better. Stand the pallet upright, imagine plants spilling from each row, then mark the “top” with pencil.
Step 2: Reinforce and tidy the frame
Tighten any loose slats with exterior screws, especially near the corners and along the outer frame. Replace broken boards if needed, or remove them and adjust pocket layout around the gap. Pull or hammer down any nails that stick out.
A sturdier frame helps the planter stay square after watering, wet soil adds real weight.
Step 3: Add a back panel (optional, but helpful)
A backing keeps soil tidy and makes watering cleaner against a wall. Use thin exterior plywood, scrap fence boards, or even another pallet face if you have one.
Screw the backing to the rear edges of the pallet frame, leaving a small gap near the bottom for drainage. A half-inch space at the lower edge often works, enough for water to escape without dumping soil.
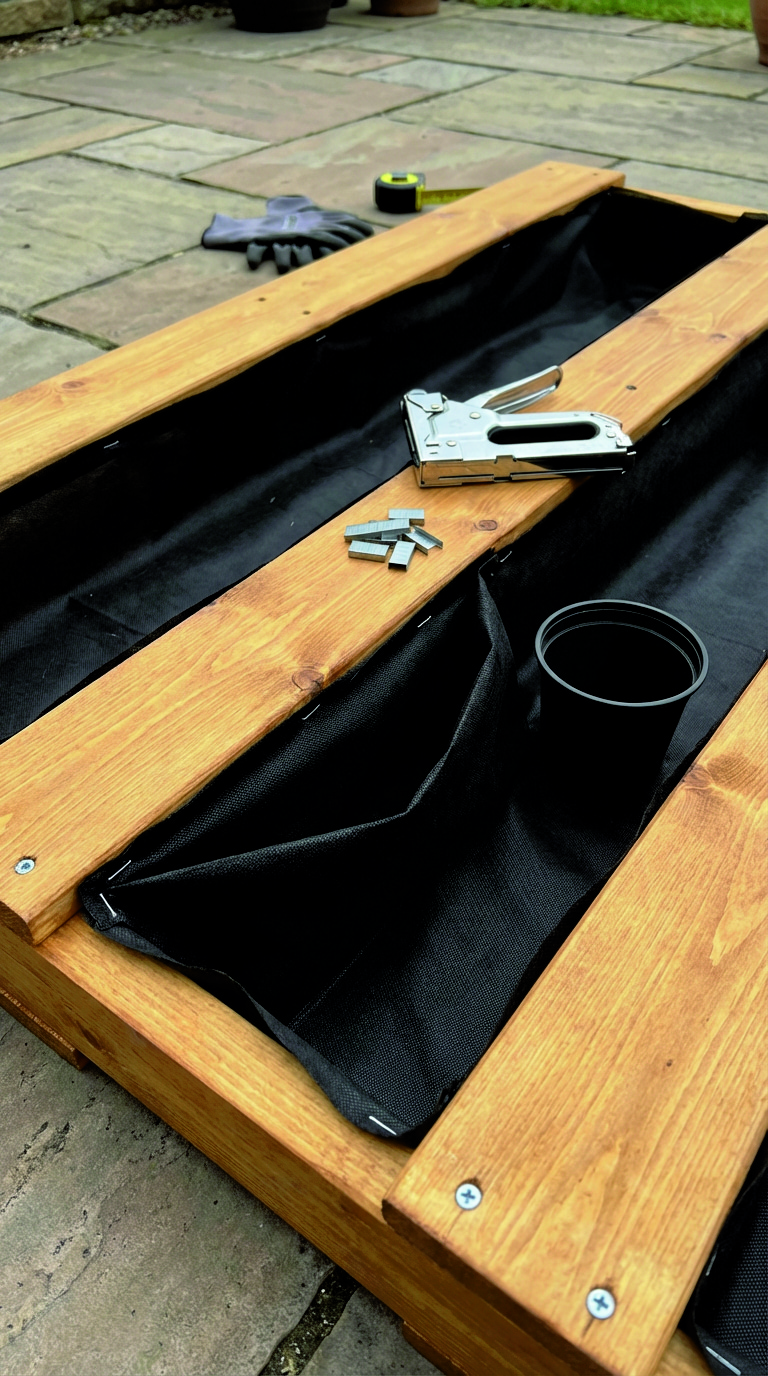
Step 4: Create the pockets with fabric
Cut landscape fabric wide enough to cover the interior back and wrap up the sides. Staple it along the inside edges, pull it taut, then staple again every few inches. Double-layer fabric in high-stress areas, especially lower pockets where soil pressure builds.
Now form each planting pocket:
- Start at the bottom row.
- Fold fabric upward, creating a “sling” behind the slat opening.
- Staple the fabric to the back of the slat above, not the slat below.
- Repeat row by row, keeping pocket depth consistent.
Aim for pockets deep enough to hold soil without bulging forward. If a pocket looks too shallow, shift your staple line higher on the back board.
Step 5: Plan for drainage and surface protection
Vertical planters shed water, so plan where it lands.
- On soil or gravel, a simple drip line at the base may be enough.
- On decking or pavers, use a shallow tray, a narrow strip of river stones, or a splash guard panel behind the pallet.
- Against siding, leave an air gap, use spacer blocks so wood dries faster.
Avoid sealing the bottom shut. Standing water shortens pallet life and stresses roots.
Step 6: Fill pockets without making a mess
Use a light, free-draining potting mix, heavy garden soil compacts and turns pockets into bricks. A handy blend looks like:
- 2 parts quality potting mix
- 1 part compost
- a handful of perlite or pumice per bucket (optional)
Fill one pocket at a time, press gently to remove big air gaps, then stop before the soil reaches the edge. Watering will settle everything.
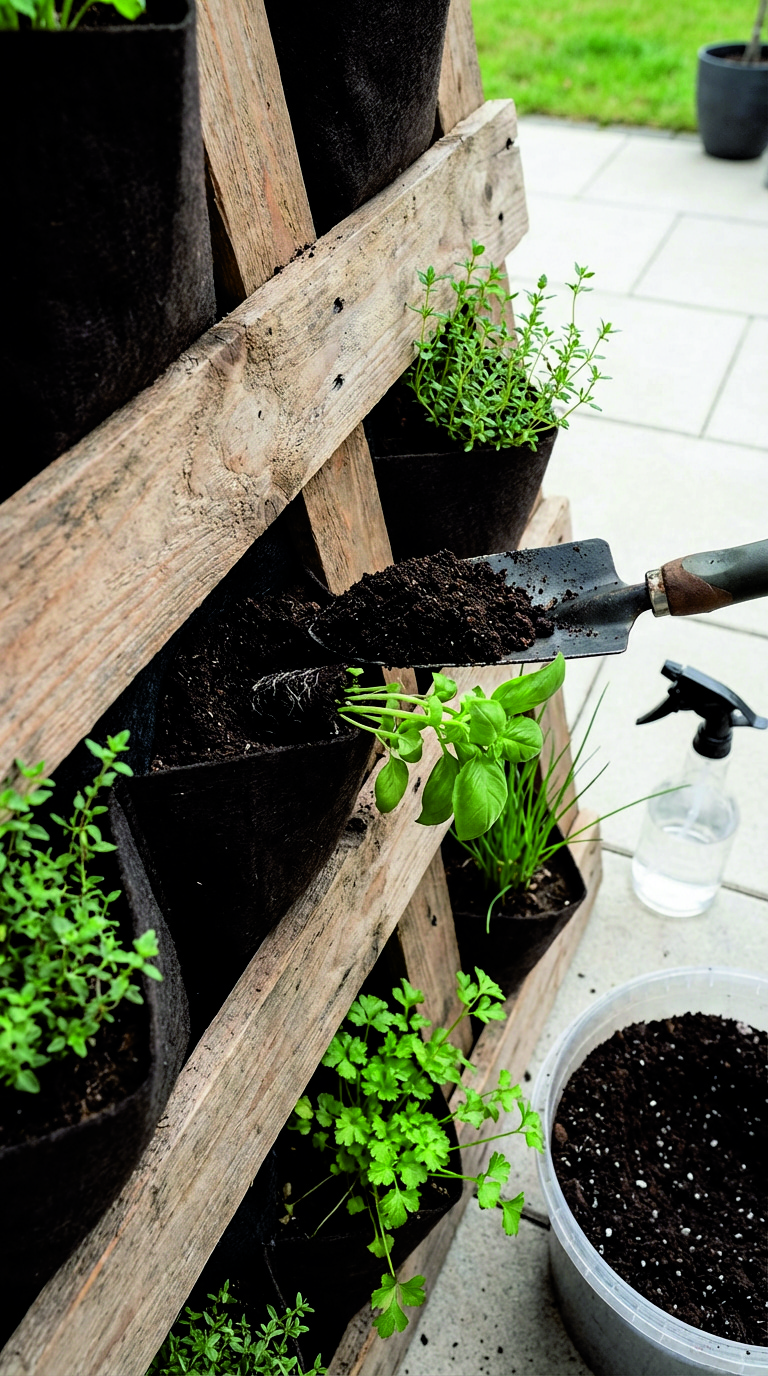
Step 7: Plant with a “sideways root” approach
Small plants work best, plug-size starts settle faster. Slide each plant into the pocket on a slight angle, roots tucked sideways, stems facing out through the slat opening. Firm soil around roots with your fingers, then add a bit more mix behind the root ball if space allows.
Place thirstier plants lower, those pockets stay moister. Put drought-tolerant picks near the top, where sun and wind dry pockets faster.
Step 8: Water in, then top up
Water slowly, let each pocket absorb, then water again. Soil settles after the first soak, so top up pockets where the mix drops below the opening. Keep soil just inside the fabric line, not spilling out.
Step 9: Let roots grip before going fully vertical
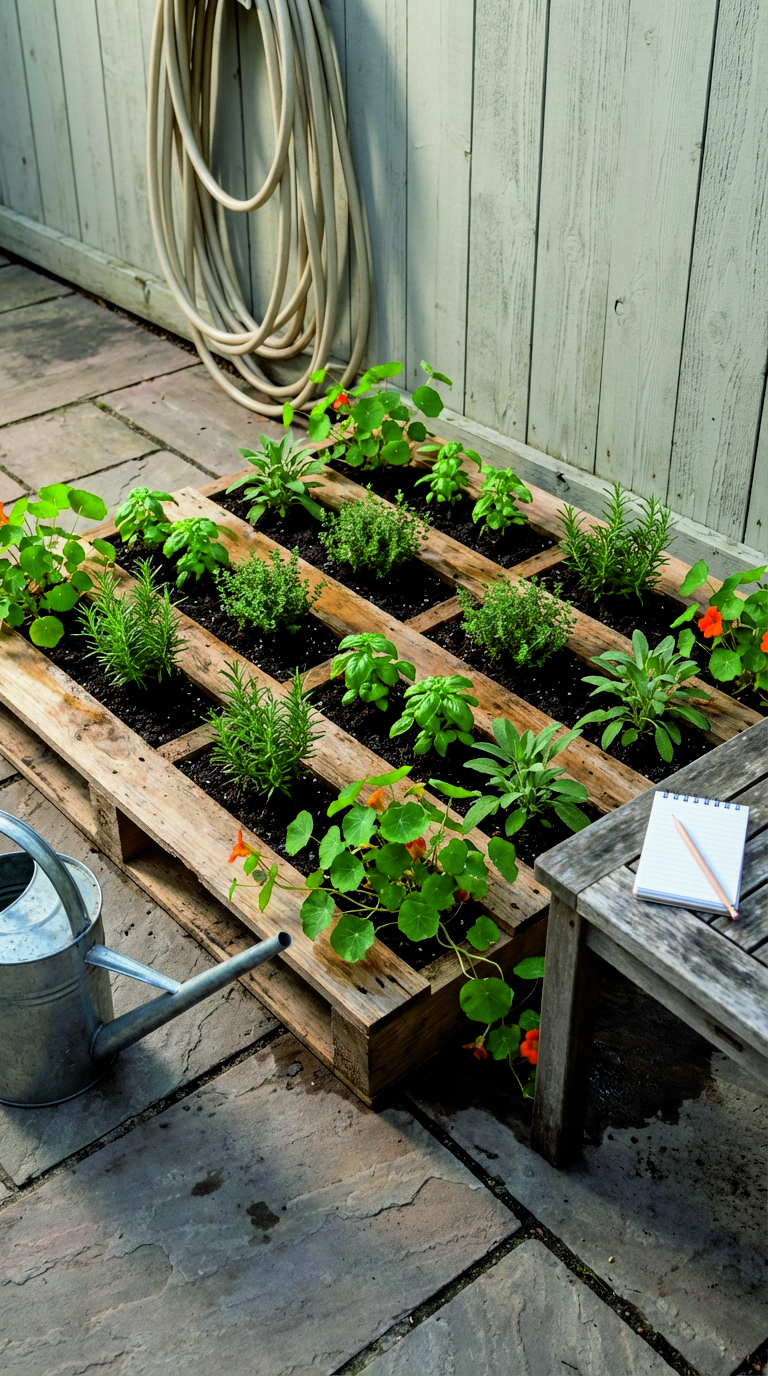
If space allows, leave the pallet lying flat for a few days, even a week, so roots begin anchoring. After that, raise it upright, and check pockets for slumping. A brief “settling period” reduces plant loss in the first month.
Mounting and stability, keep it safe and sturdy
A planted pallet weighs more than most people expect. Wet soil is heavy, and wind can tug at foliage like a sail.
Two reliable setup options:
Lean-and-brace method
Lean the pallet against a fence or wall at a slight angle, then brace the base with sturdy blocks. Add a bottom cleat, a short board screwed across the base, so the pallet can’t slide forward.
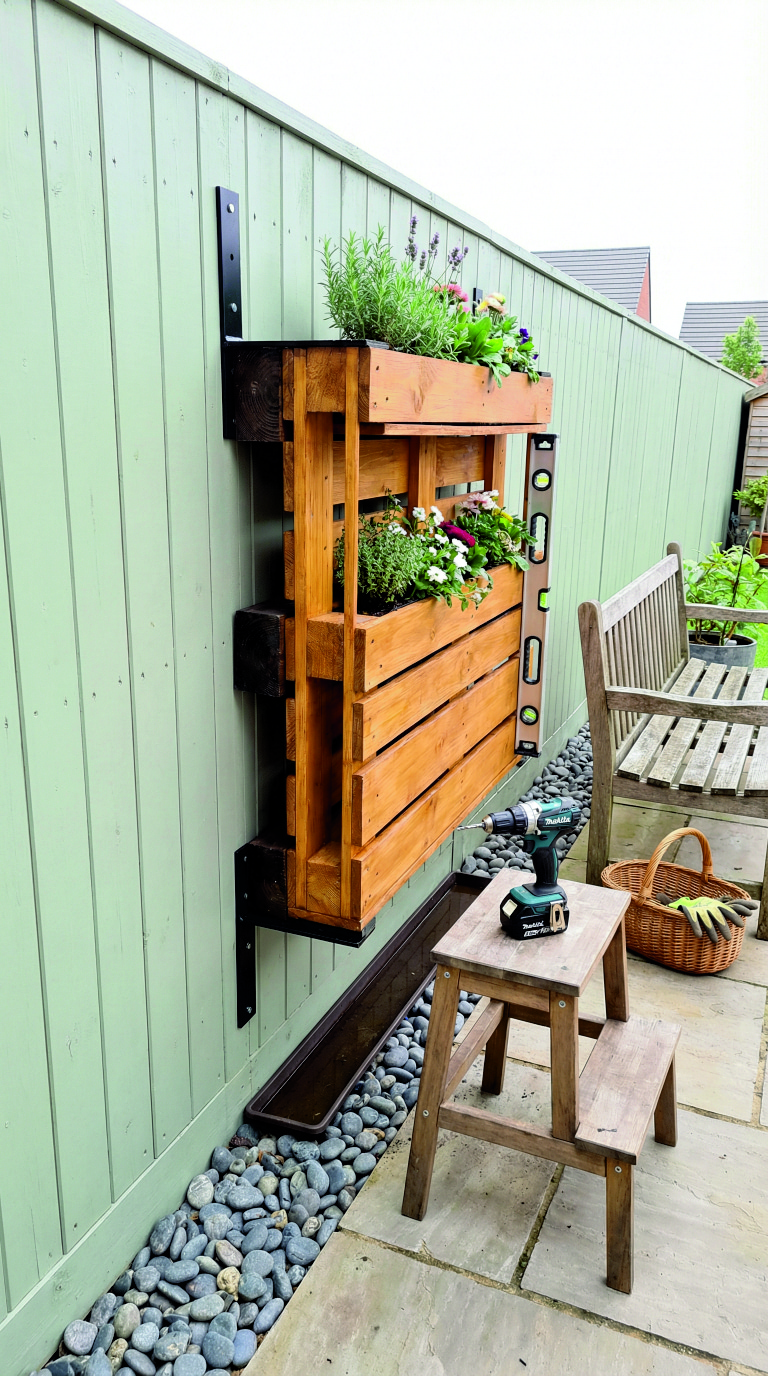
Secure mount method
Mount to wall studs or a strong fence frame using heavy-duty brackets. Leave a small gap behind the pallet for airflow, spacer blocks help. Use exterior-rated hardware, indoor hooks fail fast outdoors.
If mounting to masonry, use appropriate anchors and follow load ratings. A wider pallet with dense planting can exceed what small anchors can hold.
Planting plans that look good and grow well
A vertical pallet planter can read as “garden feature” or “working herb station,” depending on plant choices. Mix textures, vary leaf shapes, and keep growth habits in mind.
Herb-focused wall for easy picking
Choose plants that tolerate trimming and don’t demand deep soil.
Good options:
- basil, compact varieties
- thyme, creeping or upright
- oregano
- chives
- parsley
- cilantro (cooler seasons)
Planting layout tip, keep vigorous spreaders like mint in a dedicated pocket, or skip them. Label pockets with small tags, chalkboard stakes, or simple painted markers.
Flower wall with color that lasts
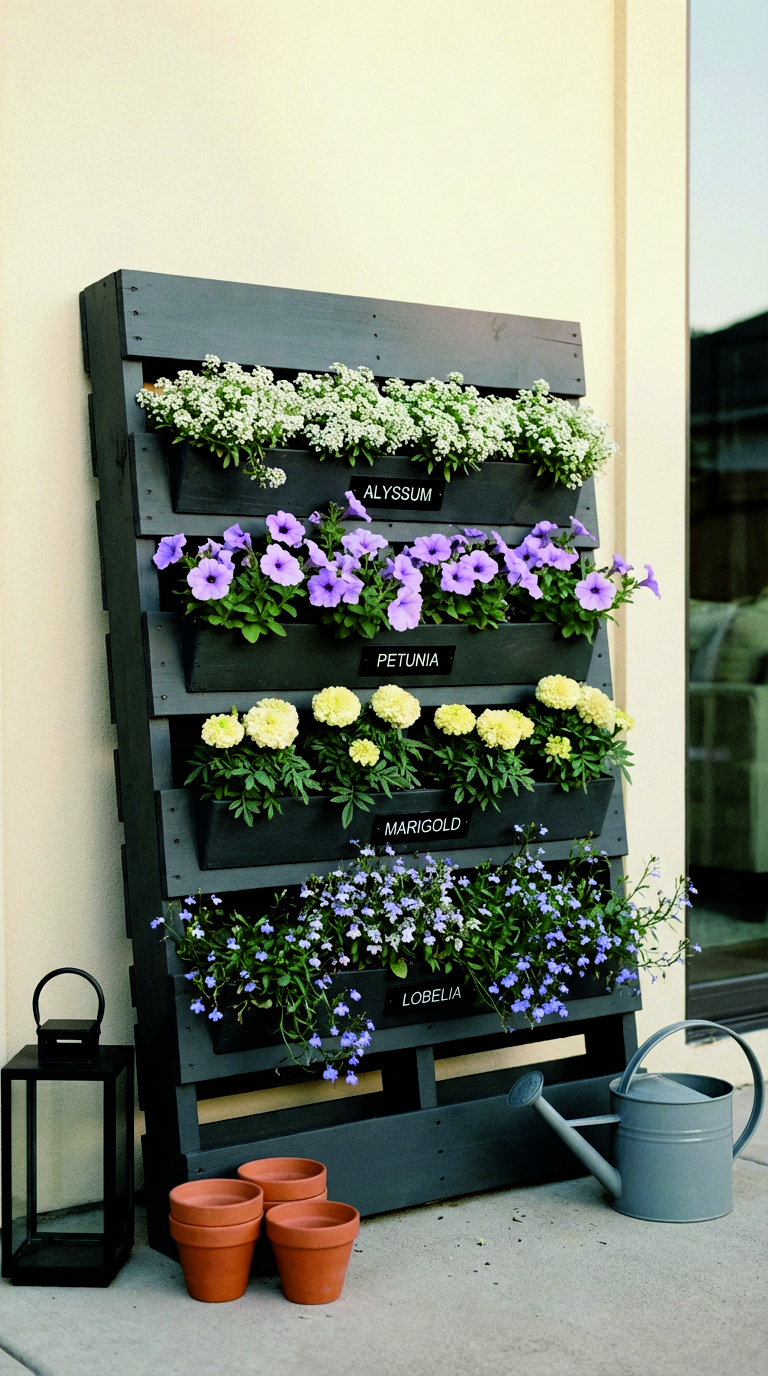
Annuals that handle container life work well.
Good options:
- petunias (trail beautifully)
- pansies or violas (cool seasons)
- alyssum (soft edging)
- marigolds (sun, steady blooms)
- lobelia (cooler weather, vivid color)
Build a simple palette, two main colors plus one neutral, then repeat it row by row. Repetition looks designed, random mixing can look messy from a distance.
Low-fuss plan for small patios
Choose plants that forgive missed watering and handle heat.
Good options:
- sedum (smaller types)
- portulaca (sun-loving, bright)
- rosemary (needs sun, moderate water)
- lavender (compact varieties, good airflow)
- trailing sweet potato vine (colorful foliage)
Group by water needs. One thirsty pocket in a dry row leads to constant fuss.
Balcony-friendly picks for wind and weight
Balconies often bring stronger wind and faster drying.
Good options:
- thyme
- compact geraniums
- dwarf marigolds
- parsley
- nasturtiums (edible flowers, trail nicely)
Use lighter soil mix, add extra tie points, and avoid tall top-heavy plants that catch wind.
Watering without the drip-stains and washout
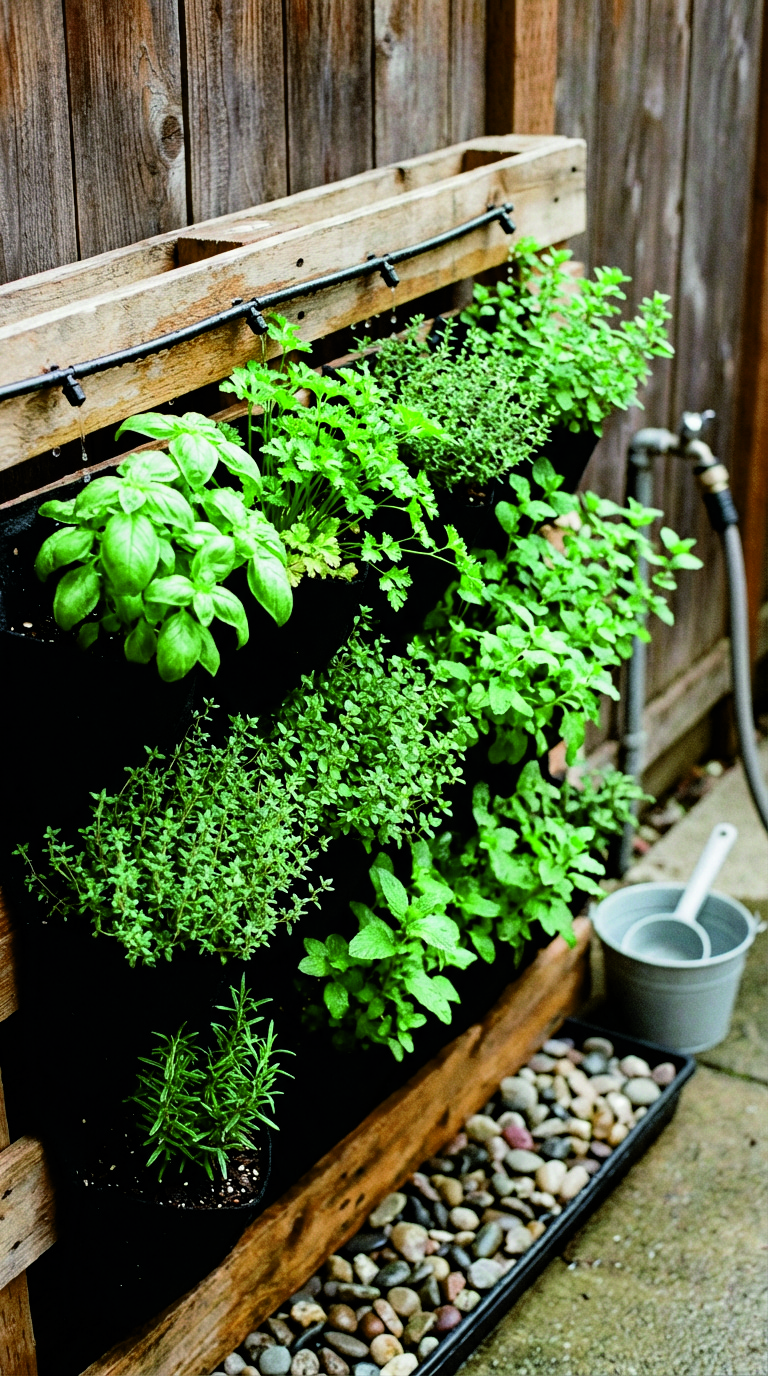
Vertical planters can be neat, yet only if watering stays controlled. A hard pour can carve channels, wash soil out, and splash muddy water onto walls.
Better habits:
- Water with a narrow-spout can, pour slowly along the top edge of each pocket.
- Pause between rows, let moisture soak in.
- Check lower pockets, they can become overwatered from runoff.
For a simpler routine, a basic drip line can run along the top row with small emitters. A gravity-fed bottle system can also work, though it looks less polished.
Mulch helps too. A thin layer of fine bark or coco coir tucked inside each pocket reduces surface drying, and it keeps soil from splashing out.
Seasonal care and easy maintenance
A vertical planter looks best with quick, regular attention. Ten minutes a week beats a big rescue later.
Weekly check
- dry pockets near the top
- yellowing leaves, often linked to watering imbalance
- loose staples or fabric sag
- wobbly mounts, tighten early
Feeding
Container plants need nutrients because frequent watering flushes minerals. A slow-release fertilizer mixed into the potting blend can cover weeks of growth. A light liquid feed every few weeks also works, especially for flowers.
Pruning
Herbs stay bushy with regular snips. Pinch basil above a leaf pair, trim thyme lightly, cut back oregano to prevent legginess. Removing spent blooms keeps flower pockets looking fresh.
Cold and wet seasons
In rainy spells, check drainage, soggy pockets invite root issues. In colder months, swap to cool-season plants, or let the pallet rest with evergreen herbs and simple foliage.
Design upgrades that look magazine-ready
A pallet planter can be charming on day one, small details make it feel intentional.
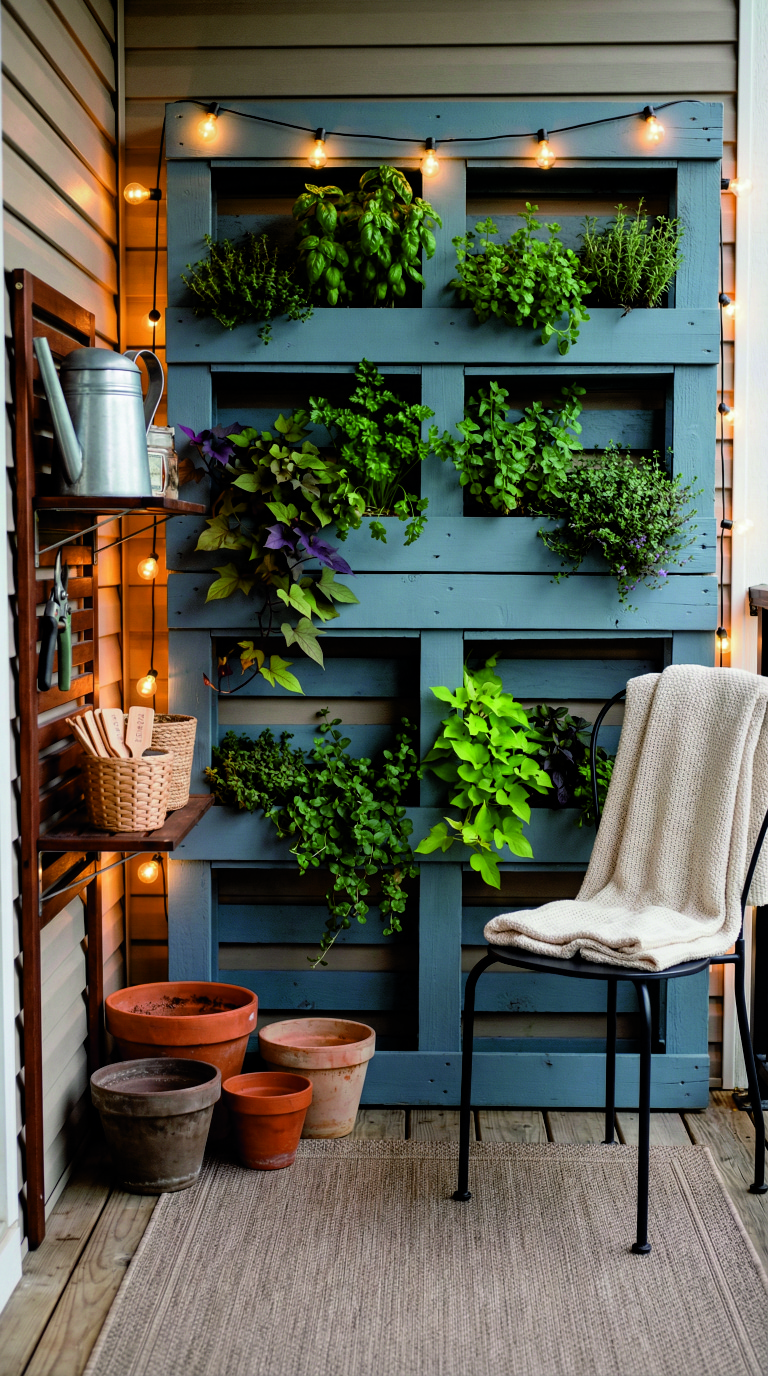
Paint or stain, then keep edges crisp
A muted paint color, soft sage, warm white, charcoal, or dusty blue, can lift the look, especially against fences. Sand edges lightly after painting for a worn-in finish, or keep lines crisp for a cleaner vibe.
Add labels that match the style
- engraved wood tags for a rustic look
- simple black metal labels for modern patios
- small chalkboard stakes for a casual herb wall
Layer textures around the planter
A few supporting touches make the whole corner feel styled:
- a small watering can in galvanized steel
- a narrow bench below for tools
- terracotta pots nearby to echo warm tones
- a simple outdoor rug in neutral shades
Soft lighting for evenings
A short strand of warm outdoor-rated lights around the frame looks inviting. Keep wiring tidy, secure cords, and avoid placing lights where watering soaks connections.
Advice section: common hiccups and how to fix them
Problems happen, especially in the first month. Most fixes are simple, and none require rebuilding from scratch.
Soil slipping out of pockets
Fabric may be too loose, staples may be spaced too far apart, or pockets may be overfilled.
Fixes:
- add a second layer of fabric behind the pocket
- staple more frequently, especially at pocket corners
- leave a small “lip” of empty space near the opening
- add a thin slat across the opening to hold soil back
Top pockets drying faster than the rest
Sun and wind hit the upper rows first.
Fixes:
- plant drought-tolerant picks near the top
- add a light mulch layer in upper pockets
- water top rows first, then circle back
- consider a simple drip line along the top row
Lower pockets staying soggy
Runoff collects at the bottom, and shade can slow drying.
Fixes:
- use thirstier plants lower, parsley and leafy greens often work
- lighten the soil mix with perlite or pumice
- confirm drainage gaps at the base
- reduce watering volume, water slower instead
The pallet leans or wobbles
Weight shifts after watering, and wood can warp.
Fixes:
- add a bottom brace board, screwed across the base
- tighten mounts, check brackets and screws
- use spacer blocks so the pallet sits evenly
- reduce load, swap heavier plants for lighter ones
Plants struggle even with good watering
Light mismatch is often the real issue. Crowding also reduces airflow.
Fixes:
- move sun-lovers to a brighter spot, or swap to shade-tolerant plants
- thin out pockets, fewer plants often look cleaner
- refresh compacted soil, scratch the surface gently
- remove mildew-prone leaves, improve airflow around the wall
A simple timeline that keeps the project stress-free
A calm pace makes the build more enjoyable.
Day 1: choose pallet, clean, sand, reinforce
Day 2: add fabric pockets, fill soil, plant
Days 3–7: keep pallet flat if possible, water lightly, let roots grip
Week 2: raise upright, adjust watering, top up soil
Week 3 onward: prune, feed lightly, swap any plants that fail early
Early plant loss happens sometimes, treat it as editing, not failure. A vertical planter gets better with small tweaks.
Final thoughts
A DIY vertical pallet planter turns one overlooked material into a useful garden feature, and it changes how an outdoor space feels, especially where every square foot matters. Herbs become easier to reach, flowers lift the view at eye level, and a once-empty wall starts working for you. After the first build, variations come naturally, a shelf version for quick swaps, a painted version for a cleaner look, even a seasonal rotation that keeps the same corner feeling fresh year after year.