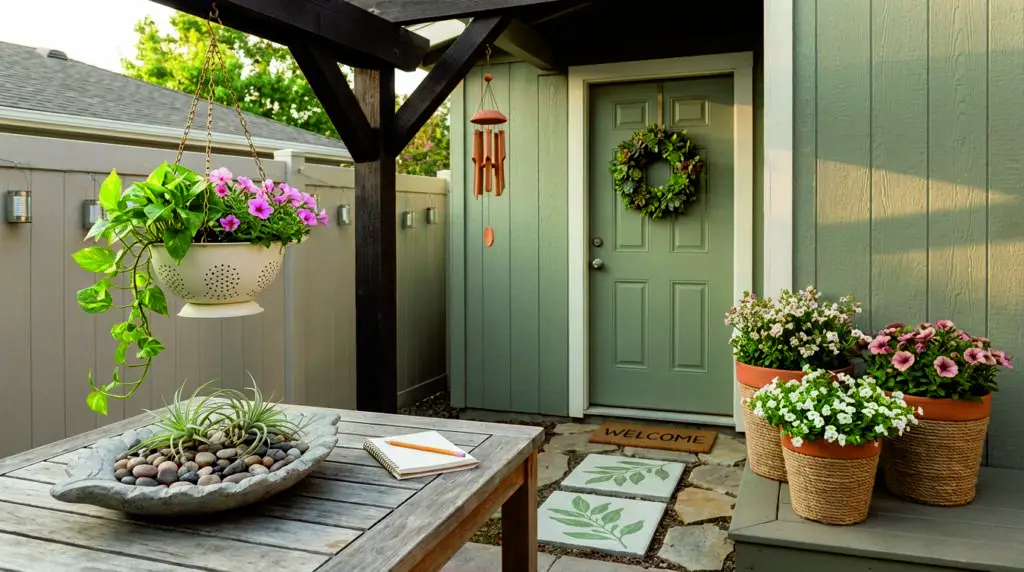
Garden Crafts: 12 Projects for PersonalizingYour Outdoor Space
Your garden doesn’t need a dramatic makeover to feel new, it needs a few small surprises that make you smile when you step outside. A little chime that moves in the breeze, a border that catches the light, a handmade stone underfoot, those details change how a space feels. Best of all, most of them come together with basic tools, forgiving materials, and a relaxed, try-it-and-see attitude.
If you’ve already painted stones, hung a macramé planter, or turned something old into a new garden feature, you’re ready for the next round. The projects below lean practical, they handle real weather, and they make your garden feel more like an extension of your home. Pick one that fits your weekend, your style, and the corner of the yard that’s asking for attention.
A simple approach before you start
Before you gather supplies, choose one “anchor spot” where a craft will actually earn its place. It could be the path to the back door, the patio chair you sit in most, the fence line you always see from the kitchen window, or the edge of a raised bed. A project looks more intentional when it has a clear purpose, even if the purpose is simply delight.
Next, decide what kind of mood you want. Warm and rustic tends to lean on wood, terracotta, and muted colors. A crisp, modern yard often looks best with simple shapes, limited color, and repeated materials. Cottage gardens can handle a bit more pattern and a bit more charm, especially when flowers soften the edges. Pick one direction for this round of crafts, your garden will feel calmer when the details agree with each other.
A quick trick for cohesion helps too, repeat one material and one color family. If you’re using terracotta in one project, echo it in another. If you love soft whites and greens, keep paint choices in that range. A garden can hold plenty of personality without looking busy, spacing and repetition do the heavy lifting.
Finally, plan for weather from the start. Outdoor-rated paint, the right adhesive, and a protective sealer are what separate a “cute for a week” project from something that survives seasons. You’ll see weather notes in every craft below, because a garden craft should feel easy, not like it needs constant repairs.
12 fresh DIY garden crafts to try
1) Clay pot wind chime with soft tones
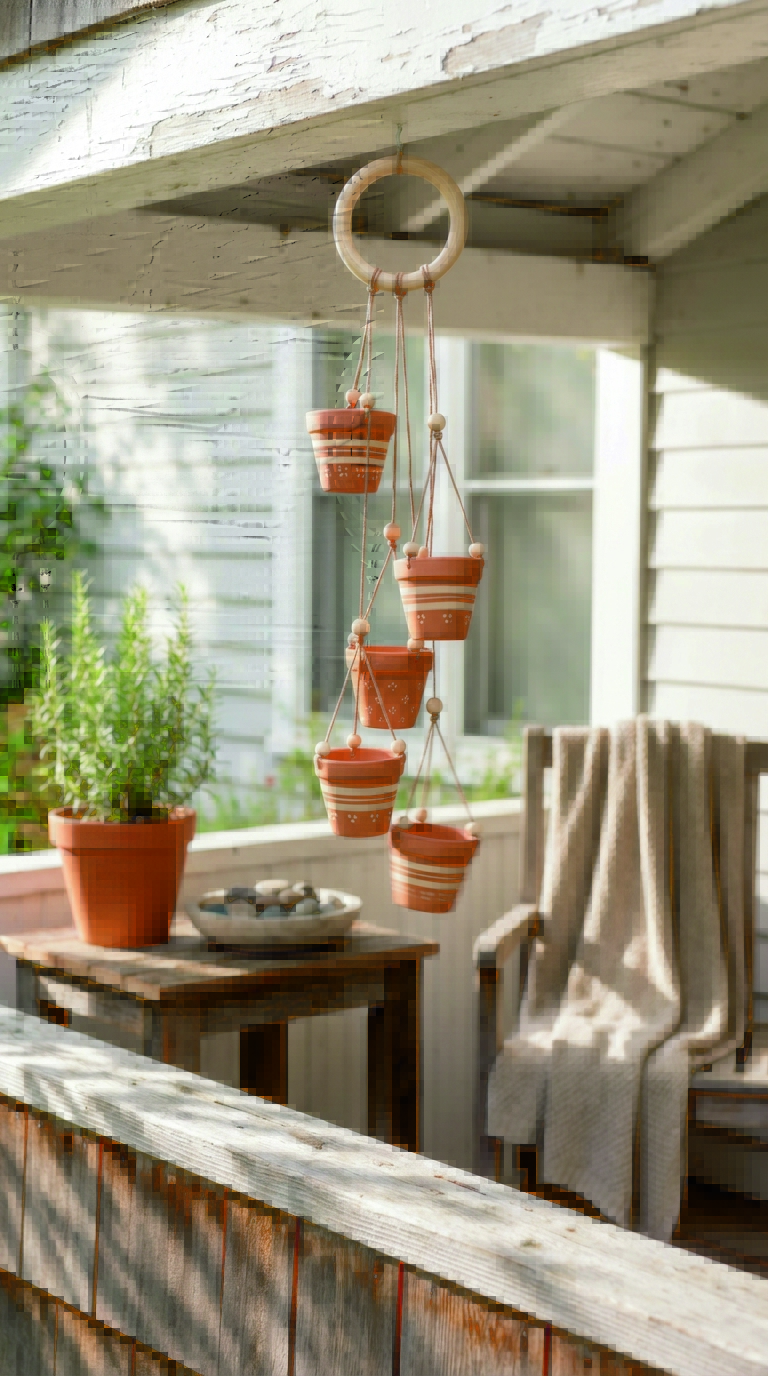
A wind chime doesn’t need to be loud to be satisfying. Terracotta gives a gentle, earthy sound, and it looks right at home near herbs, pots, and sun-warmed stone.
Materials: small terracotta pots or mini bells, strong outdoor twine or waxed cord, a wooden ring or sturdy branch piece, a few wooden beads, a small metal washer or tiny bell for the center, scissors, optional matte outdoor paint.
How to make it:
Start by cleaning the pots, then decide if you want them natural or lightly painted. If painting, keep it simple, a soft stripe, a small dot pattern, or a single muted color. Thread your cord through the drainage hole of each pot, knotting securely inside. Add a bead above each pot to prevent slipping and to create space between pieces. Tie cords to the wooden ring at different lengths, staggering them so they don’t collide constantly. For the center, hang a washer or small bell slightly lower than the pots, it becomes the gentle “tap” point.
Placement tip: hang it where it gets movement without being battered, under a porch roof, from a pergola beam, or from a sturdy branch that doesn’t sway wildly.
Weather tip: if you paint, seal the pots with an outdoor clear coat, and use cord that resists moisture so knots don’t loosen over time.
2) A living wreath for a gate or shed door
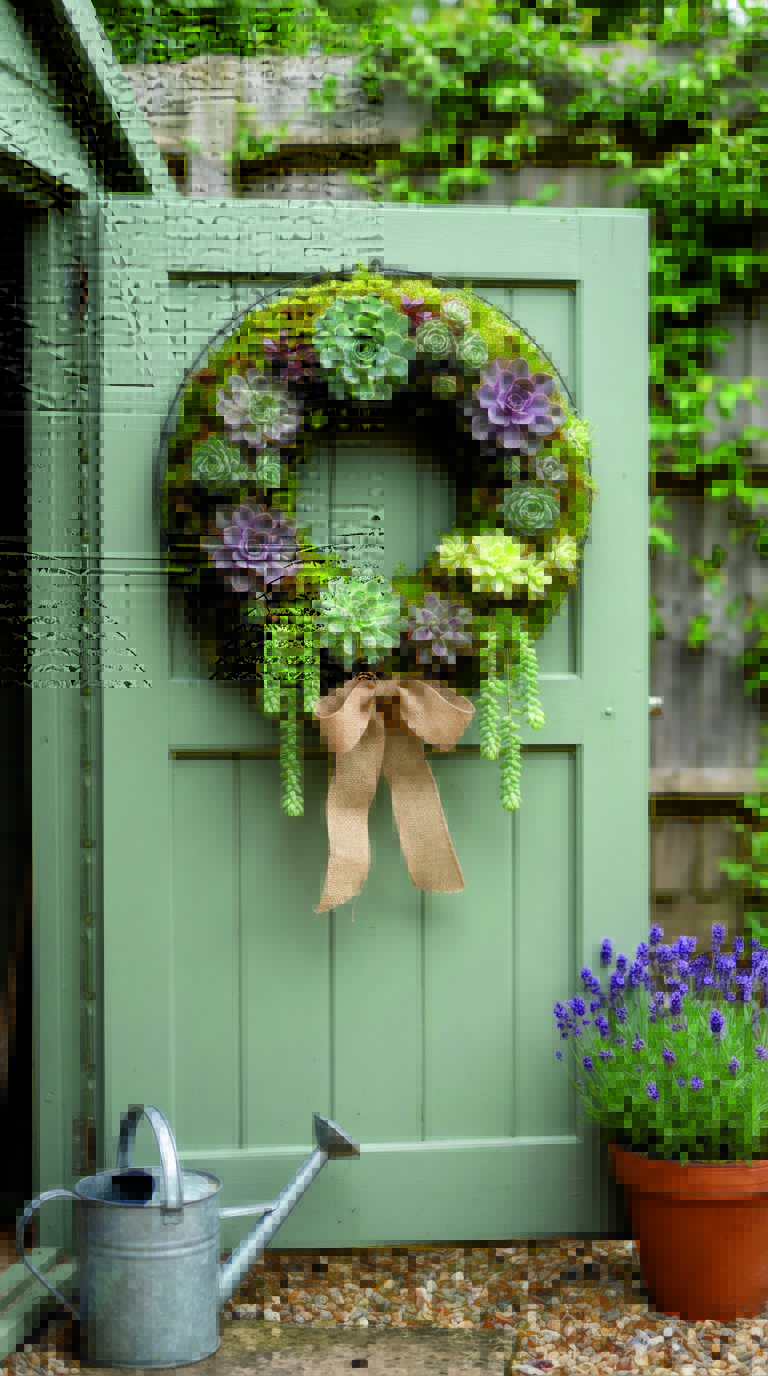
A living wreath turns a plain door into a small garden moment, it’s green, textured, and it changes gently as it grows. Sedum and other succulent cuttings are ideal, because they root easily and handle sun.
Materials: wire wreath form, sphagnum moss or coco fiber, floral wire or pins, succulent cuttings, gardening gloves, optional burlap ribbon.
How to make it:
Soak the moss until it’s pliable, then squeeze out excess water. Pack it around the wreath form, creating a thick bed for cuttings, and secure it tightly with floral wire. Poke small holes in the moss with your fingers, then tuck in succulent cuttings so their stems contact the moss. Spread colors and shapes evenly, mixing tiny rosettes with trailing bits for movement. If you want extra security, use floral pins to hold stubborn pieces in place.
Placement tip: a shed door or gate that gets morning sun is ideal, because it dries after watering and avoids constant dampness.
Weather tip: hang it with a small gap behind the wreath so air can circulate, and avoid deep shade where moss stays soggy.
3) Upcycled colander hanging planter
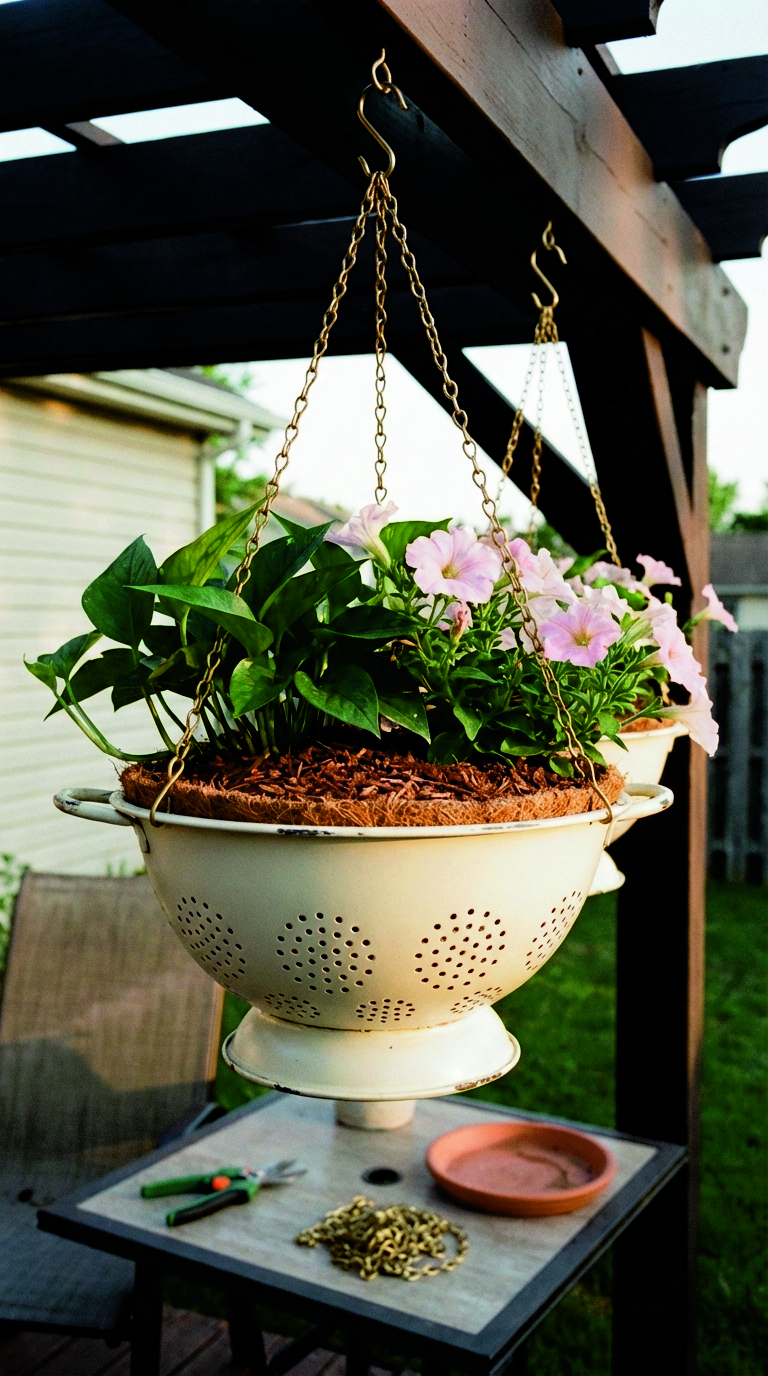
Colanders are quietly perfect planters. They already drain, they have charming shape, and they look great with trailing plants spilling over the edge.
Materials: sturdy metal colander, coco liner or a sheet of landscape fabric, chain or strong rope, S-hooks, potting mix, trailing plants.
How to make it:
Check the colander for sharp edges, then sand any rough spots. Line the inside with coco or fabric to keep soil from washing out while still letting water drain. Attach chain in three or four points around the rim, evenly spaced, then join the chain at a single hook. Fill with potting mix, then plant with a “thriller and spiller” approach, one compact plant for fullness, plus trailing plants that soften the edges.
Placement tip: hang it where you’ll see it often, near a kitchen window, beside a seating area, or at the corner of a pergola.
Weather tip: if the colander is prone to rust, use a rust-inhibiting spray paint first, then topcoat, it extends the life dramatically.
4) Painted paver “welcome path” set
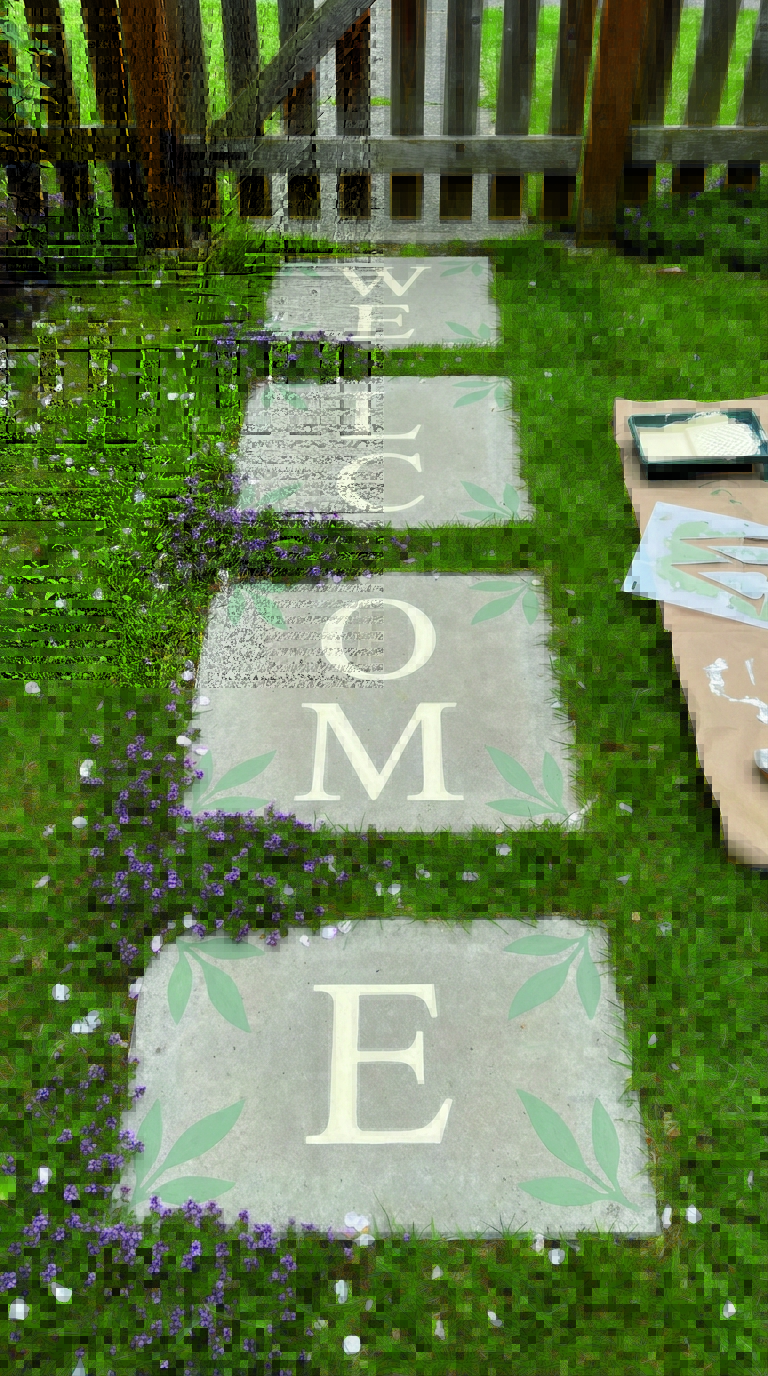
A few painted pavers can guide visitors, frame a border, or create a playful message without turning the yard into a signboard. It’s practical art, you walk on it, and it still feels personal.
Materials: plain concrete pavers, scrub brush, outdoor paint, painter’s tape, stencils or chalk, masonry sealer.
How to make it:
Clean pavers thoroughly, then let them dry completely. Sketch your design with chalk, keeping lettering bold and simple so it reads outdoors. Use tape to create crisp lines, then paint in thin coats, letting each layer dry before adding the next. You can spell out a single word across multiple stones, add simple leaf silhouettes, or create a repeated pattern that feels calm. Once fully dry, seal with a masonry sealer designed for outdoor surfaces.
Placement tip: lay them where they’ll be useful, in a muddy section of lawn, beside the patio door, or as a visual cue to a garden gate.
Weather tip: seal the top and the sides, and re-seal occasionally if the pavers take heavy foot traffic.
5) Bottle-edge garden border with a tidy finish
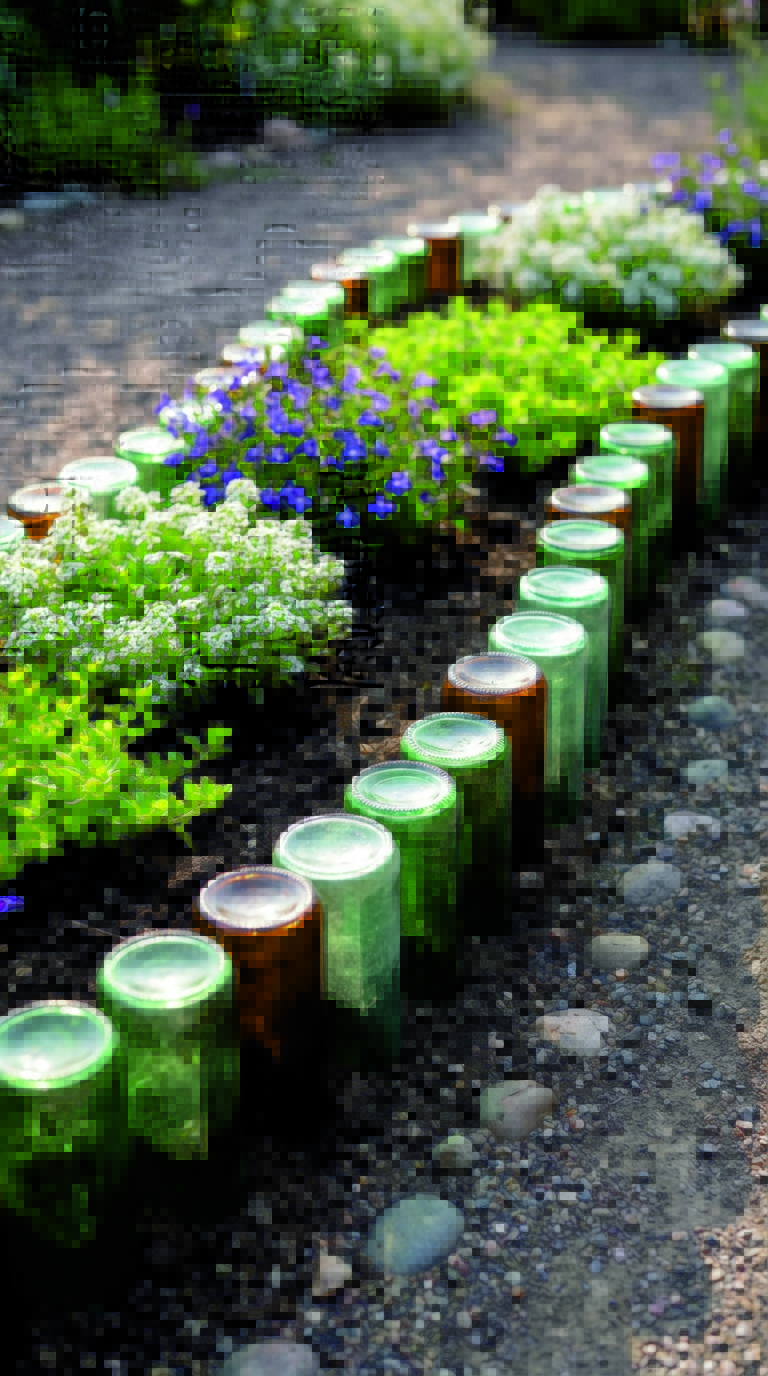
A bottle border is a classic, it adds subtle color and defines a bed edge cleanly. With the right prep, it looks intentional rather than improvised.
Materials: glass bottles in a consistent color or mixed tones, sandpaper block, gloves, shovel, gravel or coarse sand.
How to make it:
Choose bottles with similar heights for a neat line. Wash and dry them, then lightly sand the rim to remove any tiny chips or sharp spots. Dig a narrow trench along the border line, keeping depth consistent. Add a thin layer of gravel or coarse sand for drainage and stability. Place bottles upside down, press them firmly into the trench, then backfill and tamp the soil tightly around them.
Placement tip: it works best along straight or gently curved edges, especially beside paths where the border reads clearly.
Weather tip: avoid spots where a mower will clip the bottles, and set them deep enough that frost heave won’t pop them up.
6) Tin-can lantern row for evening glow
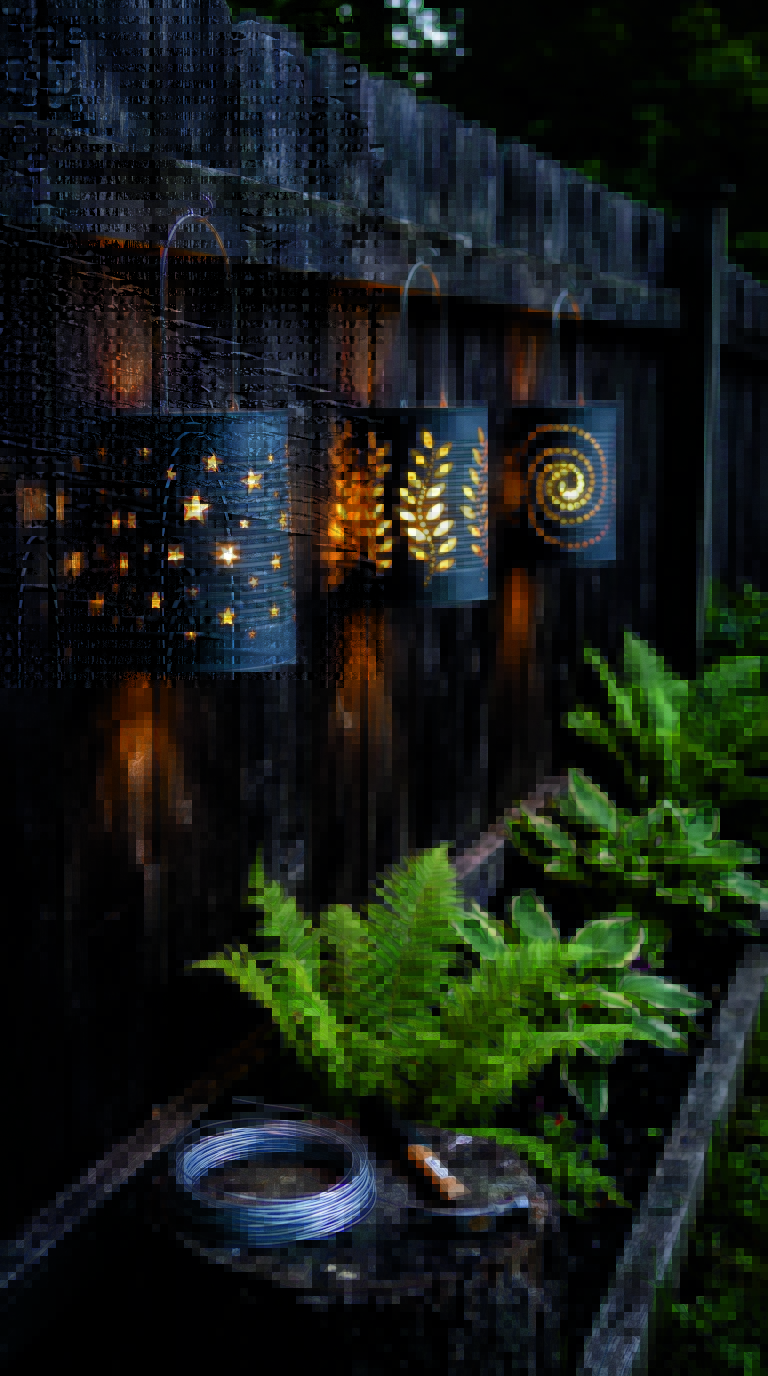
Lanterns make a garden feel lived-in after dark. Tin-can lanterns give you pattern and mood, and they look great in a row along a fence.
Materials: large tins, hammer and nail, water, freezer space, wire for hanging, LED tealights or outdoor-safe candles, optional spray paint.
How to make it:
Fill cans with water and freeze them, the ice supports the metal while you punch holes. Draw a simple pattern with marker, dots, stars, leaf shapes, or a repeating stripe. Use a nail and hammer to punch holes along your design. Let the ice melt, dry the cans well, then add a wire handle through two small holes near the rim. If you paint, keep it matte for a softer, more natural look.
Placement tip: hang them at eye level along a fence, or cluster three near a seating corner for a cozy effect.
Weather tip: use LED lights for worry-free evenings, and add drainage holes in the bottom so rain doesn’t pool inside.
7) Cedar scrap plant label stakes that actually last
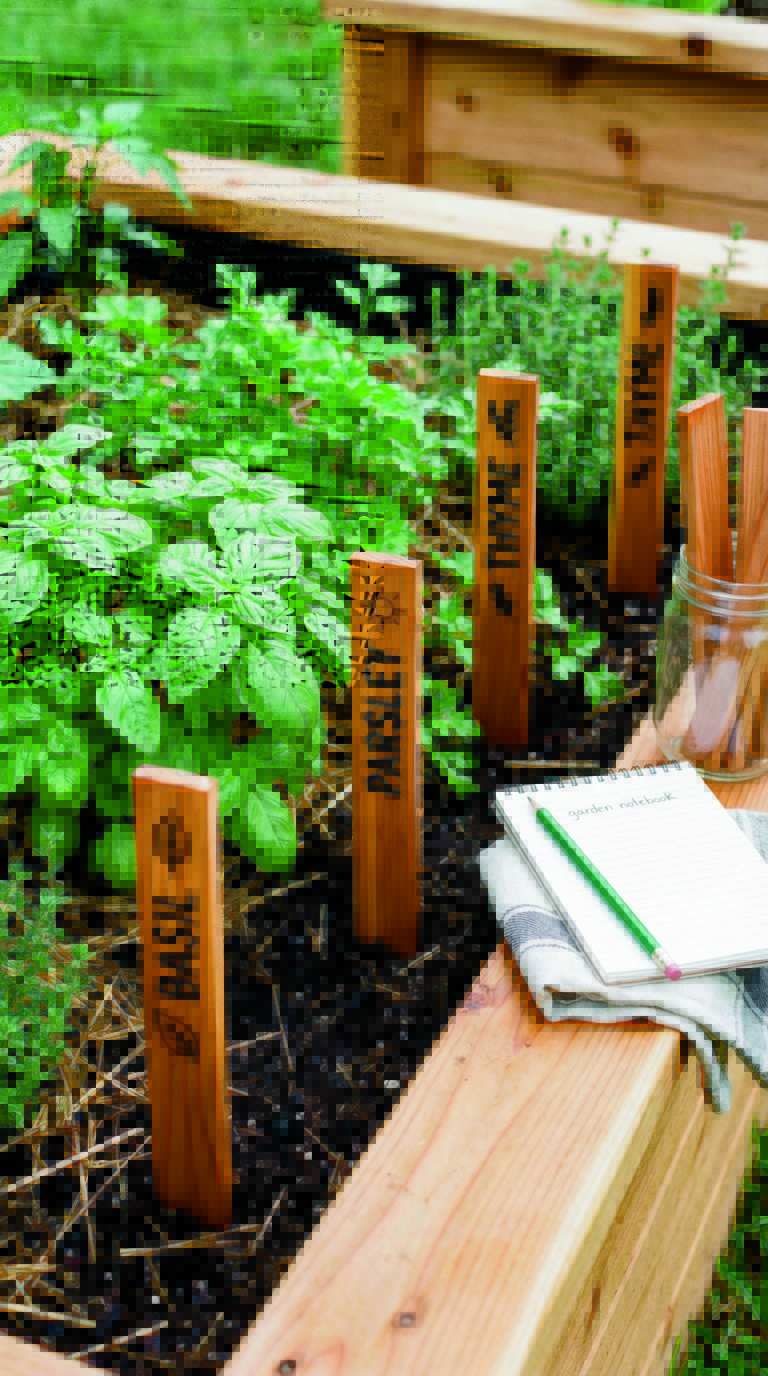
Plant labels can be pretty, but they should also survive watering, sun, and the occasional bump. Cedar holds up outdoors, and a simple finish keeps lettering readable.
Materials: cedar offcuts, saw or pre-cut stakes, sandpaper, paint pen or permanent marker, exterior oil or clear sealer.
How to make it:
Cut stakes with a pointed end so they slide into soil easily. Sand edges smooth, then wipe away dust. Write plant names clearly, block letters work best from a distance. For extra charm, add a tiny icon, a leaf for basil, a little sun for tomatoes. Seal the wood, especially the bottom section that sits in soil.
Placement tip: put labels slightly behind plants rather than directly in front, it keeps beds looking calm.
Weather tip: re-coat with exterior oil as needed, and avoid water-based craft paint that tends to fade fast in sun.
8) Teacup bird feeder with good drainage
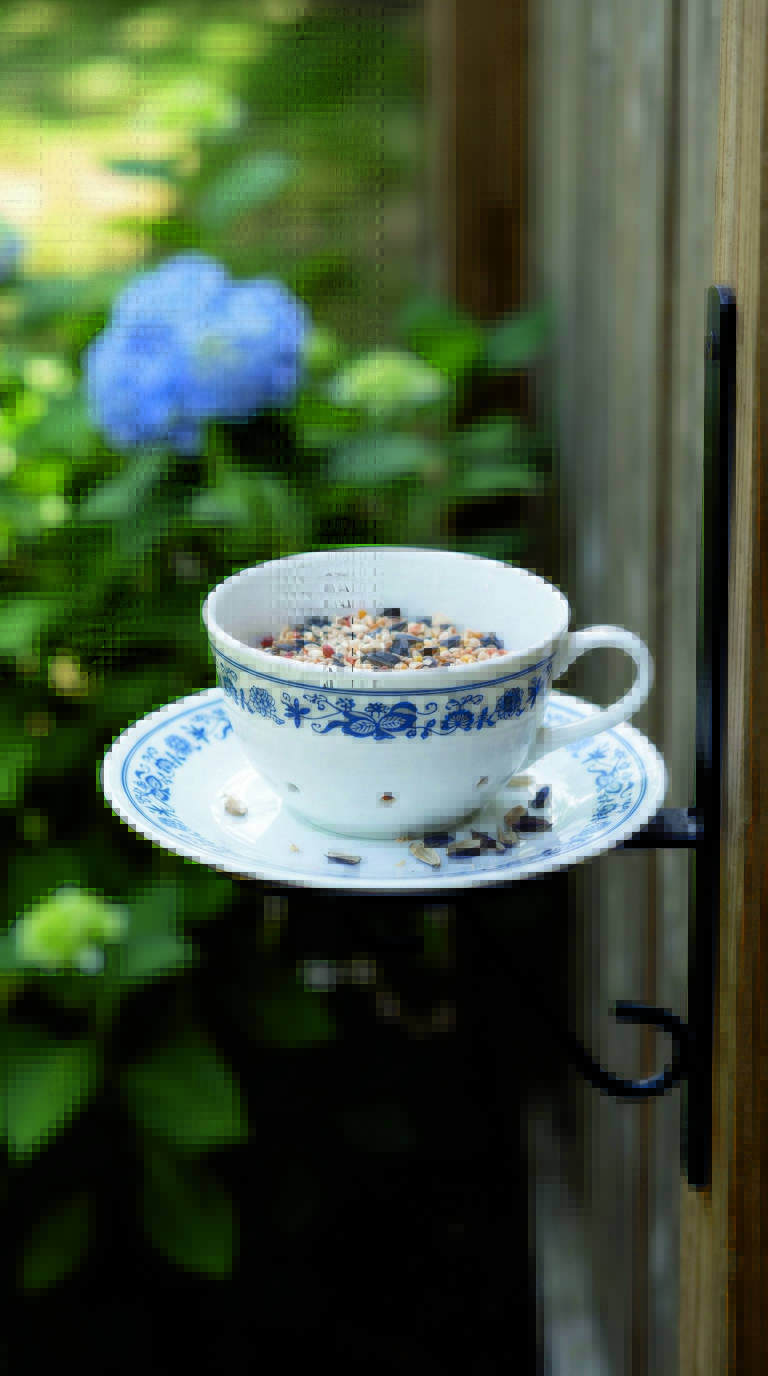
A teacup feeder adds gentle charm, and it’s easy to place where you can enjoy watching visitors. Drainage is the key, seed stays fresher and birds return more reliably.
Materials: teacup and saucer, waterproof epoxy, small drill bit for ceramics, mounting bracket or a post cap, birdseed.
How to make it:
If the teacup already has a crack, skip it, it won’t last outdoors. Drill one or two tiny drainage holes in the cup, go slowly, keep the bit cool, and use light pressure. Glue the teacup to the saucer with waterproof epoxy, then let it cure fully. Mount the saucer onto a bracket or post cap so it’s stable, then fill with seed.
Placement tip: place it near shrubs or small trees, birds like a quick escape route, yet keep it far enough from dense cover to discourage cats.
Weather tip: clean it regularly, and bring it inside during severe storms to protect both the piece and the birds’ food supply.
9) Concrete leaf bowl for a tabletop centerpiece
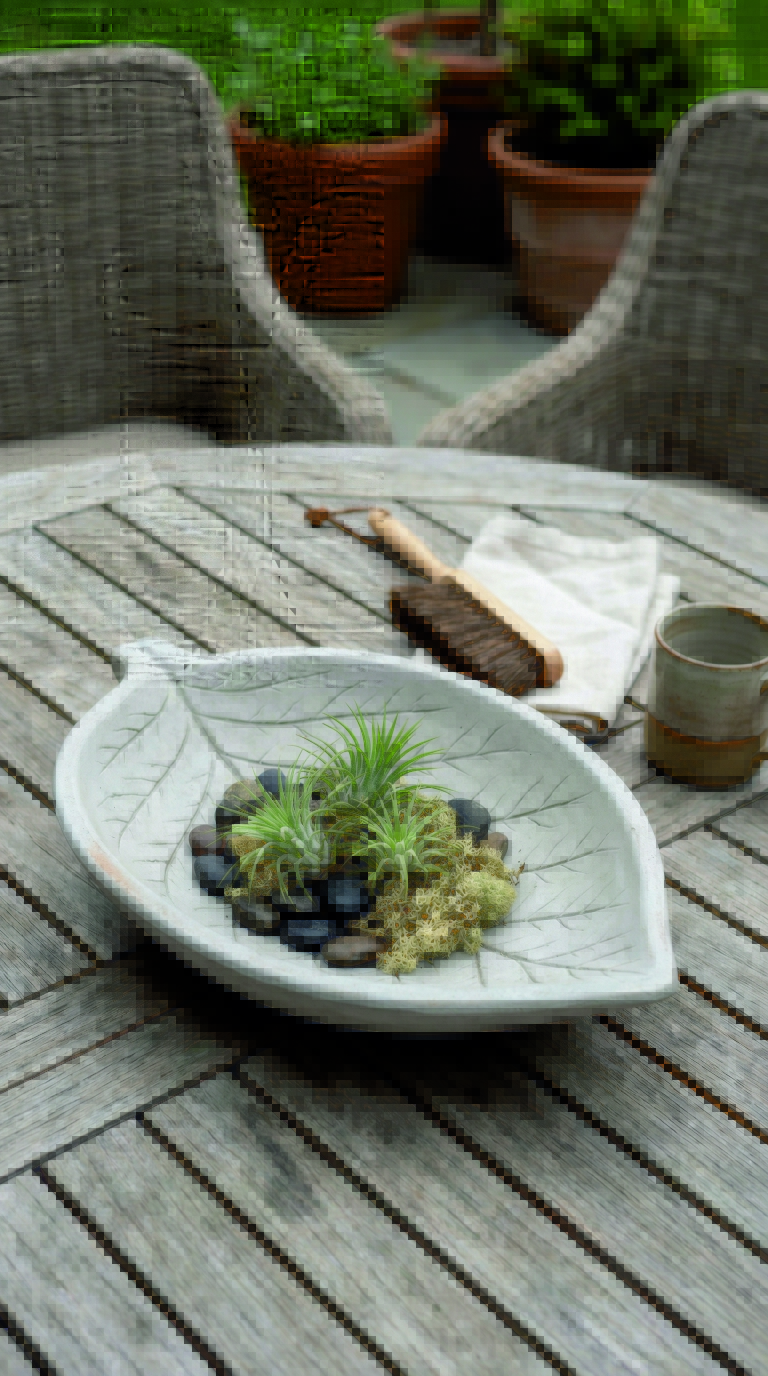
A leaf bowl looks sculptural, and it’s useful, it can hold air plants, pebbles, small pots, or a seasonal arrangement. It also feels satisfying to make, because the leaf texture comes through beautifully.
Materials: large textured leaf, quick-set cement, sand, cooking spray, gloves, mixing container.
How to make it:
Create a mound of damp sand on a tray, then press a shallow bowl shape into it. Spray the leaf lightly with cooking spray so it releases more cleanly. Place the leaf vein-side up over the sand mold. Mix cement to a thick, spreadable consistency, then apply it over the leaf in an even layer. Build thickness gradually, especially around the rim, because thin edges chip easily. Let it cure fully, then peel away the leaf to reveal the texture.
Placement tip: set it on a patio table, a low wall, or a stump, it reads as a small art piece even when empty.
Weather tip: seal it with a concrete sealer, and lift it slightly so it doesn’t sit in standing water.
10) Rope-wrapped planter sleeves for mismatched pots
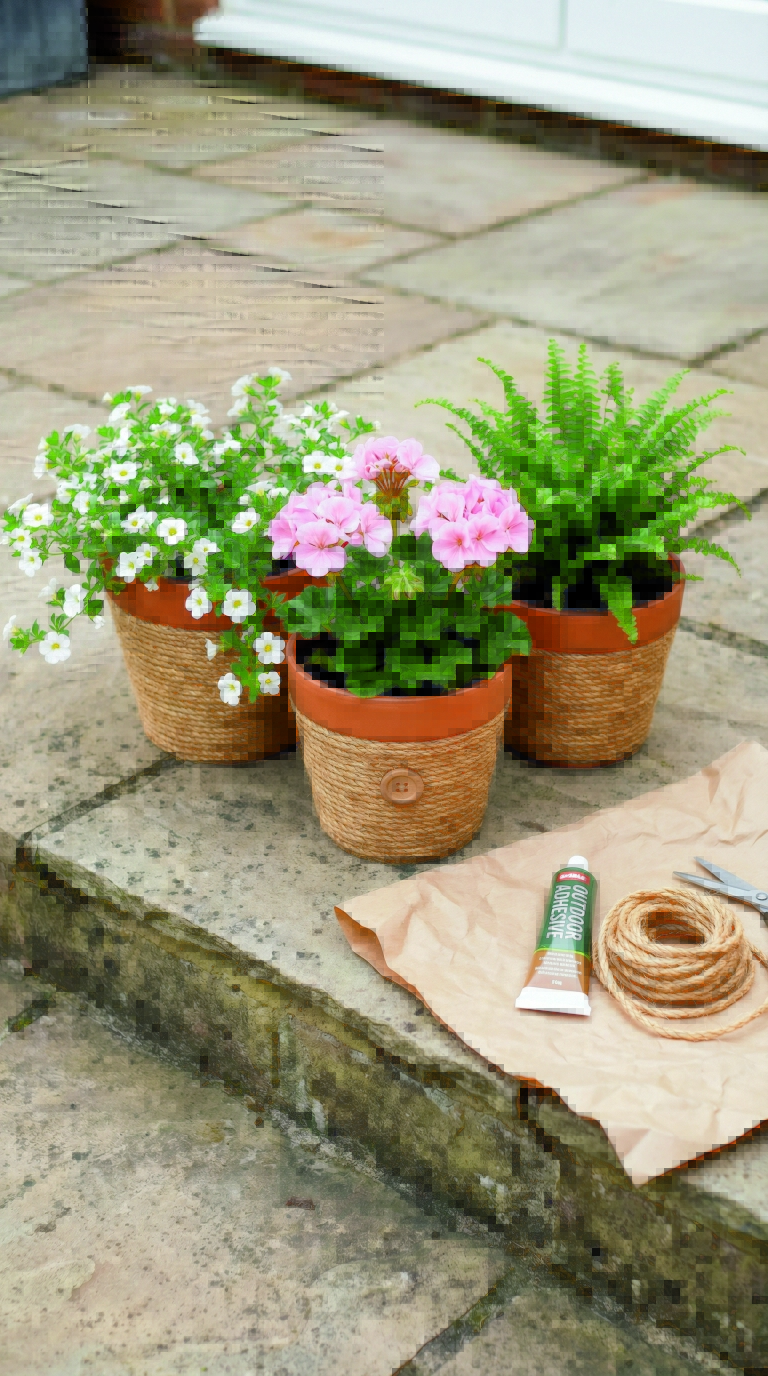
If you have a handful of plastic pots that work fine but look out of place, rope sleeves bring them into the same visual family. It’s quick, and it softens harsh lines.
Materials: sisal or jute rope, outdoor adhesive, scissors, optional wood buttons or small tags.
How to make it:
Start at the bottom edge of the pot, apply adhesive in a small section, then press rope into place. Work around the pot, keeping rows snug and aligned. Continue upward, trimming rope neatly at the top rim. If you want a small detail, glue on a wood button, a tiny tag, or a short wrapped loop that looks like a handle.
Placement tip: group wrapped pots in threes, varying heights helps them look styled rather than scattered.
Weather tip: keep sleeves above the soil line so they don’t stay wet constantly, and bring them under cover during long rainy stretches.
11) Tool silhouette wall art for a shed or fence
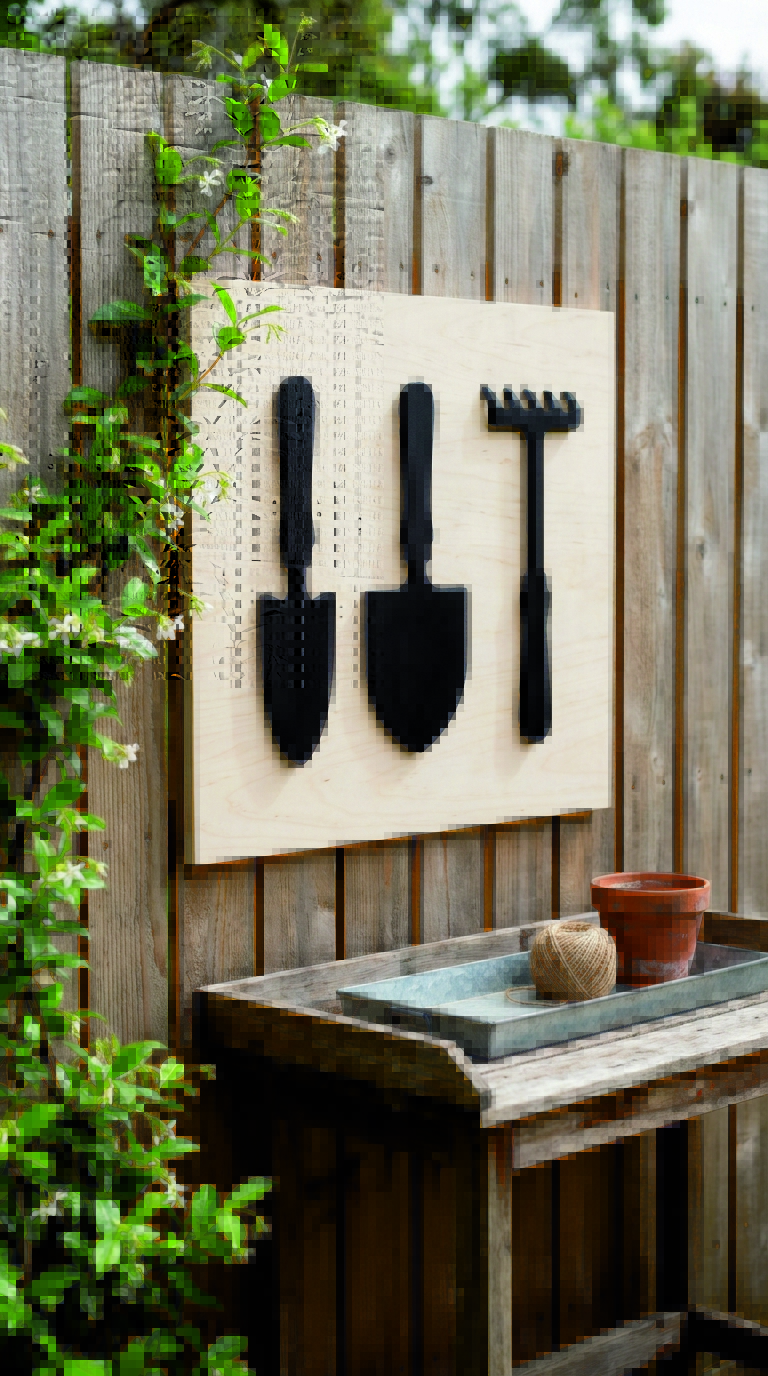
Old tools can become bold wall art without needing complex carpentry. A matte finish makes the shapes graphic, and a simple backing keeps the display neat.
Materials: old tool heads or garden tools, wire brush, rust converter or primer, matte outdoor spray paint, board backing, screws.
How to make it:
Brush off loose rust, then clean and dry the tools. Apply rust converter or primer if needed, then spray paint in a single matte color for a crisp silhouette effect. Mount tools on a board backing with screws or sturdy brackets, keeping spacing even. You can line them up in a row, or create a simple grid that feels tidy.
Placement tip: mount it on a shed wall, fence panel, or near a potting bench, it belongs where work happens.
Weather tip: leave a small gap behind the backing board for airflow, and use exterior screws that resist corrosion.
12) Pebble mosaic stepping stones in a tray mold
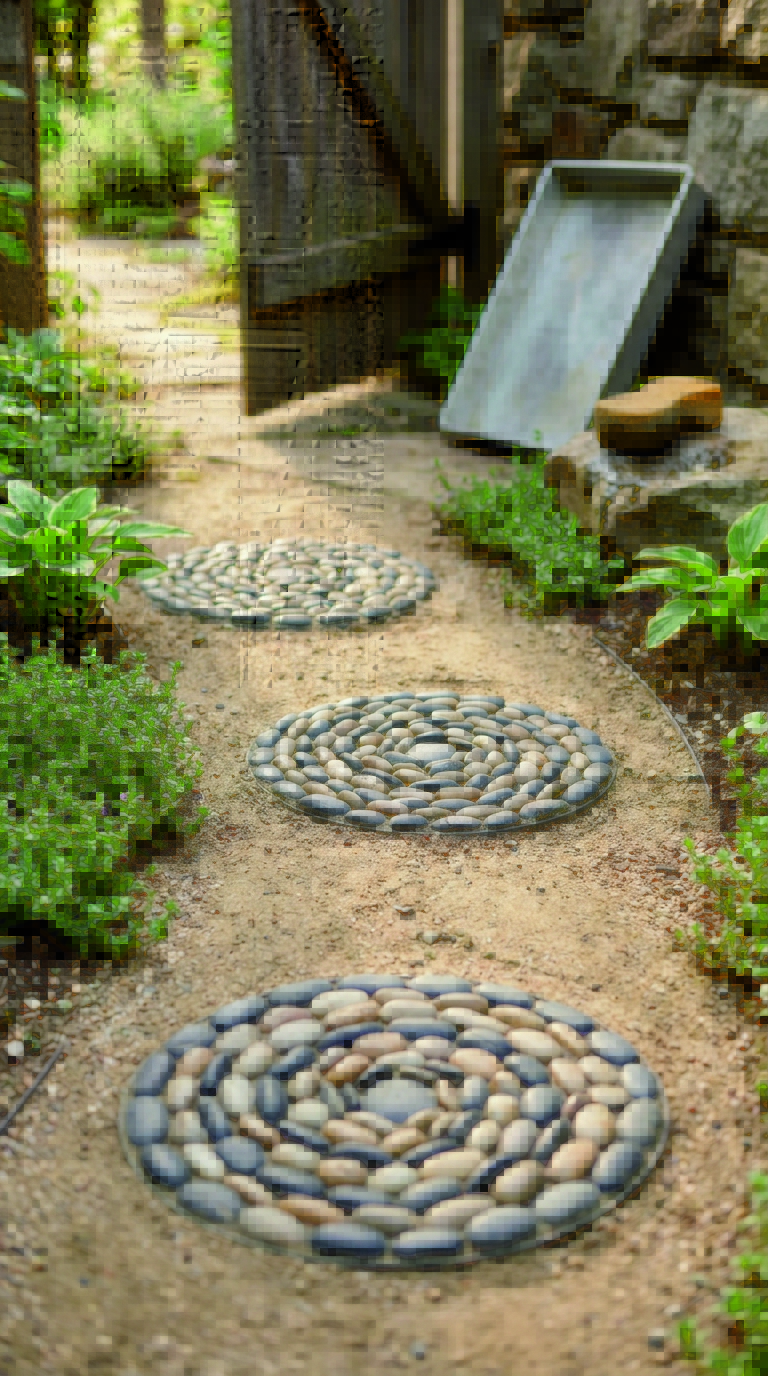
Stepping stones are functional, but they can also be personal. Pebble mosaics feel timeless, and they look best when patterns are simple and readable.
Materials: shallow tray mold or silicone mold, mortar mix, smooth pebbles, grout sponge, gloves.
How to make it:
Lightly oil the mold so the stone releases cleanly. Mix mortar, then spread it evenly into the mold, tap to remove air pockets. Press pebbles into the surface, keeping tops level so the finished stone is comfortable underfoot. Patterns can be minimal, a spiral, a simple border, or a single line that suggests a leaf vein. Let it cure fully before removing from the mold, then rinse and brush away dust.
Placement tip: use them where you naturally walk, stepping stones feel best when they follow your real routes.
Weather tip: choose a mortar mix rated for outdoor freeze-thaw if your climate demands it, and set stones on a compact base so they don’t wobble.
Make your crafts last outdoors
A little protection turns handmade work into lasting garden features. For wood, use an exterior oil or a clear sealer that penetrates rather than sitting like a thick shell, it tends to age more gracefully. For concrete and mortar projects, a masonry sealer helps resist staining and reduces surface wear. For metal, rust control is the priority, brush loose rust away, prime if needed, then topcoat with an outdoor paint meant for metal.
Adhesive matters more than most people expect. Hot glue is fast, yet it often fails outdoors once heat and moisture come into play. Waterproof epoxy, exterior construction adhesive, and outdoor-rated glues hold better when weather changes. If a project will hang, choose hardware that’s built for the weight, and use locking hooks or strong S-hooks so wind doesn’t jostle it loose.
Ground contact causes the fastest wear, because moisture lingers. Lift items slightly with hidden pavers or small stones, even a half-inch helps. Good drainage, airflow, and the right finish mean you spend more time enjoying your crafts, less time fixing them.
Styling that keeps the garden calm
Garden crafts should add personality, not compete with your plants. A simple way to keep things balanced is to choose one focal item per zone. A lantern row can be the feature along a fence, while plant labels stay quiet and functional in beds. A leaf bowl can own the patio table, while a wind chime adds movement near the door. When every corner tries to be the star, nothing stands out.
Repetition creates a pulled-together look. If you used terracotta in the wind chime, echo terracotta in a pot or two nearby. If you painted pavers with a simple motif, repeat that color in one small detail, like a ribbon on the wreath or a matte can lantern finish. Keep patterns bold and simple, they read better outdoors from a distance, and they age more kindly.
Don’t forget the evening view. Pick two spots to highlight, a lantern cluster near seating, and a gentle glow along a path. Soft light makes a yard feel welcoming, and it gives your handmade pieces a second life after sunset.
A one-weekend plan for fast results
If you want a satisfying “before and after” in two days, mix one quick project with one build that needs curing time. On Saturday morning, paint a set of pavers or make cedar plant labels, both are low-stress and tidy. Saturday afternoon, punch tin-can lanterns or hang a colander planter, you’ll see the impact immediately.
On Sunday, tackle a leaf bowl or pebble stepping stone, then let it cure while you set up the finished Saturday projects. By the end of the weekend, you’ll have something to see, something to use, and something that makes your garden feel intentionally yours.
A small checklist helps: gloves, drop cloth, outdoor adhesive, a clear sealer, and sturdy hooks. Keep supplies in a simple bin, you’ll be more likely to start another project when everything is ready.
Final thoughts
A garden becomes memorable through small details, the kind you notice without trying. A hand-built feeder, a soft wind chime, a border that catches afternoon light, those touches turn ordinary space into something personal. The best part is how these projects build on each other. Once you make one piece that lasts, you’ll start seeing potential everywhere, in a colander, a stack of pavers, a tool that’s past its working days.
Pick one craft that fits your space right now, give it a good home, protect it for the weather, then enjoy how it changes the feel of your yard. Over time, your garden collects stories, not just plants, and every handmade piece becomes part of what makes your outdoor space feel like home.