Pallet Privacy Fences That Actually Look Good: A Weekend DIY Guide for Real Yards
That moment when you step outside and realize your yard is basically “open concept” for the whole neighborhood… yeah. A pallet privacy fence is one of the fastest ways to fix that without blowing your budget—and if you do it with a little intention, it can look clean, modern, and surprisingly can look serioysly good. Like “clean horizontal lines, soft stain, and climbing plants”. Not just “random shipping wood leaned against a post”!
Below, will walk you through smart planning, safe pallet picking, and three build approaches—so you can choose the DIY pallet fence that fits your space, your tools, and your patience level.
Pallet privacy fence basics: what you’re building (and why it works)
A pallet privacy fence is exactly what it sounds like: a privacy fence made from reclaimed wood pallets, either used whole as panels or taken apart into boards. The reason it’s so popular is simple—pallets give you a lot of wood fast, and the slatted structure naturally lends itself to an outdoor privacy screen.
But here’s the honest truth: pallets are imperfect. Boards vary in thickness, nails are stubborn, and some pallets have lived rough lives. The goal is to work with that reality, not fight it. Your fence will look better (and last longer) when you build around the material instead of pretending it’s showroom lumber.
Before you build: plan like a grown-up (future you will thank you)
Even the prettiest pallet fence ideas fall apart if the plan is fuzzy. Take 30 minutes and do these basics.
First, decide whether you need a full pallet privacy fence along a boundary, or a pallet privacy screen that blocks one specific sightline—like a patio, a hot tub corner, a bin area, or that one neighbor window that somehow sees everything.
Next, walk your site and notice three things:
- Ground conditions: Is it flat, sloped, sandy, muddy, or rocky?
- Wind: Does the area get gusty? Solid panels can act like sails.
- Drainage: Avoid trapping water at the base of posts or along the bottom edge of the fence.
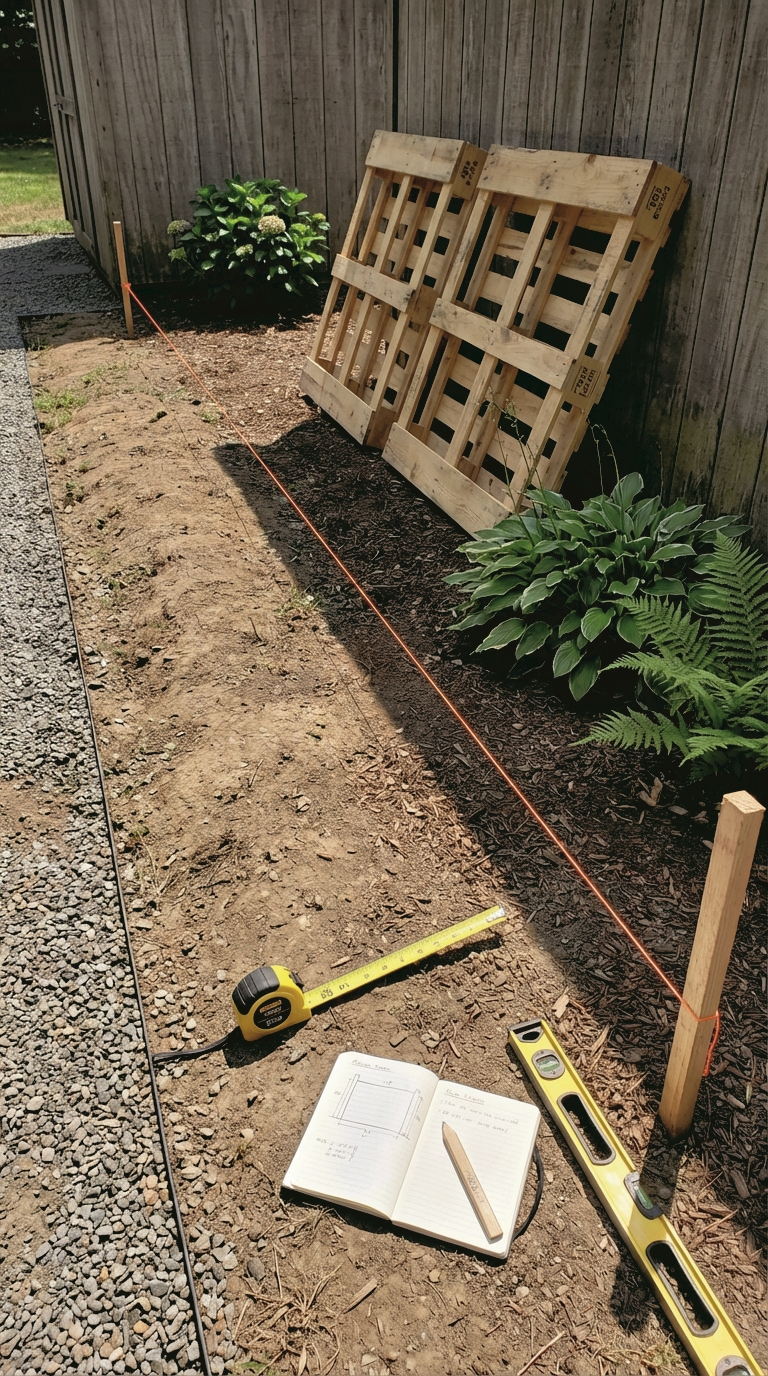
Now measure the run. Mark corners and post locations with small stakes (or even sticks), and stand back. This is where you can catch the “oops, that blocks the garden gate” moment before you dig anything.
One more practical note: if you’re building on or near a property line, check local rules and talk to neighbors if needed. It’s boring, but it prevents the kind of drama that ruins a perfectly good weekend project.
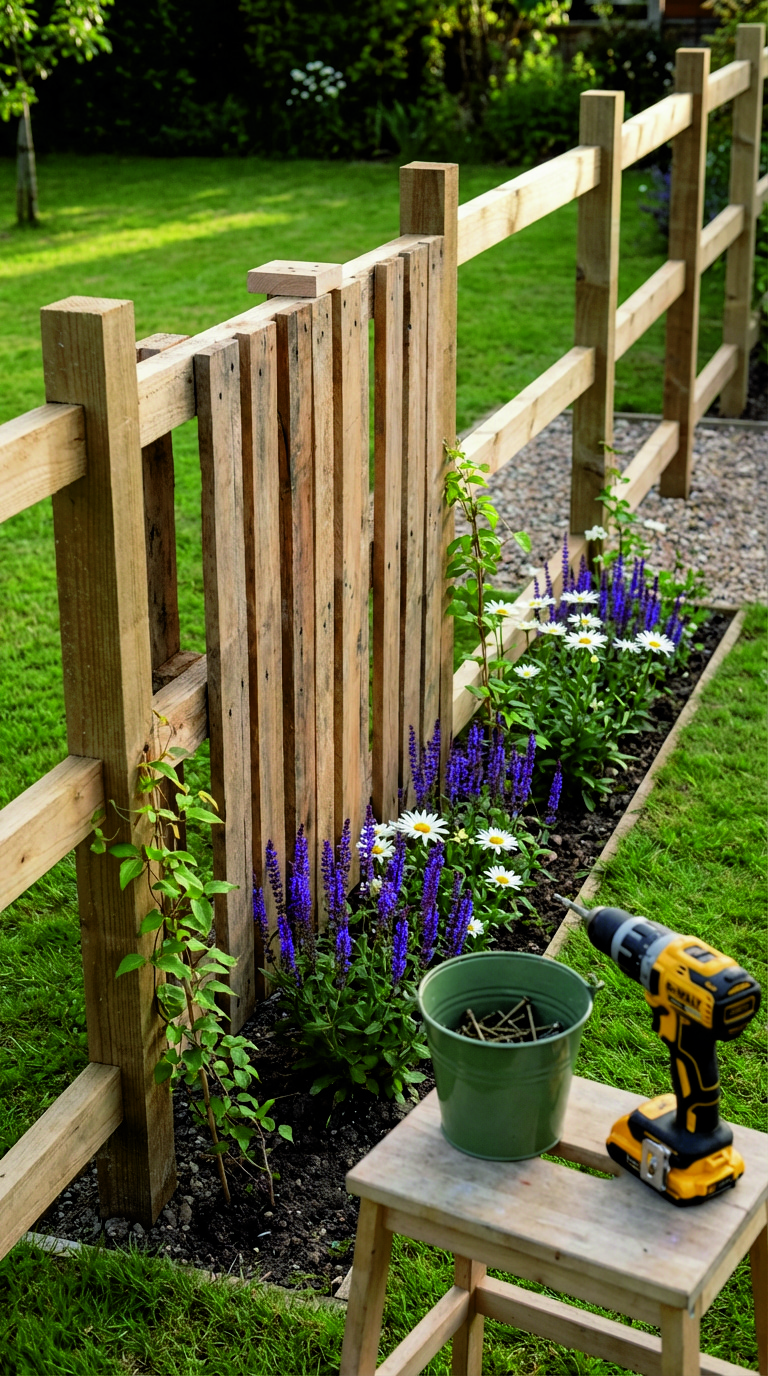
Choosing safe pallets (the non-negotiable step)
Let’s keep this friendly but firm: not all pallets are safe for home projects.
Look for pallets that are clearly stamped and in good condition. Many pallets used in shipping have treatment marks. You want heat-treated pallets (often stamped “HT”). Avoid pallets marked “MB” (that indicates a chemical fumigation treatment). And if a pallet has no markings and you can’t confirm its history, skip it. There are plenty out there—don’t gamble.
Also avoid pallets that smell strange, have oily stains, or look like they’ve been wet for a long time. If you wouldn’t want that wood near your raised beds, you definitely don’t want it in a fence you’ll touch regularly.
Quick pallet-picking checklist:
- Clean stamp you can read
- No chemical or fuel smells
- No sticky residue or dark spills
- Boards aren’t punky or crumbling
- Minimal mold and no soft rot
Pallet fence ideas that look that it is meant to be (not improvised)
If you only take one design tip from this article, take this: choose a style on purpose.
Here are a few looks that consistently work, and each one ties neatly into Pinterest-friendly searches like pallet privacy wall, horizontal pallet fence, and pallet privacy screen ideas.
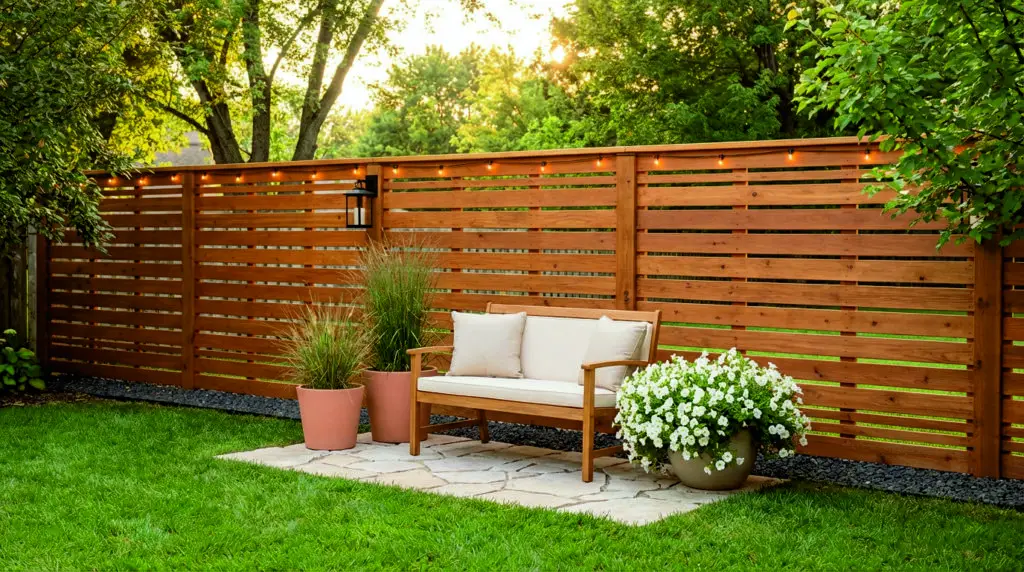
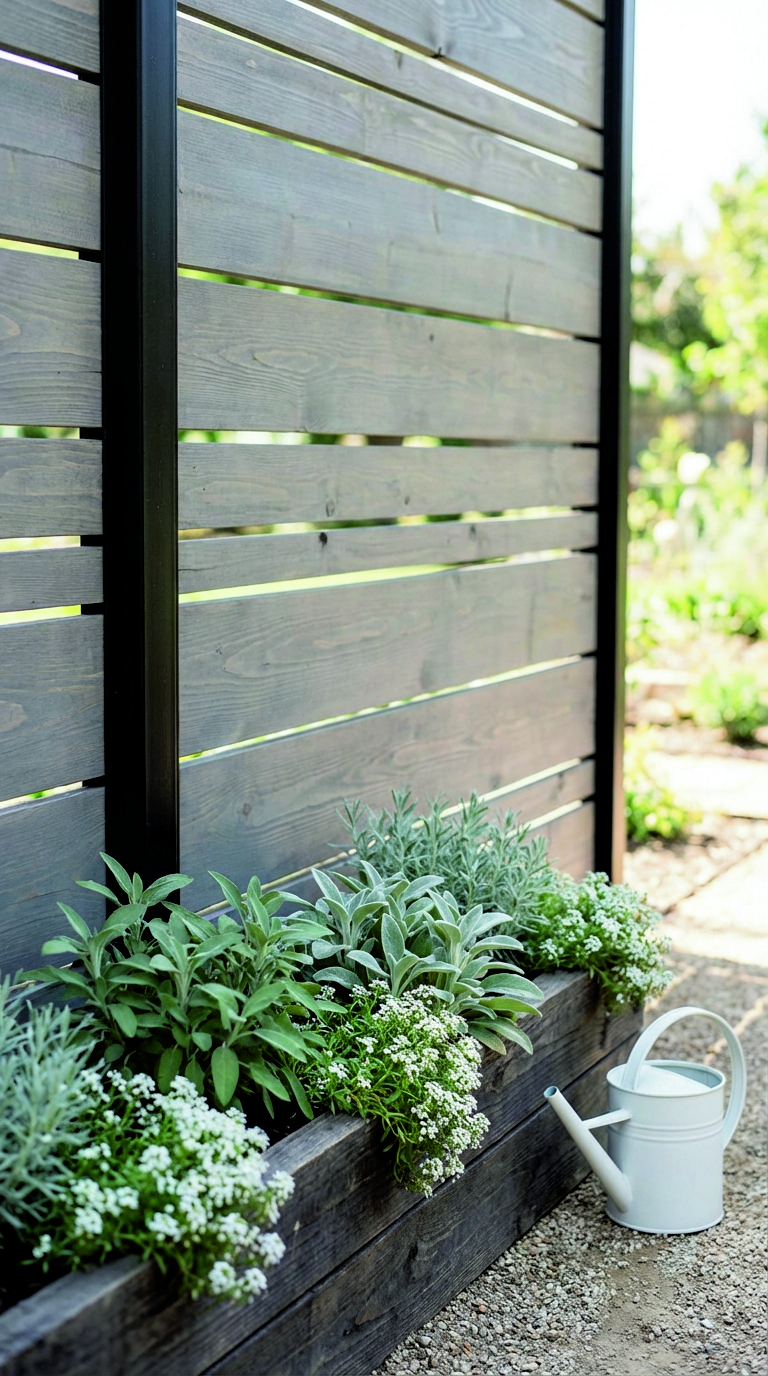
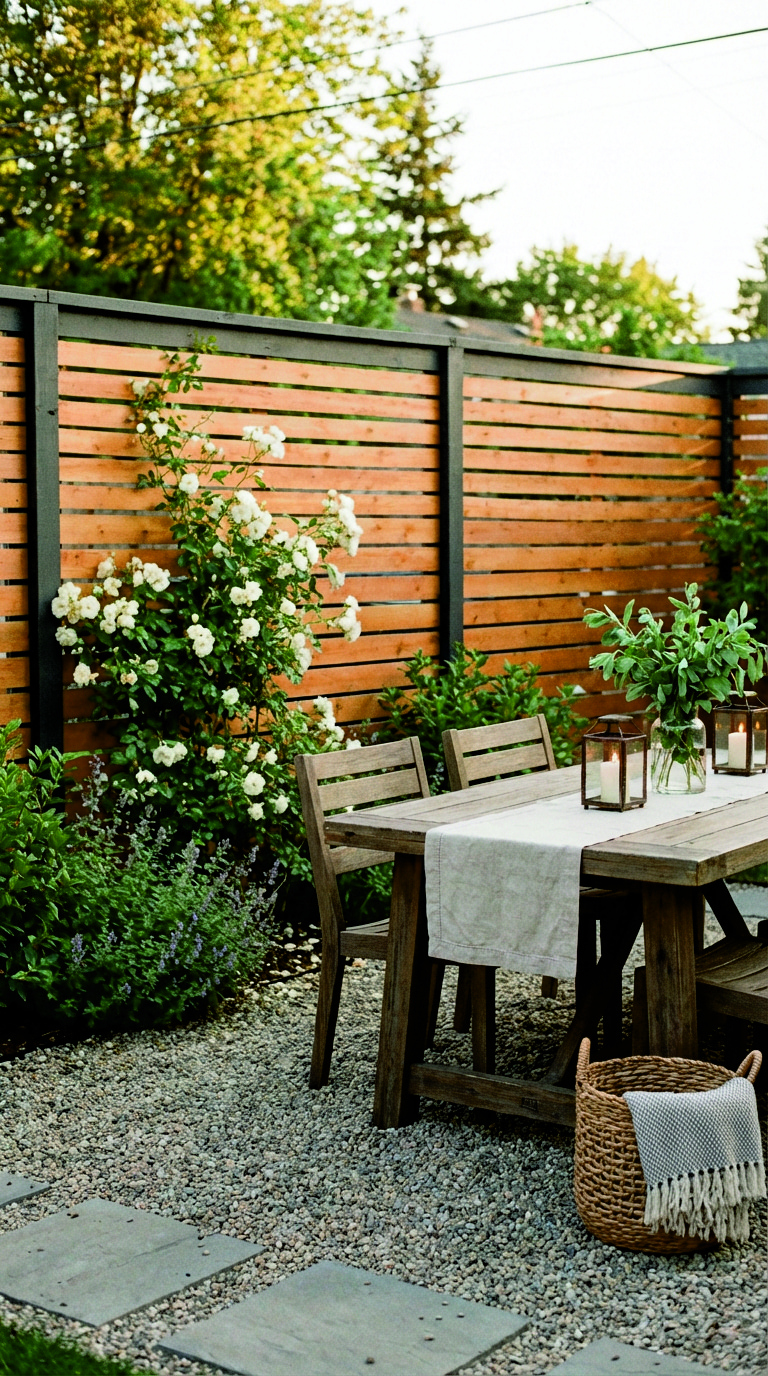
The “Horizontal Pallet Fence” look (modern and clean)
This is the one people pin like crazy. You dismantle pallets and re-install the boards horizontally with consistent spacing. It reads like a modern slat fence, especially if you stain it a warm cedar tone or a soft driftwood gray.
Why it works: the repeating lines visually smooth out the “mixed pallet wood” problem.
The “Pallet Privacy Wall” (fast coverage, stronger feel)
This uses whole pallets as panels. It’s a quick way to get a tall privacy wall up in a weekend. The trick is to frame it so it doesn’t look like you simply attached pallets and walked away.
Why it works: speed. And it’s great for blocking ugly views (bins, equipment, side yard clutter).
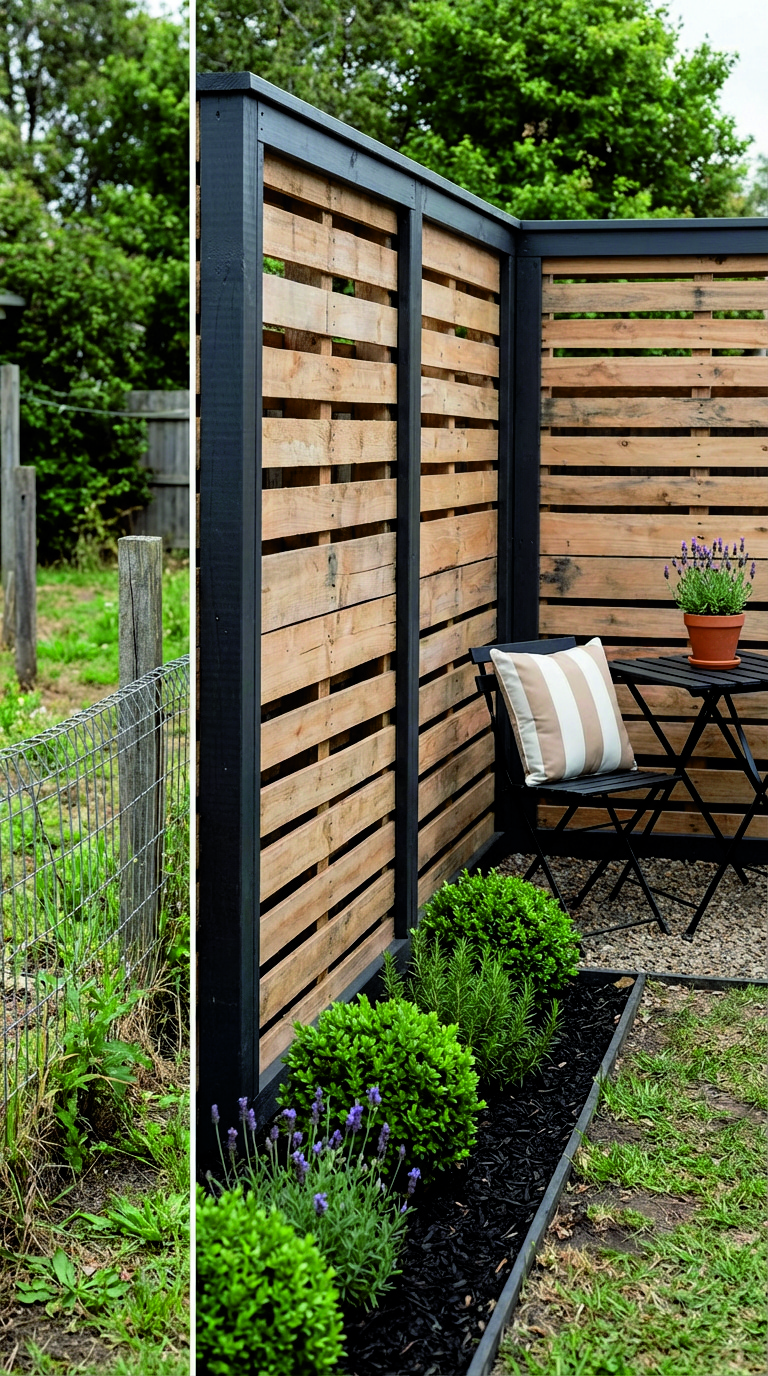
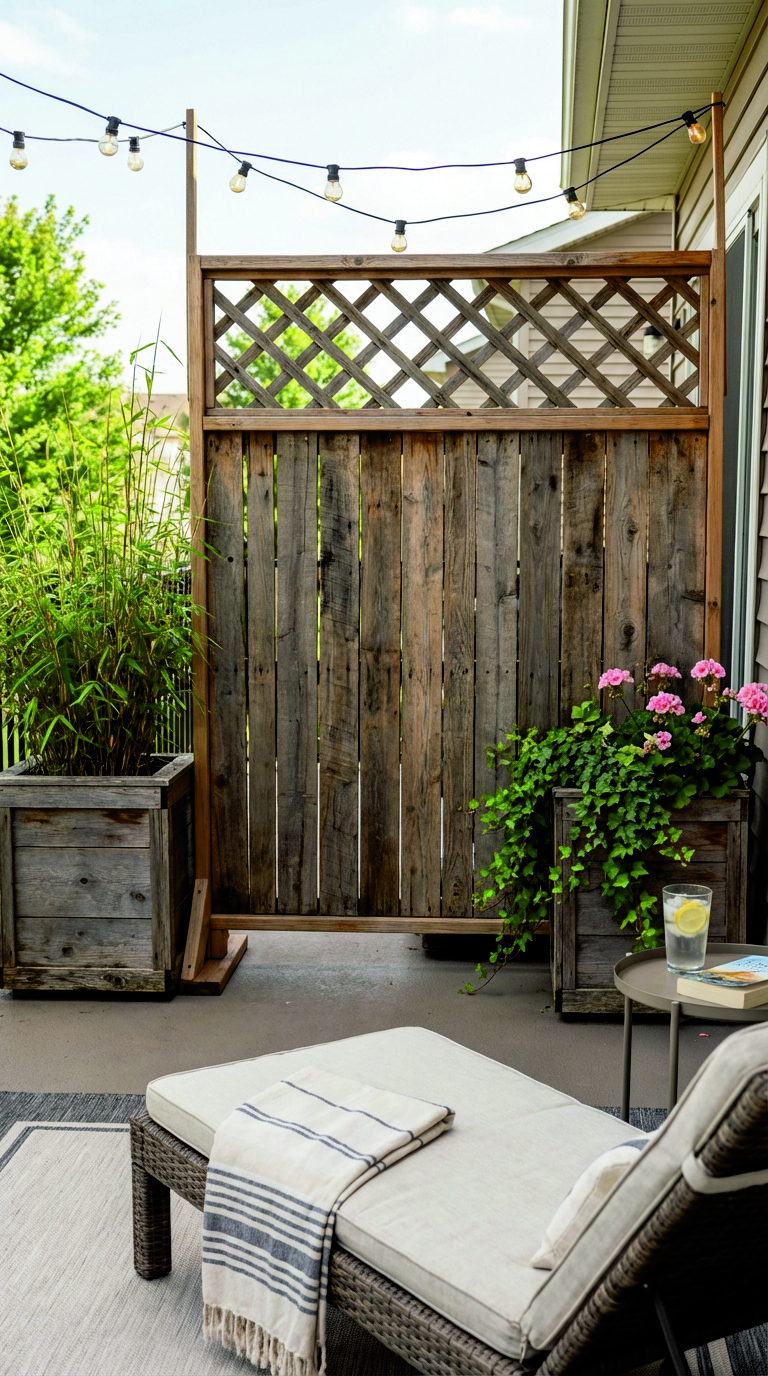
The “Pallet Privacy Screen” (perfect for patios and small yards)
Freestanding panels can give you privacy exactly where you need it without committing to a full fence line. It’s also ideal if you want something that feels more like outdoor décor than construction.
Why it works: flexible, and it pairs beautifully with planters and lighting.
The “Two-Tone Fix” (because pallet wood isn’t consistent)
If boards vary wildly, a two-tone scheme makes it feel planned: darker frame, lighter slats. Or natural slats with a charcoal frame. Even a simple consistent stain across everything makes a huge difference.
DIY pallet fence build options: pick your path
There’s no single “right” way to build a pallet privacy fence. Here are three approaches, from quickest to most polished.
Option 1: The fastest pallet privacy fence (whole pallets as panels)
Best for: quick privacy, large coverage, side yards, temporary-ish solutions
Basic idea: set sturdy posts, attach pallets between them, then add trim to clean up the edges.
High-level steps:
- Set posts on a string line, spaced to fit your pallet width (you may need to adjust spacing to match the pallets you actually have).
- Keep pallets slightly off the ground so they don’t sit in moisture.
- Attach pallets to posts with exterior-rated screws or structural fasteners.
- Add a top cap board for a finished silhouette.
- Optional but worthwhile: add a bottom rail or kicker board for stability.
The “make it look good” move: add simple vertical trim where panels meet and a cap along the top. Those two details instantly turn “pallet wall” into “fence.”
Option 2: The horizontal slat pallet privacy fence (most Pinterest-worthy)
Best for: modern gardens, patios, front yard sections, “I want it to look expensive” goals
Basic idea: dismantle pallets, then install the boards like a horizontal privacy fence with proper spacing.
High-level steps:
- Set posts and install horizontal rails (top, middle, bottom).
- Sort pallet boards by width and straightness.
- Install boards horizontally, using a spacer block so gaps stay consistent.
- Keep the top line straight—trim if needed.
- Add a cap rail and (optional) a thin trim frame.
Spacing tip: small gaps give you privacy while still letting air pass through. That airflow matters in windy spots.
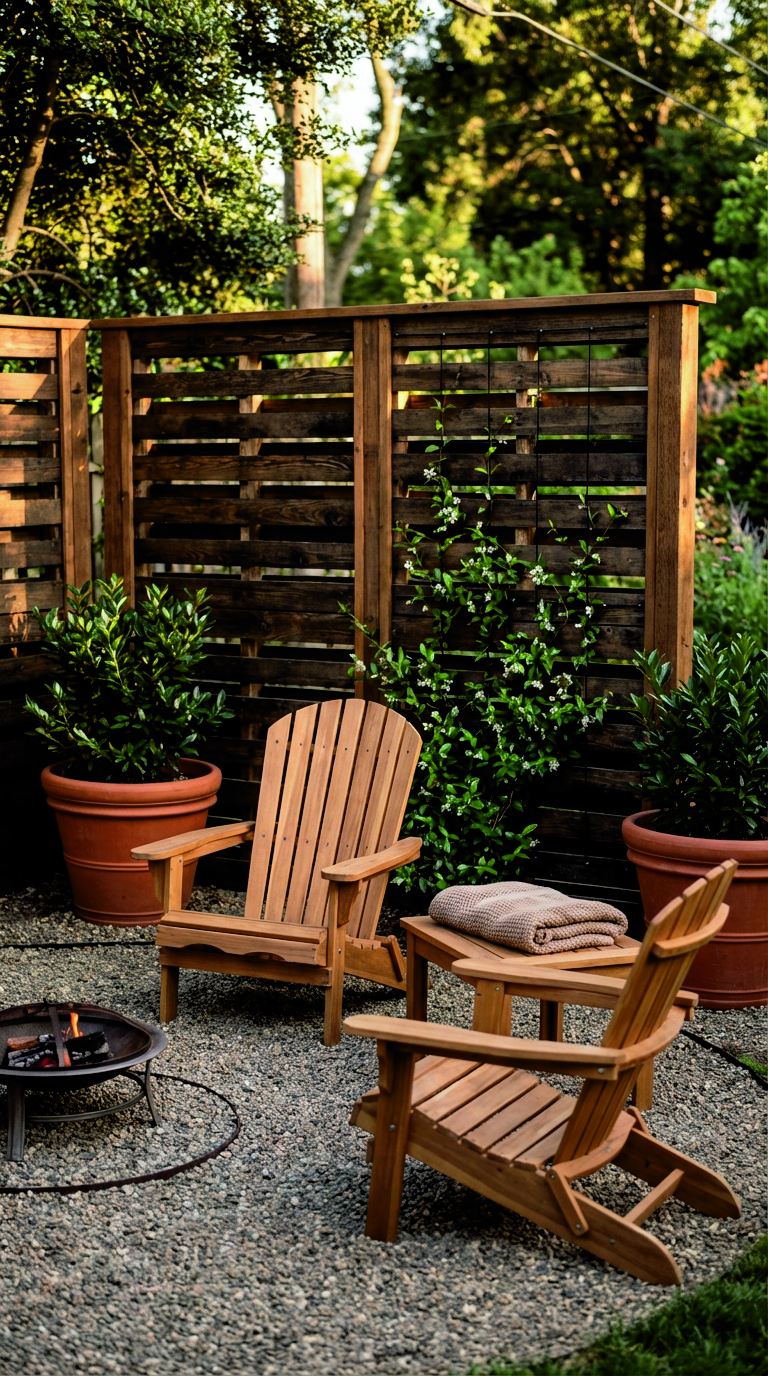
Option 3: Freestanding pallet privacy screen panels (patio-friendly)
Best for: renters (if allowed), decks, patios, hot tubs, small spaces
Basic idea: build a simple rectangular frame, attach pallet boards to it, then anchor the panel with feet or planters.
High-level steps:
- Build a rigid frame from straight lumber (this is where strength comes from).
- Attach pallet boards to the frame as slats, either vertical or horizontal.
- Add diagonal bracing or a rigid back rail to prevent wobble.
- Stabilize the panel with wide feet, or screw it into heavy planter boxes.
- Finish with sanding and sealant.
The “make it cozy” move: combine two panels at a slight angle near your seating area, add a planter with tall grasses, and string warm lights above. Instant outdoor room.
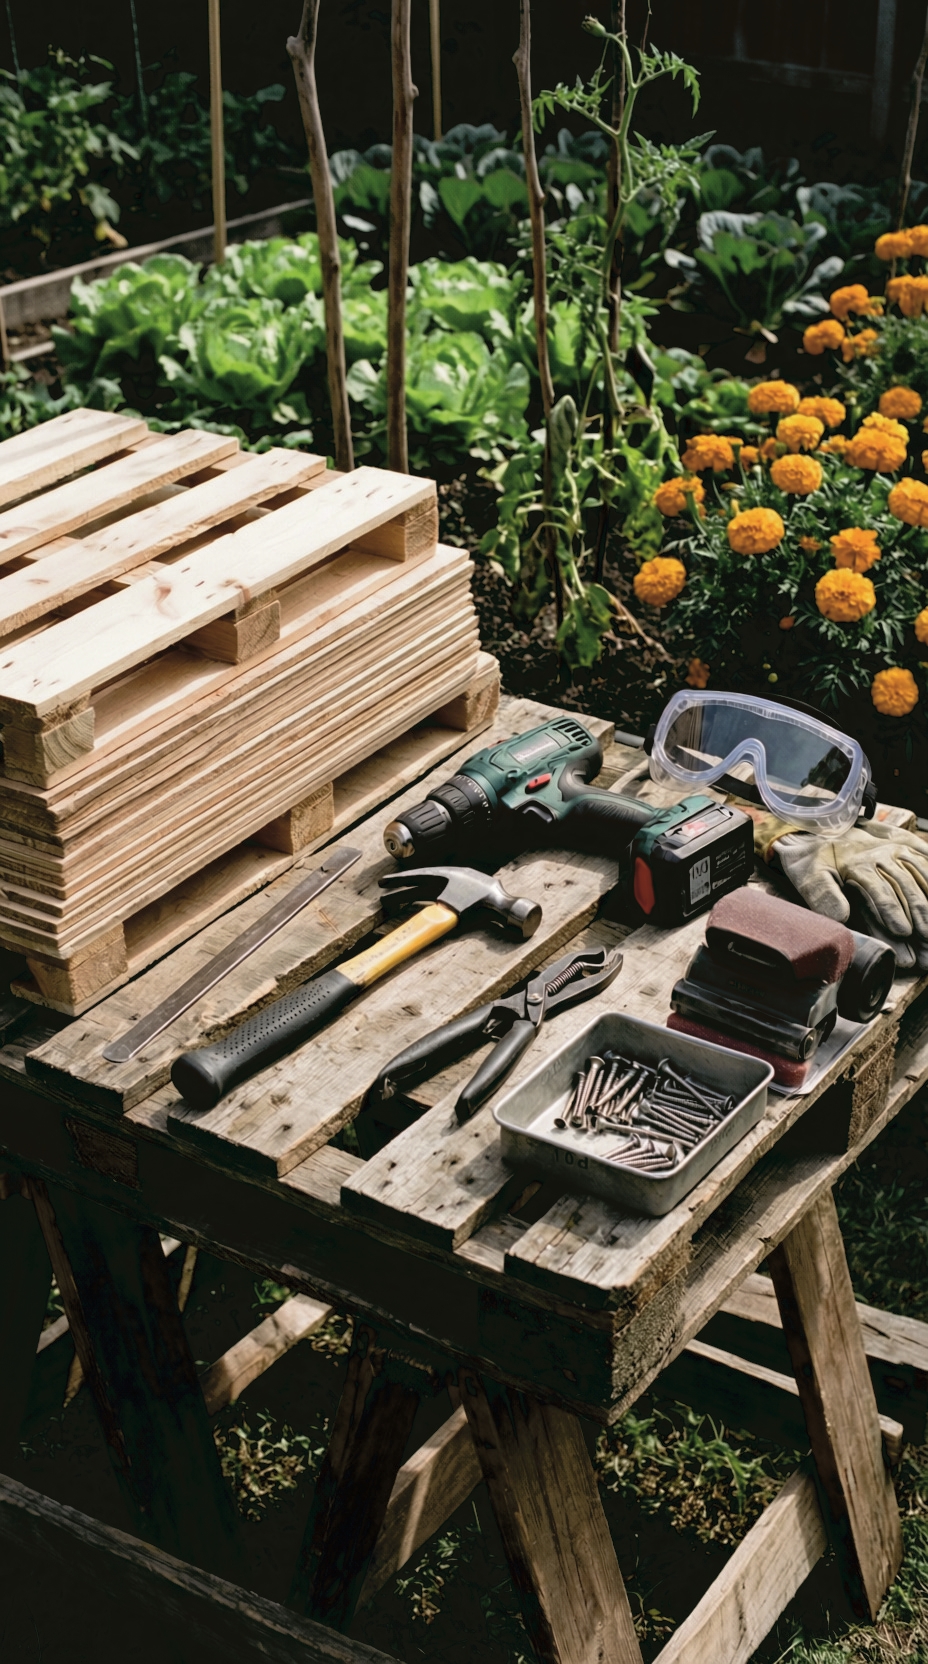
Tools and materials you’ll actually use (no fantasy workshop required)
Here’s a realistic list for most pallet privacy fences:
Tools:
- Gloves and eye protection (pallet nails are no joke)
- Pry bar or pallet buster tool
- Hammer and nail puller
- Drill/driver
- Saw (circular saw is helpful; a hand saw works for smaller projects)
- Level and tape measure
- Speed square (nice to have)
- Sander or sanding block
Materials:
- Exterior screws (they’re slower than nails, but they’re easier to adjust and repair)
- Posts (if building a full fence run)
- Gravel and post-setting mix (depending on your ground and local practice)
- Rails and trim boards (especially for a clean finish)
- Exterior stain/sealer or paint
If you want the fence to last, treat fasteners like part of the design, not an afterthought. Use exterior-rated screws and plan your seams so you’re not constantly battling splits.
Step-by-step: a simple weekend timeline for a pallet privacy fence
Let’s talk “real weekend,” not “TV weekend.”
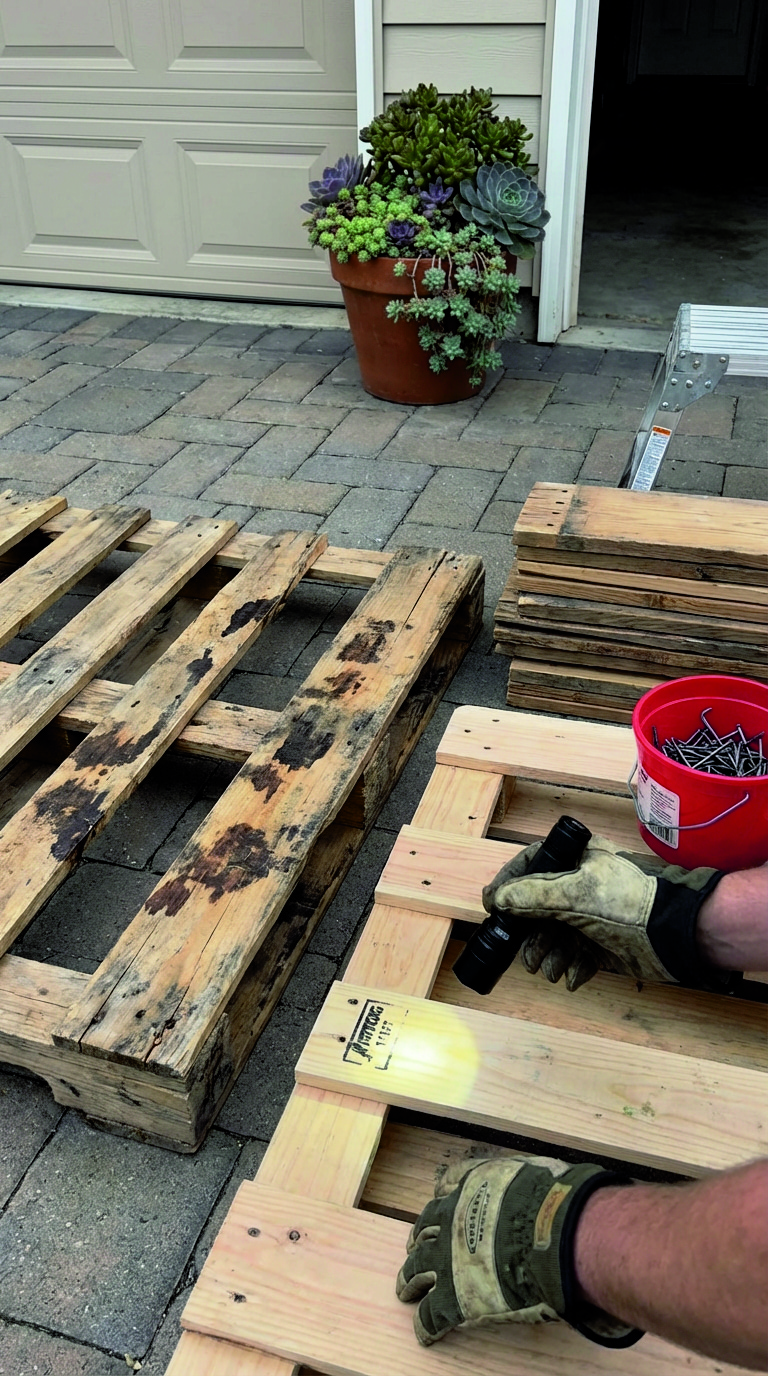
Day 1: Source, sort, and prep
- Pick your pallets and inspect them carefully.
- Decide if you’re using whole pallets or dismantling.
- If dismantling: take your time. Remove nails properly. This is the slowest part, and rushing here creates ugly splits.
- Sort boards into stacks: straight boards, slightly warped boards, short boards, and “nope boards.”
- Quick sand where hands will touch (edges, corners, rough faces).
Day 2: Build and make it look finished
- Set posts (or position your freestanding panels).
- Install rails if you’re building a slat fence.
- Attach boards with consistent spacing.
- Step back every few boards and look at the pattern—this is how you avoid the “messy patchwork” look.
- Add trim and a top cap.
- Clean up the base line and keep boards off the soil.
That last point matters. Soil contact is one of the fastest ways to shorten the life of any wood fence.
Cheap fence ideas budget readers will love: how to save without cutting corners
If you’re aiming for “cheap fence ideas budget” territory, the savings usually come from pallets and sweat equity. But a few small choices keep it affordable without making it flimsy:
- Use pallets for the infill, but use solid posts and rails.
- Build shorter runs strategically (privacy where you need it, openness where you don’t).
- Choose a simple finish: one stain color applied well beats fancy detailing applied poorly.
- Skip decorative tops until later—you can always add a trellis strip or cap rail in a future weekend.
Weatherproofing your pallet privacy fence (this is what makes it last)
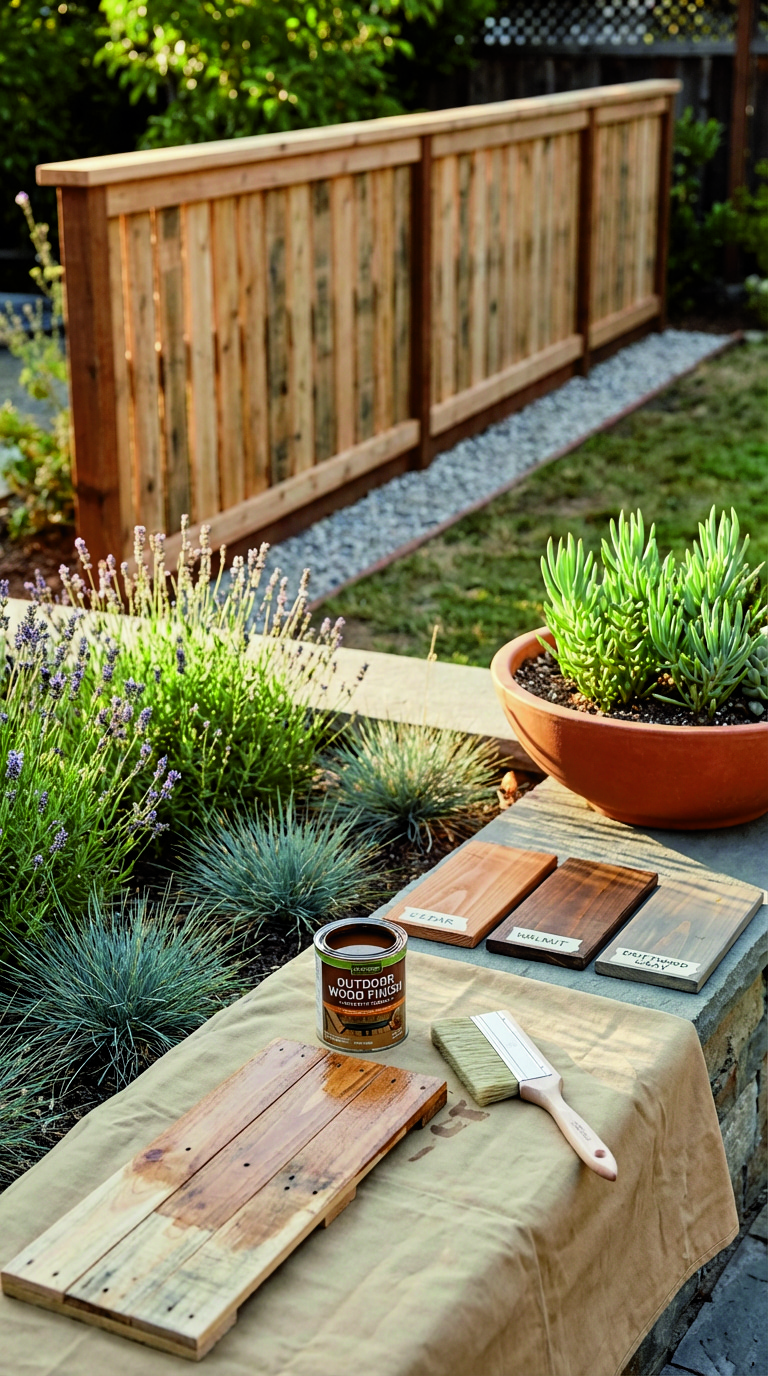
Pallet wood weathers fast. Sun and water don’t care that your project was adorable.
Here’s a simple approach that works:
- Let the wood dry out if it feels damp or freshly stored outdoors.
- Sand splinter-prone areas (especially top edges and hand-height spots).
- Apply an exterior wood stain/sealer or exterior paint.
- Pay extra attention to cut ends and end grain—they soak up moisture first.
- Consider adding a cap rail. It protects the top edges from constant water exposure and makes the fence look finished.
If you want the fence to age gracefully, semi-transparent or semi-solid stains are forgiving. They help unify mixed wood tones while still letting some grain show through.
Easy upgrades: turn a pallet fence into a garden feature
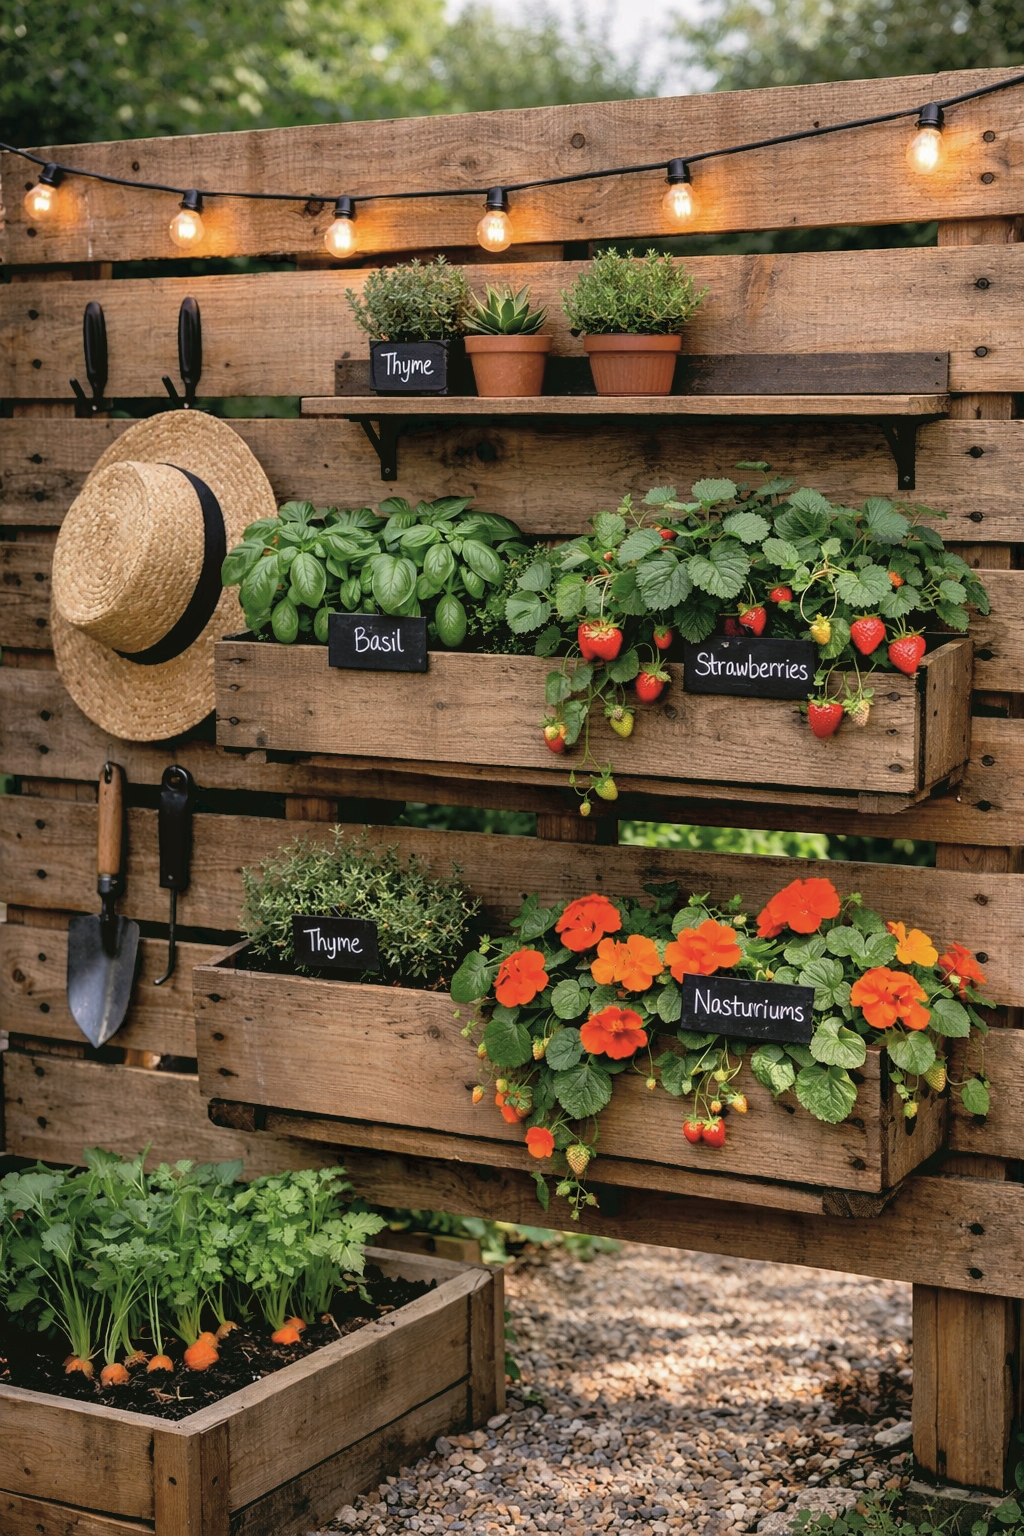
This is where pallet privacy fences really shine in a home-and-garden setting. You’re not just blocking a view—you’re building a backdrop for the yard.
Add planter boxes (instant “designed” look)
Attach simple planters along the base or build planter feet for freestanding panels. Fill them with upright plants that add softness and height—ornamental grasses, dwarf bamboo alternatives, or tall flowering annuals depending on your climate.
Top it with a trellis strip
A short trellis topper adds height without turning your yard into a fortress. It also gives climbing plants a place to go.
Use the fence as a vertical garden
Mount small pots, herb planters, or a narrow shelf for propagation trays. Just keep weight in mind—anchor properly and don’t overload one section.
Add outdoor lighting
Warm string lights, subtle solar caps, or downward-facing sconces can make the fence feel like part of an outdoor room. Lighting is the quickest way to make “privacy fence” feel like “patio glow-up.”
Common mistakes (and how to avoid the headache)
Mistake 1: Using mystery pallets
Fix: choose stamped, clean pallets and skip anything questionable.
Mistake 2: Building a solid wall in a windy spot
Fix: add spacing between slats or create airflow gaps. Use bracing.
Mistake 3: Forgetting that the top edge takes the most weather
Fix: add a cap rail and seal properly.
Mistake 4: Letting wood sit directly on soil
Fix: keep the bottom edge lifted slightly and manage splash-back with gravel or a border.
Mistake 5: No plan for “how it ends”
Fix: design your end posts, trim, and corners early. Clean endpoints make a fence look professionally done.
Cost and time: a reality check that still feels encouraging
Yes, pallets can be free. But you’ll still spend on posts, fasteners, and finish—and that’s normal. For most DIY pallet fence projects, the materials cost is still far lower than buying all-new fencing lumber, especially if you’re doing a small run or a targeted pallet privacy screen.
Time-wise, dismantling and denailing is the sneaky part. A “simple” pallet privacy fence can easily be a full weekend once you include sourcing pallets, prep, and finishing. The good news? The results are immediate. Privacy changes how a yard feels right away.
Final thoughts: build privacy that feels good to live with
A pallet privacy fence isn’t just a budget trick. Done well, it’s a genuinely practical upgrade that makes your outdoor space feel calmer, more personal, and more usable. And if you lean into the best pallet fence ideas—clean lines, consistent spacing, a simple finish, and a few garden-friendly details—you end up with something that looks like it belongs in a home and gardens magazine… because it does.
If you want, tell me which build you’re leaning toward (whole pallets, horizontal slats, or freestanding panels), and I’ll tailor a tighter step-by-step with exact measurements and a materials list for a typical 8–12 foot section.