DIY Outdoor Patio Ideas for Remodeling Your Patio Space
Wouldn’t it be great to step into a stylish, functional outdoor patio space that hasn’t drained your savings account! With some creativity and effort, you can transform your patio into a personal oasis that reflects your unique style and meets your specific needs. DIY projects offer an affordable way to revamp your outdoor area, allowing you to express your creativity while keeping costs low.
Outdoor living spaces have become extensions of our homes, providing areas for relaxation, entertainment, and connection with nature. However, professional landscaping and high-end outdoor furniture can quickly become expensive. This is where DIY projects shine, offering budget-friendly alternatives that don’t compromise on style or function.
Below, will walk you through 10 budget-friendly DIY patio ideas. Whether you have a sprawling backyard or a cozy balcony, these projects will help you maximize your outdoor living area without emptying your wallet. With some planning and effort, you’ll be able to create a stunning patio space using these easy-to-follow DIY ideas.
DIY Patio Ideas on a Budget
Outdoor Patio Ideas DIY Cheap: Upscale Old Furniture
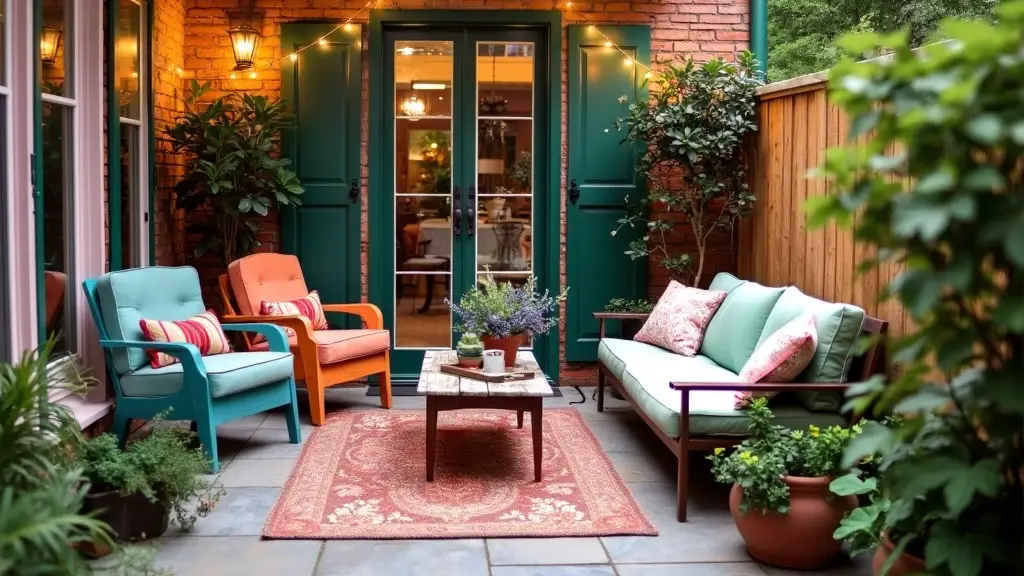
Breathing new life into old furniture provides a budget-friendly way to furnish your patio with unique, personalized pieces. This approach not only saves money but also reduces waste and allows you to create custom outdoor furniture that perfectly suits your style.
Materials needed:
- Old furniture pieces (chairs, tables, dressers)
- Sandpaper (80-grit and 220-grit)
- Exterior primer
- Exterior paint or spray paint
- Paintbrushes or foam rollers
- Outdoor fabric (if reupholstering)
- Staple gun and staples (for upholstery)
- Outdoor sealant
Steps:
- Clean the furniture thoroughly, removing all dirt and grime.
- Sand the surfaces, starting with 80-grit for rough areas, then finishing with 220-grit for smoothness.
- Apply exterior primer to help the paint adhere and increase durability.
- Once the primer dries, apply exterior paint. For a smooth finish, use multiple thin coats rather than one thick coat.
- For upholstered pieces, remove old fabric and padding. Replace with outdoor-grade foam and weather-resistant fabric.
- Apply an outdoor sealant to protect your work from the elements.
Project ideas:
- Transform an old wooden chair into a colorful planter by removing the seat and adding a planter box.
- Convert a dresser into an outdoor bar or storage unit by weatherproofing and adding a tiled top.
- Turn a metal headboard into a decorative trellis for climbing plants.
- Repurpose an old door as an outdoor dining table by adding legs and a glass top.
Tips:
- Choose furniture with good bones – solid wood or metal pieces work best for outdoor use.
- Opt for light colors to reflect heat and prevent fading.
- Use rust-resistant hardware when replacing knobs or hinges.
- Consider adding casters to larger pieces for easy mobility.
Upcycling old furniture for your patio allows you to create one-of-a-kind pieces that reflect your personal style while keeping costs low. This approach combines creativity with sustainability, giving new purpose to items that might otherwise end up in a landfill.
When selecting pieces to upcycle, look beyond their current state and envision their potential. An old, worn chair might become a charming plant stand, while a dated coffee table could transform into a stylish outdoor ottoman with the addition of some weather-resistant cushioning.
Remember that imperfections often add character to upcycled pieces. A slightly weathered look can contribute to a cozy, lived-in feel that’s perfect for outdoor spaces. Embrace the unique qualities of each piece and let them shine through in your redesign.
By upscaling old furniture, you’re not just creating affordable patio decor – you’re crafting a space filled with history, creativity, and personal flair. Each piece tells a story and contributes to a truly unique outdoor living area that’s sure to impress guests and provide you with a sense of accomplishment every time you step outside.
Outdoor Patio Ideas DIY Projects: Crate Bar
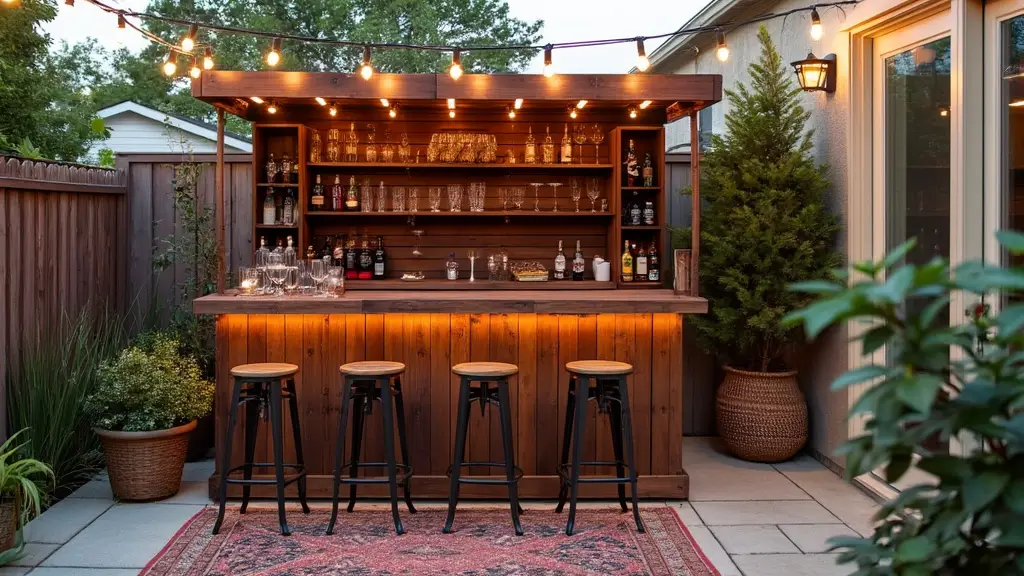
Create a stylish and functional outdoor bar using wooden crates. This project adds a touch of rustic charm to your patio while providing a dedicated space for entertaining.
Materials needed:
- 4-6 wooden crates
- Sandpaper
- Wood stain or exterior paint
- Screws and drill
- Countertop material (wood planks or tile)
- Optional: casters for mobility
Steps:
- Sand the wooden crates to smooth any rough edges.
- Apply wood stain or paint to the crates, ensuring even coverage. Allow to dry completely.
- Arrange the crates to form the bar structure. Typically, you’ll want to create a front-facing side and an inner bartender’s area.
- Secure the crates together using screws, ensuring the structure is stable.
- Create a countertop using wood planks or tile. For wood, sand, stain, and seal for durability. For tile, use outdoor-grade adhesive and grout.
- Attach the countertop to the crate structure.
- If desired, add casters to the bottom for easy movement.
Personalization ideas:
- Install shelving inside the crates for storage of glasses, bottles, or bar tools.
- Add a small refrigerator to one section for keeping drinks cool.
- Incorporate a built-in ice bucket or cooler for added functionality.
- Hang stemware holders underneath the top for space-saving glass storage.
This DIY crate bar provides a dedicated space for mixing drinks and entertaining guests, elevating your outdoor gatherings.
Outdoor Furniture Makeovers
DIY Outdoor Table Top Ideas Patio: Concrete Makeover

Give your old patio table a modern, industrial look with a DIY concrete top. This project breathes new life into worn-out furniture and creates a durable, weather-resistant surface.
Materials needed:
- Existing table frame
- Melamine board for mold
- Concrete mix
- Concrete sealer
- Sandpaper
- Release agent (cooking spray works well)
- Optional: decorative elements like marble chips, glass pieces or pebbles
Steps:
- Create a mold using melamine board, making it slightly larger than your table top.
- Apply a release agent to the inside of the mold for easy removal.
- Mix the concrete according to package instructions.
- Pour the concrete into the mold, tapping the sides to remove air bubbles.
- If desired, embed decorative elements into the wet concrete.
- Allow the concrete to cure fully (typically 24-48 hours).
- Remove the concrete slab from the mold and sand the edges smooth.
- Apply concrete sealer to protect from moisture and stains.
- Attach the new concrete top to your existing table frame.
Tips:
- For a smooth finish, use a vibrating sander and polisher on the mold while the concrete is still wet.
- Experiment with concrete pigments to create custom colors.
- Consider adding a drain hole if the table will be exposed to rain.
If you want to take it up a notch you can add marble chips into the concert mix. Using marble chips in concrete can indeed create a smooth, marble-like finish, but there are specific techniques and considerations to keep in mind.
Incorporating Marble Chips into Concrete
Benefits
- Aesthetic Appeal: Marble chips can enhance the visual appeal of concrete, giving it a luxurious and elegant look similar to that of polished marble.
- Durability: Unlike natural marble, which can be prone to staining and cracking, concrete mixed with marble chips can provide a durable surface that is less susceptible to damage.
Techniques
There are several methods to achieve a marble-like finish using marble chips:
- Mixing with Concrete: Marble chips can be mixed directly into the concrete before pouring. This method allows for a uniform distribution of the chips throughout the concrete, which can then be polished after curing to achieve a smooth finish.
- Overlay Systems: For existing concrete surfaces, a marble chip overlay can be applied. This involves placing a layer of concrete mixed with marble chips over the existing surface. Once cured, it can be polished to reveal the marble chips and create a smooth finish.
- Polishing: After the concrete has cured, polishing is essential to achieve the desired smoothness and sheen. Using diamond polishing pads, you can start with a lower grit and work your way up to a higher grit for a glossy finish. This process reveals the beauty of the marble chips and creates a sleek surface.
Considerations
Sealing: After polishing, it’s advisable to seal the surface to protect it from stains and enhance its longevity. A good quality sealant will help maintain the marble-like appearance over time
Mix Ratio: The amount of marble chips used will affect the final appearance and texture. Experimenting with different ratios can help achieve the desired look.
This concrete tabletop makeover combines durability with style, creating a weather-resistant surface that will last for years.
Outdoor Patio Ideas DIY Pallet Sofa: Cozy Seating
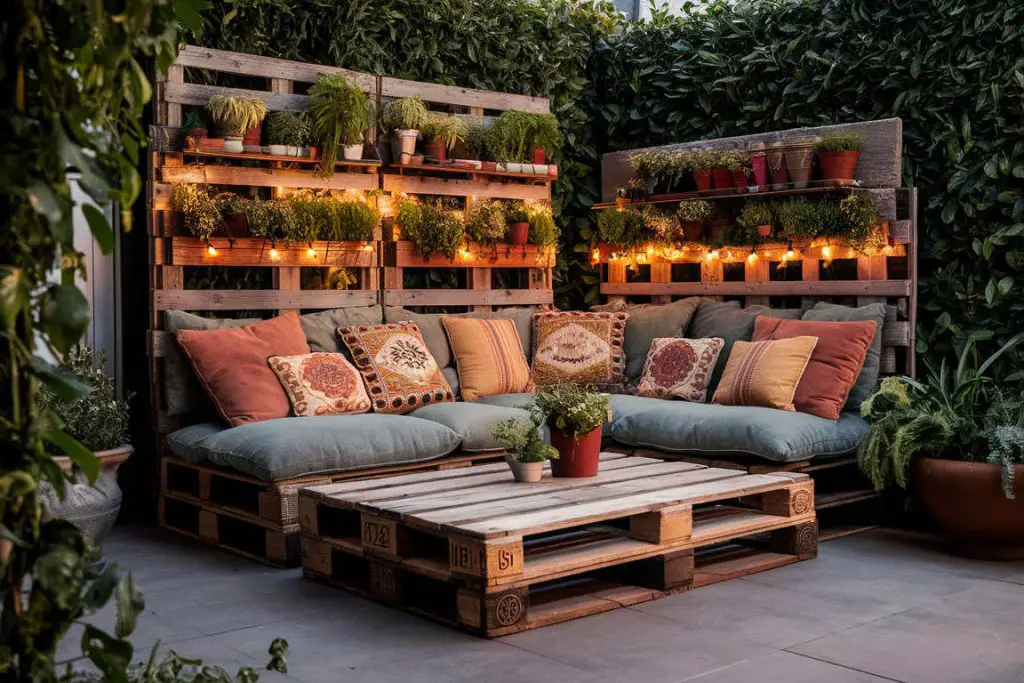
Building a pallet sofa is an excellent way to add comfortable, customizable seating to your patio. This project allows you to create a unique piece of furniture tailored to your space and style preferences.
Materials needed:
- 3-4 wooden pallets
- Sandpaper (60-grit and 120-grit)
- Weather-resistant wood stain or exterior paint
- Screws and drill
- Outdoor cushions and throw pillows
- Optional: wheels for mobility
Steps:
- Clean the pallets thoroughly, removing any dirt or debris.
- Sand the pallets, starting with 60-grit sandpaper to remove splinters and rough spots, then finish with 120-grit for a smooth surface.
- Apply weather-resistant wood stain or exterior paint to protect the wood from the elements. Allow to dry completely.
- Stack two pallets for the base, securing them together with screws for stability.
- Attach a third pallet vertically to create the backrest, ensuring it’s securely fastened to the base.
- If desired, add a fourth pallet to extend the seating area or create an L-shaped sofa.
- Optional: Attach wheels to the bottom of the base for easy movement.
- Place outdoor cushions on the seat and backrest, and add throw pillows for extra comfort and style.
Customization ideas:
- Create a modular design that allows you to rearrange the seating configuration.
- Add a fold-down arm with cup holders for convenience.
- Incorporate storage by leaving spaces between the pallet slats accessible.
This DIY pallet sofa not only provides comfortable seating but also showcases your creativity and DIY skills, becoming a focal point of your outdoor space.
Outdoor Decor on a Budget
Cute Outdoor Patio Ideas DIY: Mason Jar Lanterns
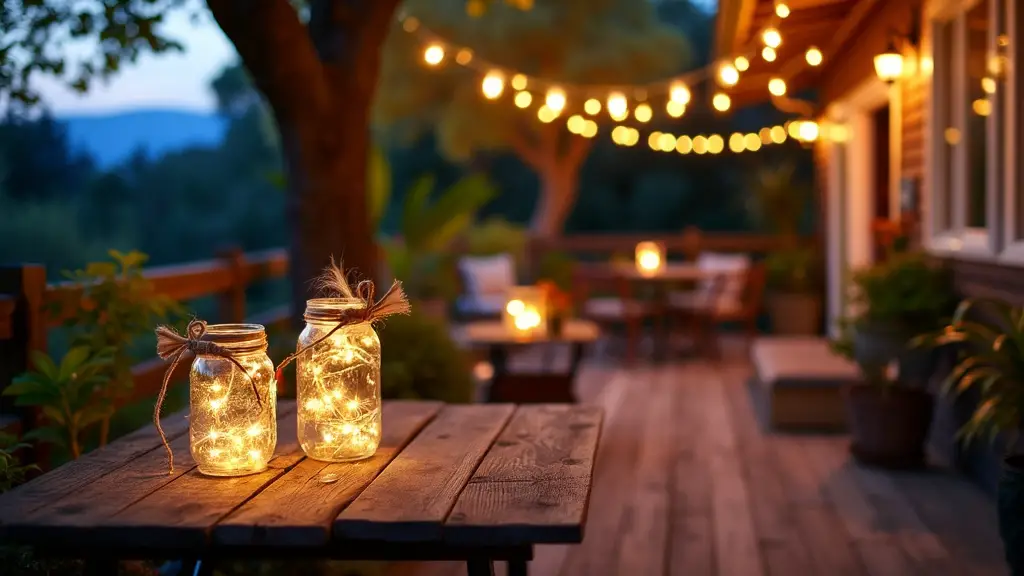
Create a magical ambiance on your patio with DIY mason jar lanterns. This simple yet charming project adds soft lighting and a touch of whimsy to your outdoor space.
Materials needed:
- Mason jars (various sizes work well)
- Wire for hanging
- Tea lights or battery-operated LED lights
- Optional: colored glass paint
- Pliers
- Optional: decorative elements like ribbons or twine
Steps:
- Clean the mason jars thoroughly and let them dry completely.
- If desired, apply colored glass paint to the inside of the jars for a tinted effect. Allow to dry according to paint instructions.
- Using pliers, wrap wire around the neck of each jar to create a secure hanger. Leave enough wire to form a hook or loop for hanging.
- Place a tea light or LED light inside each jar.
- Hang the lanterns from trees, pergolas, or shepherd’s hooks around your patio.
Variations:
- Fill the bottom of the jars with sand or pebbles for added stability and decoration.
- Use different colored jars or paints to create a rainbow effect.
- Wrap twine or ribbon around the jar’s neck for a rustic touch.
- For a coastal theme, add small seashells or beach glass to the jars.
These DIY mason jar lanterns create a warm, inviting glow that transforms your patio into a cozy retreat as the sun sets.
Small Outdoor Patio DIY Ideas: Vertical Garden
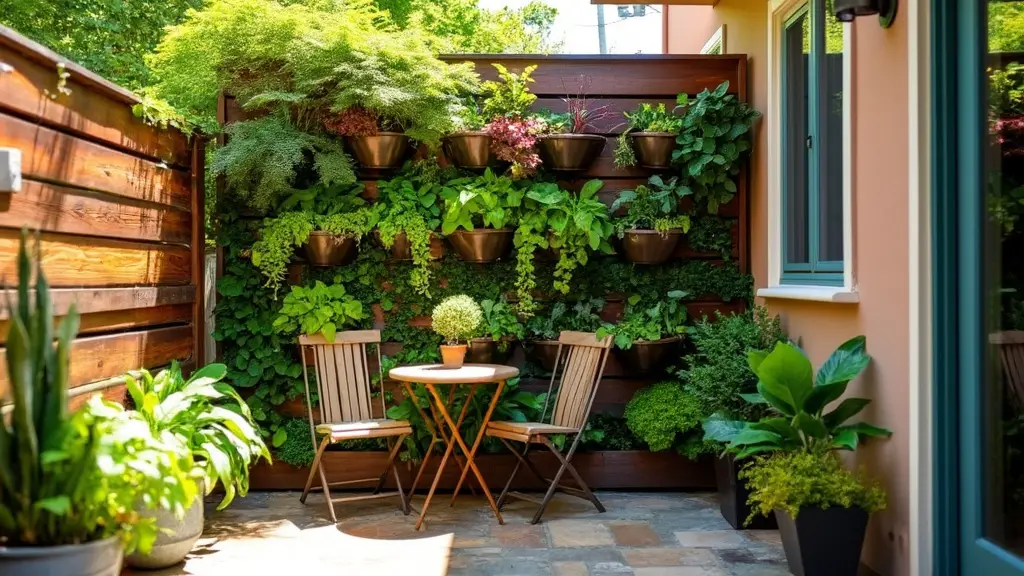
Maximize your patio space with a DIY vertical garden. This project allows you to add greenery without sacrificing valuable floor space, making it perfect for small patios or balconies.
Materials needed:
- Wooden pallet or pre-made vertical planter
- Landscaping fabric
- Staple gun and staples
- Potting soil
- Plants (succulents, herbs, or flowers work well)
- Screws and drill for mounting
Steps:
- If using a pallet, sand it to remove any rough spots and apply a weather-resistant finish.
- Cut landscaping fabric to size and staple it to the back and bottom of each shelf or section.
- Mount the pallet or planter securely to a wall or fence, ensuring it can support the weight when filled.
- Fill each section with potting soil.
- Plant your chosen greenery, considering sunlight requirements and growth patterns.
- Water thoroughly and allow excess water to drain.
Plant selection tips:
- For a lush look, combine trailing plants with upright ones.
- Herbs make a functional choice for a kitchen patio.
- Succulents are low-maintenance and drought-resistant.
- Consider seasonal flowers for changing color throughout the year.
This vertical garden not only adds visual interest to your patio but can also serve as a natural privacy screen or even a small vegetable garden.
Outdoor Storage and Functionality
Outdoor Refrigerator Ideas Patio DIY: Custom Cooling Station
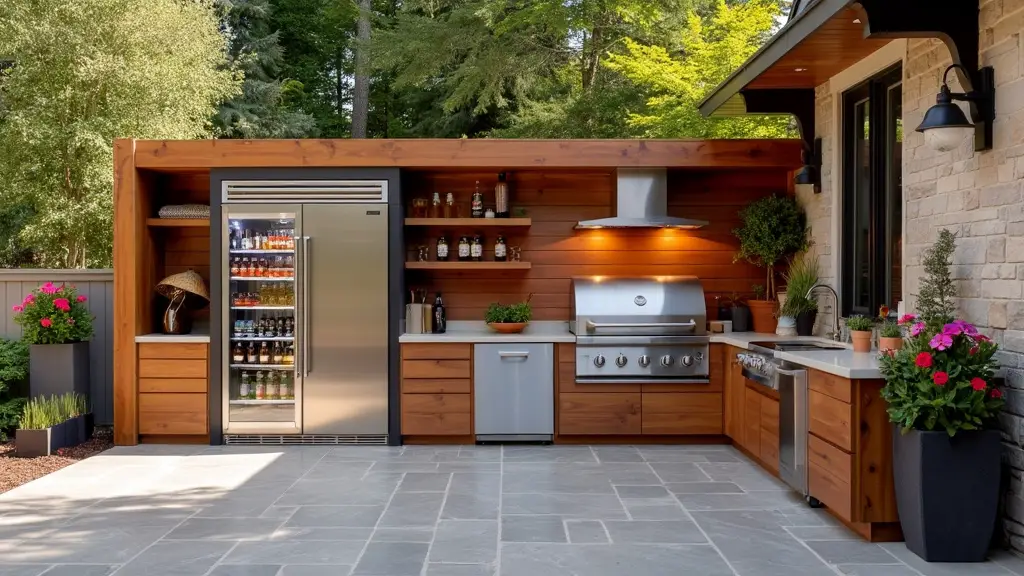
Keep your drinks cool and your outdoor kitchen organized with a DIY outdoor refrigerator station. This project combines functionality with style, creating a dedicated space for refreshments.
Materials needed:
- Mini refrigerator
- Pressure-treated lumber or weather-resistant wood
- Exterior grade plywood
- Weather-resistant screws and hinges
- Exterior paint or stain
- Optional: casters for mobility
Steps:
- Measure your mini fridge and design an enclosure that allows for proper ventilation.
- Cut the lumber and plywood to size according to your design.
- Assemble the frame of the enclosure, ensuring it’s sturdy and level.
- Create a door with hinges to access the fridge. Make sure it closes securely.
- Add shelving or a countertop above the fridge for extra utility.
- Paint or stain all wooden components for weather protection.
- Install the mini fridge into the enclosure.
- If desired, add casters to the bottom for mobility.
Additional features to consider:
- Built-in bottle opener and cap catcher
- Towel rack or hooks for bar towels
- Small drawer for storing bottle openers, corkscrews, etc.
- Fold-down side table for extra prep space
This DIY outdoor refrigerator station keeps your drinks cool while blending seamlessly with your patio decor, enhancing your outdoor entertaining capabilities.
Patio Ceiling Ideas Outdoor DIY: Retractable Canopy
Create adaptable shade for your patio with a DIY retractable canopy. This project allows you to enjoy your outdoor space in various weather conditions and times of day.
Materials needed:
- Weather-resistant fabric
- PVC pipes or wooden dowels
- Eye hooks
- Rope or paracord
- Sewing machine (or fabric glue for a no-sew option)
- Mounting hardware appropriate for your patio structure
Steps:
- Measure the area you want to cover, accounting for slope if desired.
- Cut fabric to size, allowing extra for hems and rod pockets.
- Hem all sides of the fabric and create pockets for the PVC pipes or dowels.
- Install eye hooks in your patio structure, ensuring they’re securely anchored.
- Thread the pipes or dowels through the fabric pockets.
- Attach rope or paracord to the front edge of the canopy.
- Thread the rope through the eye hooks and down to a tie-off point.
Usage tips:
- Use a pulley system for easier operation of larger canopies.
- Install a cleat at the tie-off point for secure storage of the ropes.
- Consider adding weights to the front edge for windy conditions.
This flexible shading solution allows you to adjust for sun position or retract completely on cooler days, maximizing the usability of your patio throughout the year.
Budget-Friendly Patio Makeovers
Back Patio Ideas on a Budget DIY Outdoor Areas: Pallet Planter Boxes
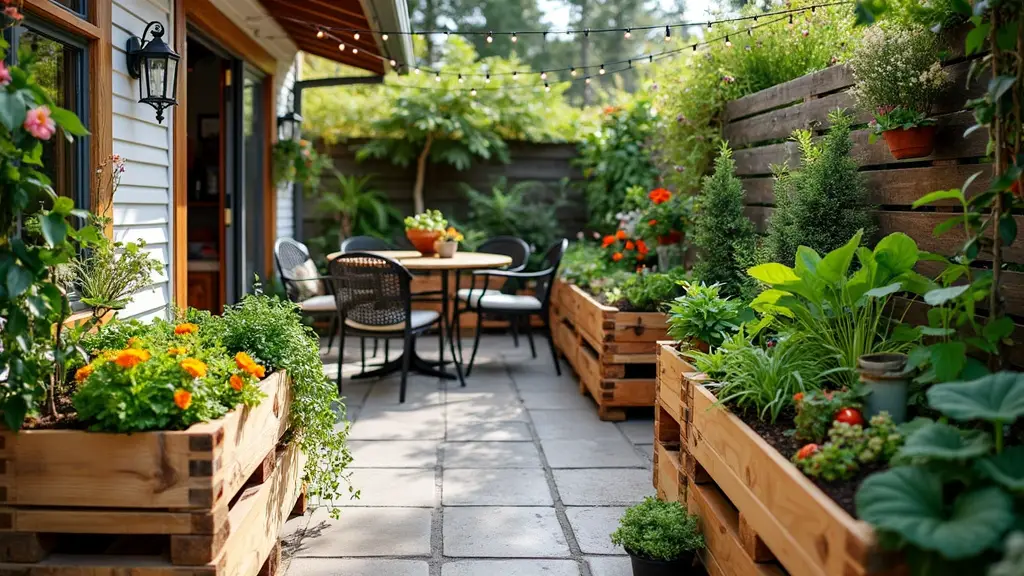
Add greenery and define spaces in your patio with DIY pallet planter boxes. These versatile containers can be used for flowers, herbs, or even vegetables, combining beauty with functionality.
Materials needed:
- Wooden pallets
- Saw
- Sandpaper
- Wood stain or exterior paint
- Landscaping fabric
- Staple gun and staples
- Screws and drill
Steps:
- Disassemble the pallet and cut pieces to your desired planter size.
- Sand all wood pieces to remove splinters and rough edges.
- Assemble the box, leaving small gaps between bottom slats for drainage.
- Apply wood stain or exterior paint for weather protection. Allow to dry completely.
- Line the inside of the planter with landscaping fabric, stapling it in place.
- Fill with potting soil and plants.
Design variations:
- Create tiered planters for a cascading effect.
- Attach wheels to the bottom for mobile greenery.
- Build narrow, tall planters for privacy screening.
- Incorporate a trellis for climbing plants.
These DIY pallet planter boxes offer an eco-friendly way to add natural elements to your patio, creating visual interest and potentially even a source of fresh herbs or vegetables.
Easy DIY Outdoor Patio Ideas: Fire Pit
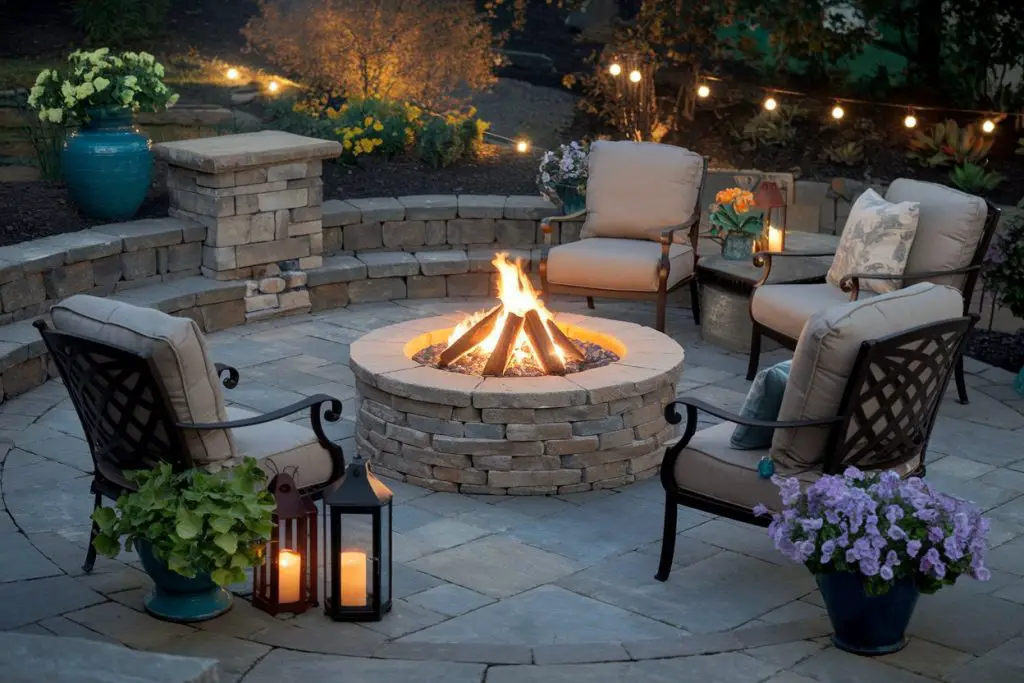
A DIY fire pit can become the cozy focal point of your patio, extending its usability into cooler evenings and creating a natural gathering spot for friends and family.
Materials needed:
- Retaining wall blocks
- Gravel
- Sand
- Metal fire pit ring (optional but recommended)
- Level
- Shovel
- Gloves
Steps:
- Choose a level spot for your fire pit, away from structures and overhanging branches.
- Mark out the circumference of your fire pit.
- Dig out the area to a depth of about 6 inches.
- Fill the excavated area with gravel for drainage.
- Lay the first layer of retaining wall blocks in a circle on the gravel bed.
- Use a level to ensure the blocks are even.
- Add subsequent layers of blocks, staggering the joints for stability.
- Fill the center with sand.
- If using, place the metal fire pit ring in the center.
Safety considerations:
- Check local regulations regarding fire pits before building.
- Maintain a safe distance from structures and flammable materials.
- Keep a fire extinguisher or water source nearby when in use.
- Never leave a fire unattended.
A DIY fire pit not only adds warmth and ambiance to your patio but also creates a central point for socializing and relaxation.
Final Thoughts
With these 10 DIY patio ideas, you can transform your outdoor space into a personalized oasis without straining your budget. From cozy seating solutions to functional outdoor kitchens, these projects offer something for every taste and skill level.
Remember to plan your projects carefully, considering your space, climate, and how you intend to use your patio. Always prioritize safety, using appropriate tools and protective gear when necessary.
The joy of DIY projects lies not just in the money saved, but in the satisfaction of creating something uniquely yours. Each piece you craft adds character to your outdoor space and becomes a conversation starter for guests.
Don’t feel pressured to tackle everything at once. Start with one or two projects that will make the biggest impact on your patio’s functionality and aesthetics. As you gain confidence and skills, you can take on more complex projects.
Ultimately, your patio should be a reflection of your personal style and needs. These DIY projects allow you to customize every aspect, from color schemes to functionality, ensuring your outdoor space truly feels like an extension of your home.
As you work on these projects, don’t be afraid to get creative and put your own spin on the ideas presented. Maybe you’ll combine elements from different projects or come up with entirely new ways to use the materials suggested. This experimentation is part of the fun and satisfaction of DIY work.
Once completed bear in mind that maintaining your DIY creations is just as important as building them. Here are some tips to keep your patio projects looking great for years to come:
- Regularly clean and inspect your DIY items for any signs of wear or damage.
- Reapply weather-resistant finishes to wooden projects annually or as needed.
- Store cushions and fabric items indoors during harsh weather or invest in weather-resistant storage solutions.
- Trim plants in your vertical garden or planters regularly to maintain their appearance and health.
- Touch up paint or stain as needed to keep your projects looking fresh.
As you revamp your patio, you may find that your outdoor space becomes a favorite spot for relaxation, entertainment, or even work. A well-designed patio can serve multiple purposes:
- A peaceful retreat for morning coffee or evening relaxation
- An outdoor dining area for family meals or entertaining friends
- A home office space for those who work remotely
- A play area for children, with durable, kid-friendly furniture and decor
- A gardening zone for growing flowers, herbs, or vegetables
If you get stuck in to remodeling your patio along the lines of these DIY ideas, you’re not just improving your home’s aesthetic appeal – you’re also potentially increasing its value. A well-designed outdoor living space can be a significant selling point if you ever decide to put your home on the market.
Moreover, spending time on DIY projects and subsequently enjoying your revamped outdoor space can have positive effects on your well-being. Working with your hands can be a great stress reliever, and spending time outdoors has been linked to improved mood and reduced anxiety.
As you embark on your patio transformation journey, remember that perfection isn’t the goal. Each small imperfection in your DIY projects adds character and tells a story. These are the details that make your space unique and personal.
Don’t Be Afraid to Get Help In
Don’t hesitate to involve family members or friends in your projects. DIY work can be a great bonding activity, and you might be surprised by the creative ideas others bring to the table. Plus, having an extra pair of hands can make larger projects more manageable and enjoyable.
Lastly, remember, your reimagined patio is more than just an outdoor space – it’s a testament to your creativity, So, host a small gathering to showcase your hard work, or simply spend a quiet evening appreciating the fruits of your labor