Underfoot Transformation: How to Design and Build a Gravel Garden Pathway
The sky opens up. Rain hammers against the roof with a relentless rhythm. You rush out to the backyard to close the window before the wind drives water onto your hardwood floors. Your foot lands on the slick grass near the patio. Mud sucks at your shoe. You slip, catching yourself awkwardly on a wet fence post, ruining your shoes and ruining the mood. The garden is not a sanctuary right now. It is a hazard.
This scenario plays out in backyards everywhere when the seasons turn wet. Dirt paths become boggy traps. Grass wears thin from heavy foot traffic. The solution lies not in pouring expensive concrete or laying complex brickwork. The answer is found in stone.
A gravel pathway offers stability where there was once slip and slide. It transforms a muddy mess into a structured, navigable space. Below, we will guide you through everything from selecting gravel path ideas to the physical labor of construction. You will learn that creating a budget-friendly gravel path does not mean sacrificing elegance. A gravel garden path is about defining space, improving drainage, and creating a permanent structure for your garden to grow around.
The Case for Stone
When homeowners think of hardscaping, they often picture poured concrete or intricate paver patios. While those have their place, a gravel walkway offers unique benefits that solid surfaces cannot match. The primary advantage is drainage. Solid concrete forces water to run off, which can lead to pooling near your foundation or erosion in lower parts of the yard. Gravel allows water to permeate the surface and soak into the ground below. This reduces runoff and keeps the path dry enough to walk on shortly after a storm.
Cost is another major factor. Landscaping budgets can vanish quickly when purchasing materials. A budget-friendly gravel path costs a fraction of the price of flagstone or brick. The materials are cheaper, and the labor is less intensive. You do not need mortar, mixers, or specialized masonry tools. This makes it an accessible project for the average homeowner.
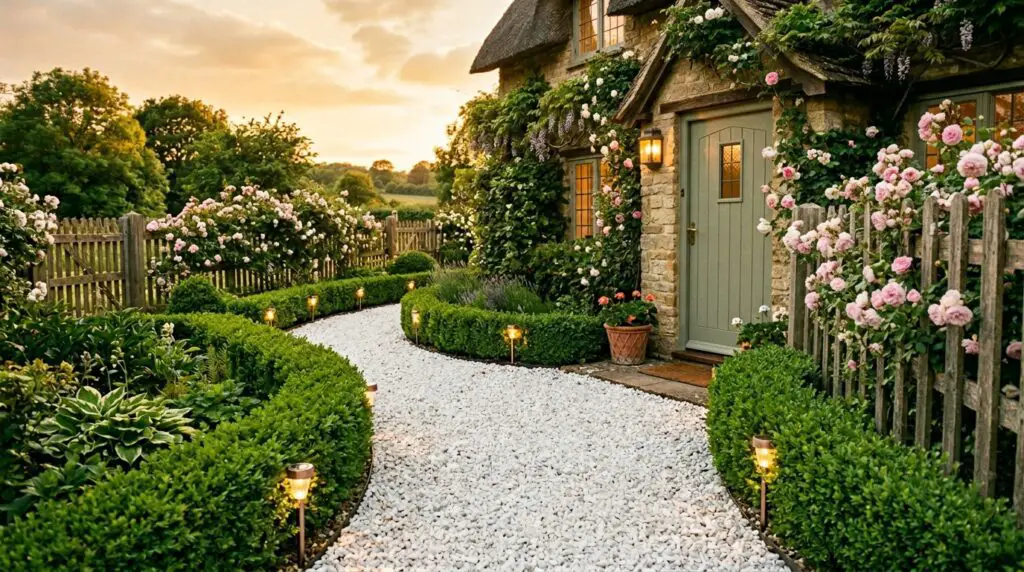
There is also the matter of flexibility. A gravel garden path can fit any style. It can look rustic and cottage-like or sleek and modern depending on the stone you choose. It softens the hardscape while providing solid footing. Furthermore, learning how to lay a gravel path is manageable for a weekend warrior. Unlike laying brick which requires precision leveling and curing time, gravel is forgiving. If you make a mistake, you can simply rake it out and try again. This flexibility encourages creativity without the fear of permanent failure.
Selecting Your Stone
Not all stone is created equal. Walking into a landscaping supply yard can be overwhelming given the variety of colors and sizes available. Understanding the difference between types of stone will help you choose the right material for your specific needs.
Pea Gravel Versus Crushed Stone
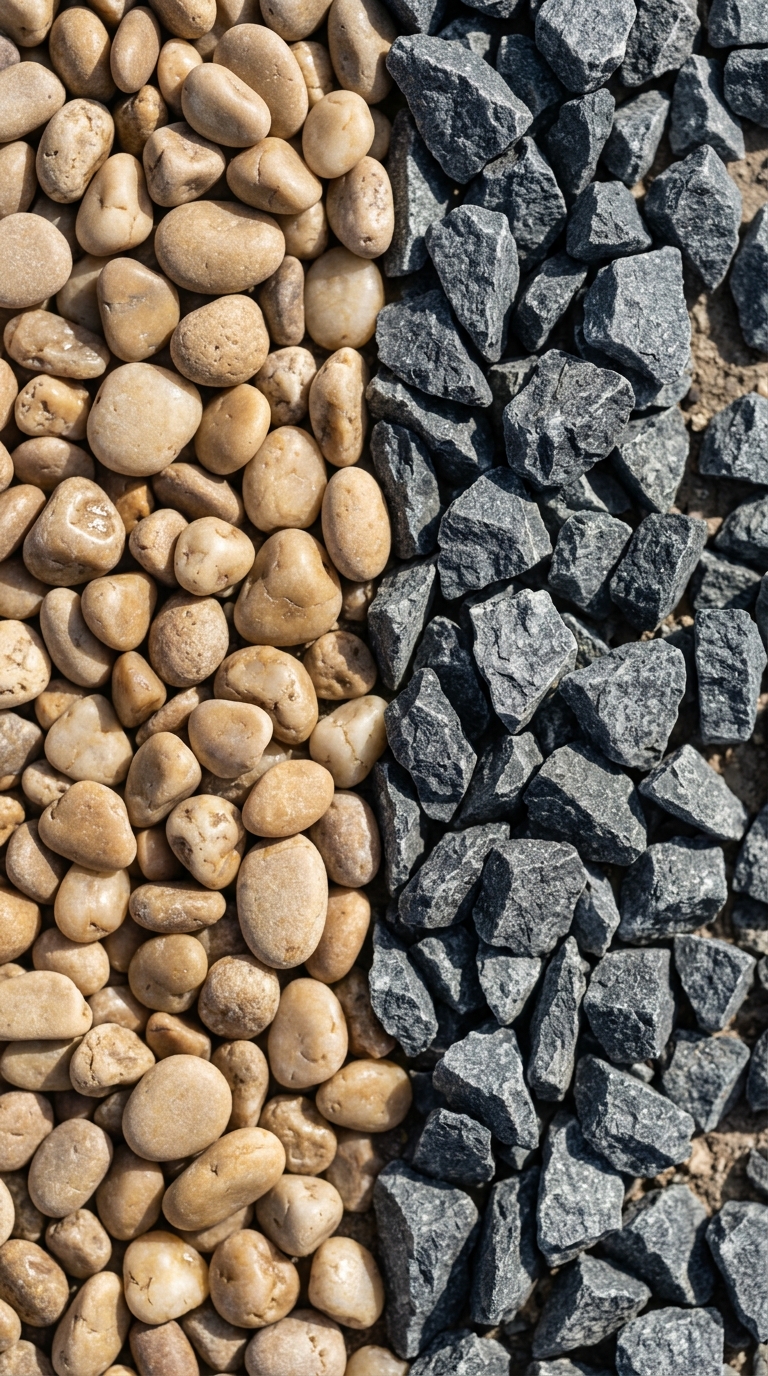
The most common choice is pea gravel. These are small, smooth, rounded stones usually about the size of a pea. A pea gravel garden looks charming and feels comfortable underfoot. It is pleasant to walk on barefoot. However, because the stones are round, they do not lock together. They shift under pressure like ball bearings. This makes them less ideal for steep slopes or high-traffic areas where stability is crucial.
For areas that need to stay put, consider angular crushed stone. These stones have jagged edges that interlock when compacted. This creates a compressed gravel pathway that feels almost solid. It is excellent for main walkways or driveways where you do not want the material shifting every time you step. Decomposed granite is another option in this category. It breaks down into a fine mix of gravel and sand that packs down very hard.
Color Psychology
The color of your stone changes the feel of the garden. A white gravel path reflects light. It brightens up shady corners and looks stunning under moonlight. This is a popular choice for modern designs or Mediterranean styles where light and airiness are key. However, white stone shows dirt and fallen leaves more easily. It requires more frequent cleaning to maintain its crisp look.
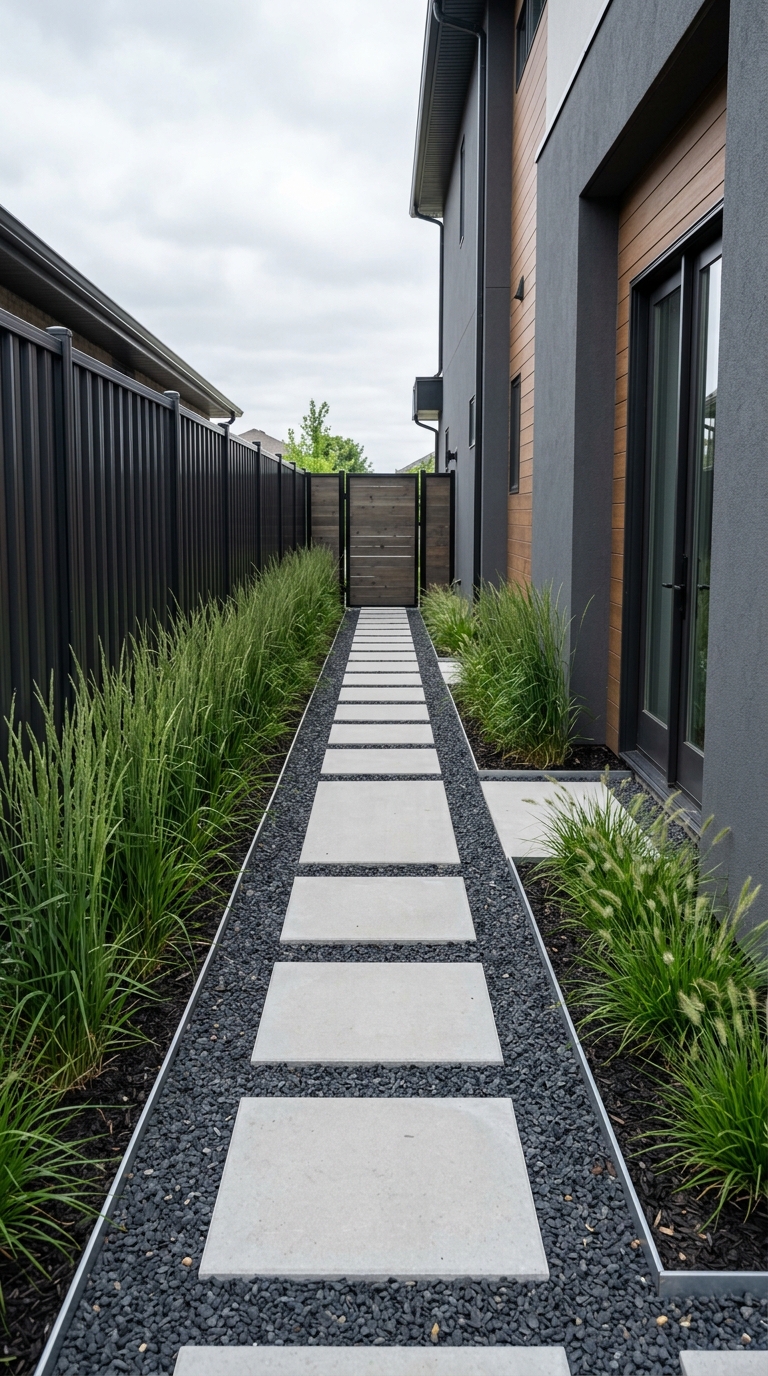
Conversely, a dark stone gravel path grounds the garden. Basalt or dark granite makes plant colors pop. Green foliage looks vibrantly alive against a dark background. Dark stone also hides dirt and debris better than light stone. It is a practical choice for high-traffic zones or areas under trees where leaf drop is common. Consider the surrounding architecture and plant palette when making this choice. The stone should complement the home, not clash with it.
Containing the Flow
One of the biggest mistakes people make when building a diy gravel pathway is skipping the edging. Without a border, garden pathways gravel will migrate. It will spill into the lawn, get caught in the mower, and disappear into flower beds. Within a year, your path will look unkempt and wide. Proper containment is essential for longevity.
Material Options for Edging
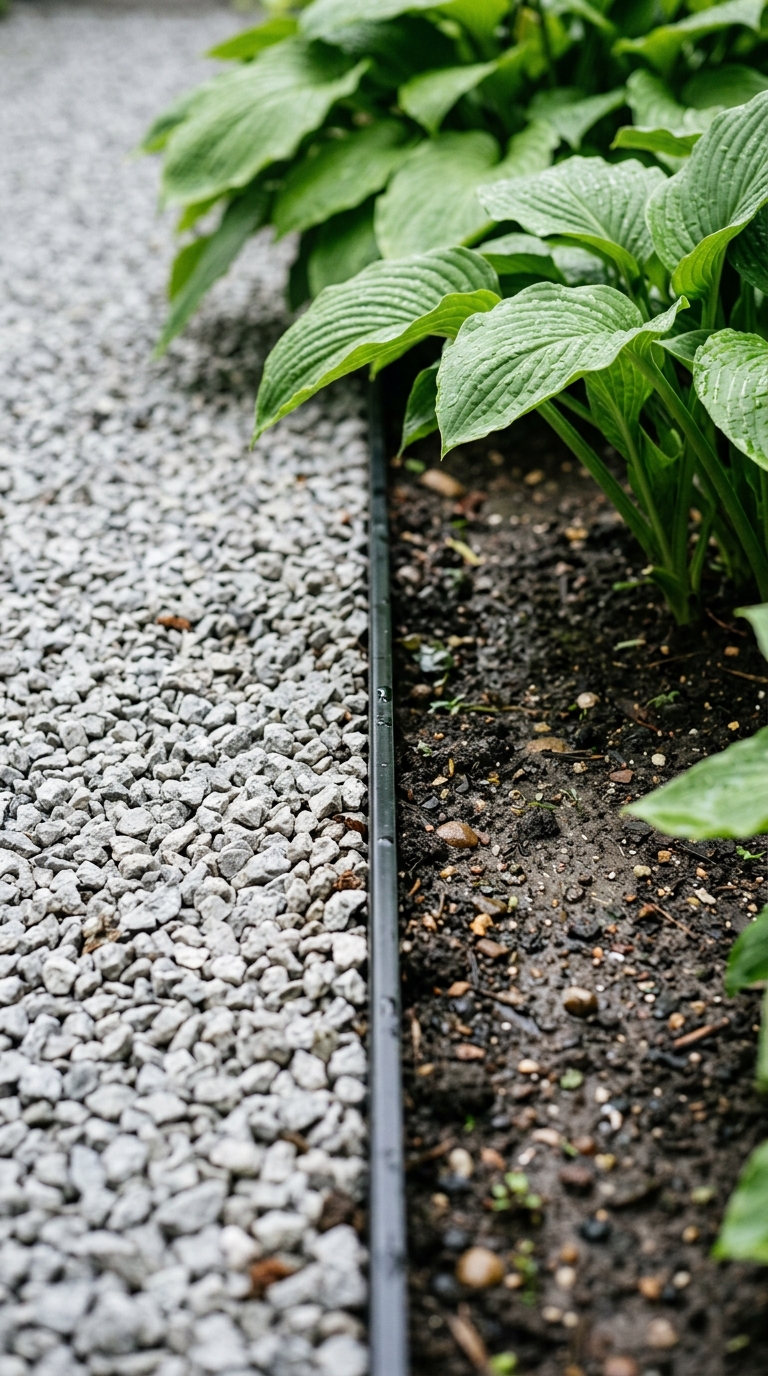
There are several effective ways to handle gravel walkway edging. Metal edging is a top choice for a clean look. It is sleek, durable, and can be nearly invisible if installed correctly. You sink it into the ground so only a thin lip shows above the stone. This is ideal for modern gravel path border needs where you want the focus on the plants and stone.
Wood is another option. Timber or railroad ties create a rustic, natural look. This works well for cottage gardens or woodland settings. The downside is that wood eventually rots. You may need to replace it after several years. Brick or stone pavers set on edge create a classic, heavy separation. This is more labor-intensive to install but adds a decorative element to the path itself.
You can also use living edges. Low-growing plants like mondo grass or liriope can hold the line naturally. This blurs the line between hardscape and softscape. However, you must ensure the plants are dense enough to stop the stone from rolling out.
Installation Tips
Regardless of the material, gravel path edging ideas must include proper anchoring. You need to dig a trench along the sides of your path to seat the edging. If you just place it on top of the soil, frost heave and ground movement will tip it over. Drive stakes into the ground behind the edging to hold it firm. Ensure the top of the edging sits slightly higher than the final level of the gravel. This creates a dam that keeps the stone contained even when you are raking or walking heavily on the path.
Building the Path
Now comes the physical work. Knowing how to lay a gravel path properly ensures it lasts for years without sinking or becoming weed-infested. Follow these steps to build a solid foundation.
Step 1: Planning the Route
Mark the path with spray paint or a garden hose. Walk the line to ensure it feels natural. Curves should be gentle rather than sharp. Make sure there is enough width for two people to walk abreast if this is a main entrance. A standard width is three to four feet.
Step 2: Excavation
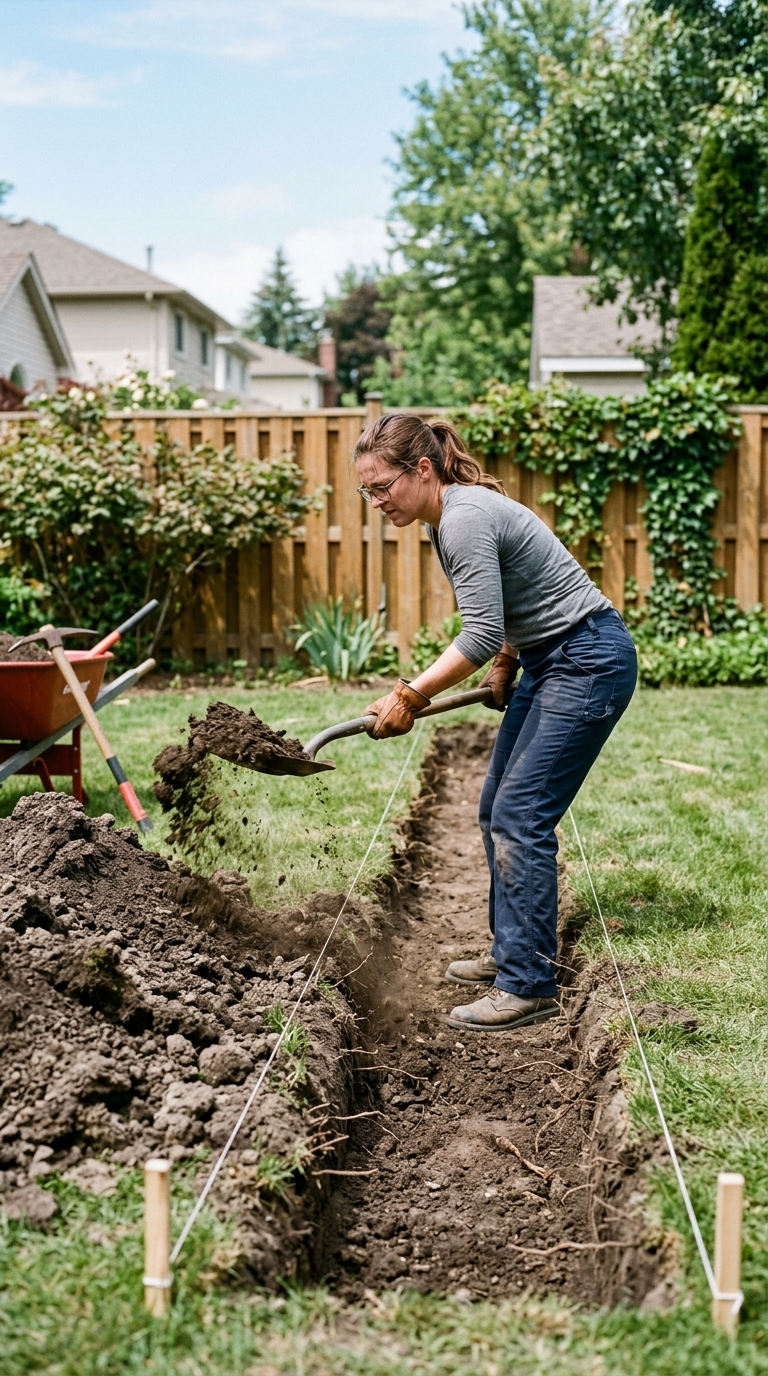
This is the most labor-intensive part of a diy gravel pathway. You need to dig down about four to six inches. Remove all grass, roots, and organic material. If you leave grass underneath, it will decompose and cause the path to sink. It will also try to grow back through the stone. Create a slight crown in the middle of the path so water runs off to the sides rather than pooling in the center.
Step 3: The Base Layer
Do not skip the base. Pour a layer of larger crushed stone about two inches deep. This provides drainage and stability. It prevents the finer top layer of gravel from mixing with the clay soil below. Compact this base layer with a hand tamper or a plate compactor. A solid base prevents ruts from forming later.
Step 4: Landscape Fabric
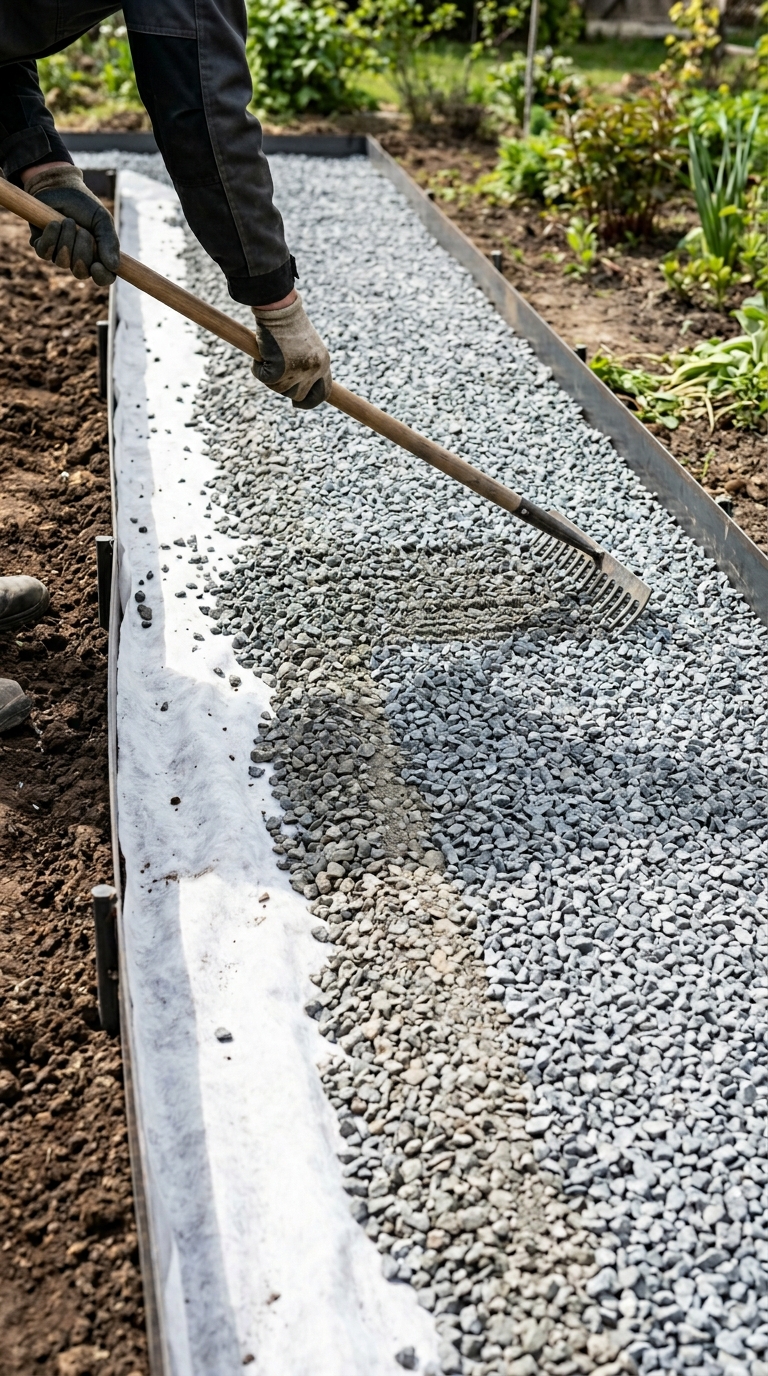
Lay down high-quality permeable landscape fabric over the base. This stops weeds from growing up through the path. There is debate about fabric. Some say it clogs over time. However, for a home garden, it significantly reduces maintenance. Make sure the fabric overlaps at the seams by at least six inches. Push the fabric up against the sides of your gravel walkway edging.
Step 5: Laying the Stone
Pour your chosen garden pathways gravel onto the fabric. Aim for a depth of about two to three inches. If you go too shallow, the fabric will show through. If you go too deep, walking becomes difficult. Rake the stone evenly across the surface.
Step 6: Compaction
If you are using angular stone or decomposed granite, use a plate compactor to create a compressed gravel pathway. This locks the stones together. If you are using pea gravel, simply walking on it is enough. Do not compact pea gravel too hard or it loses its loose, crunchy texture.
Designing the Look
Once the construction is done, you can focus on aesthetics. A gravel pathway is a canvas for your design style. The way you style the path changes the entire feel of the outdoor space.
Curves Versus Lines
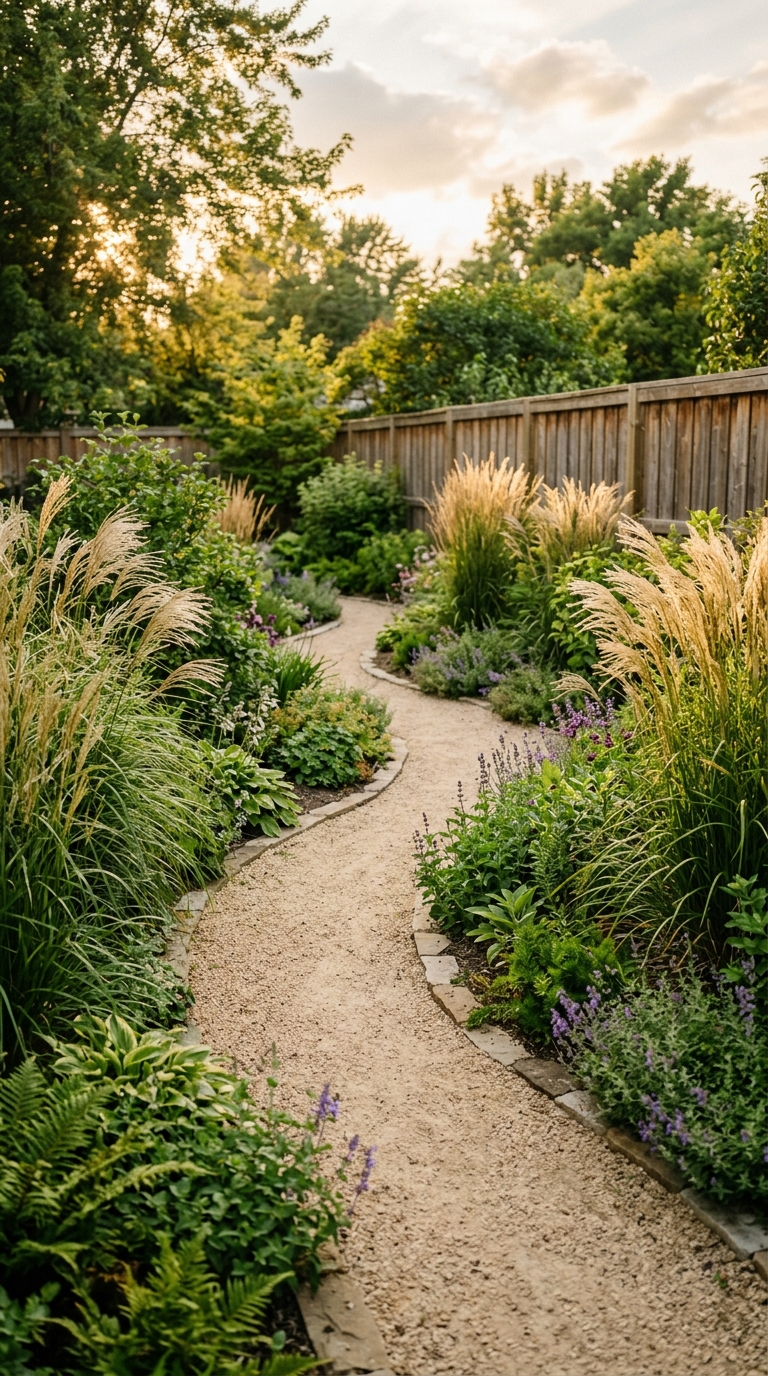
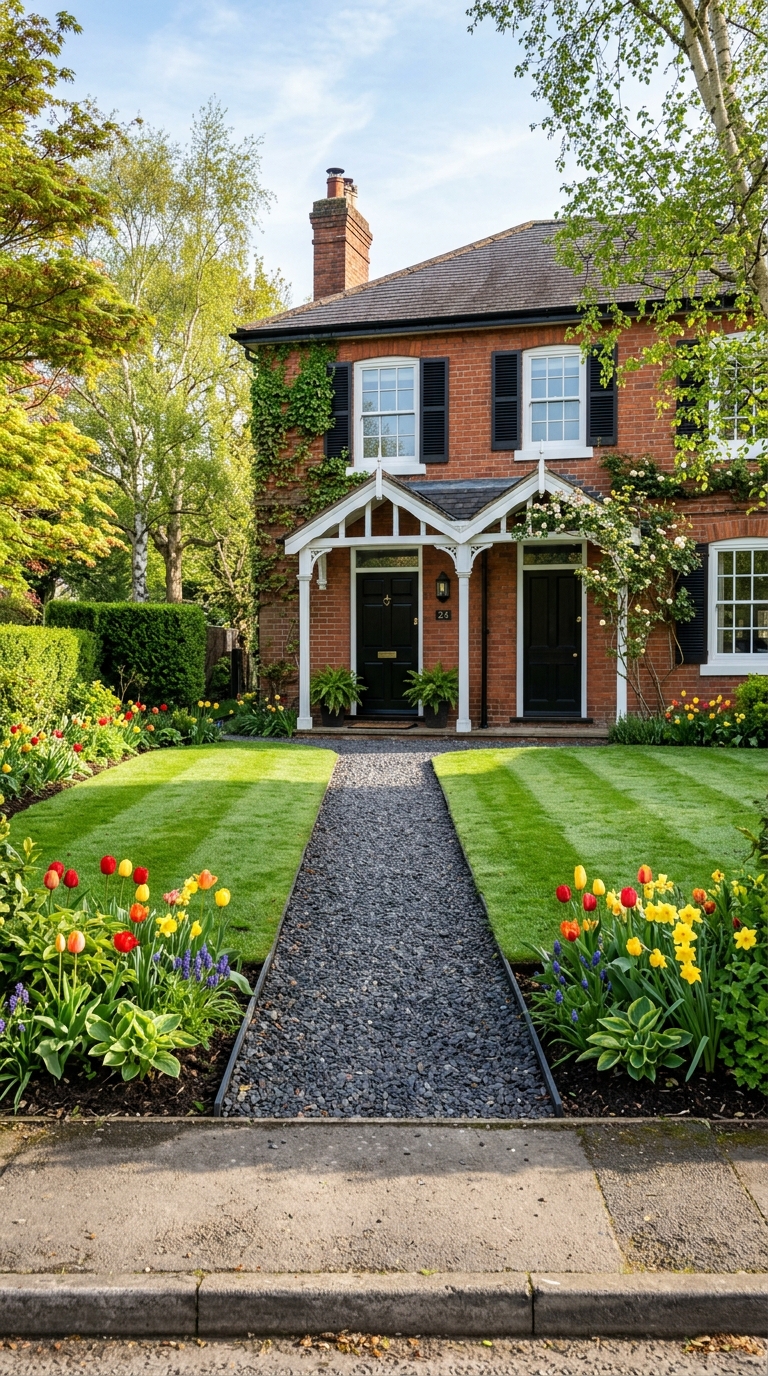
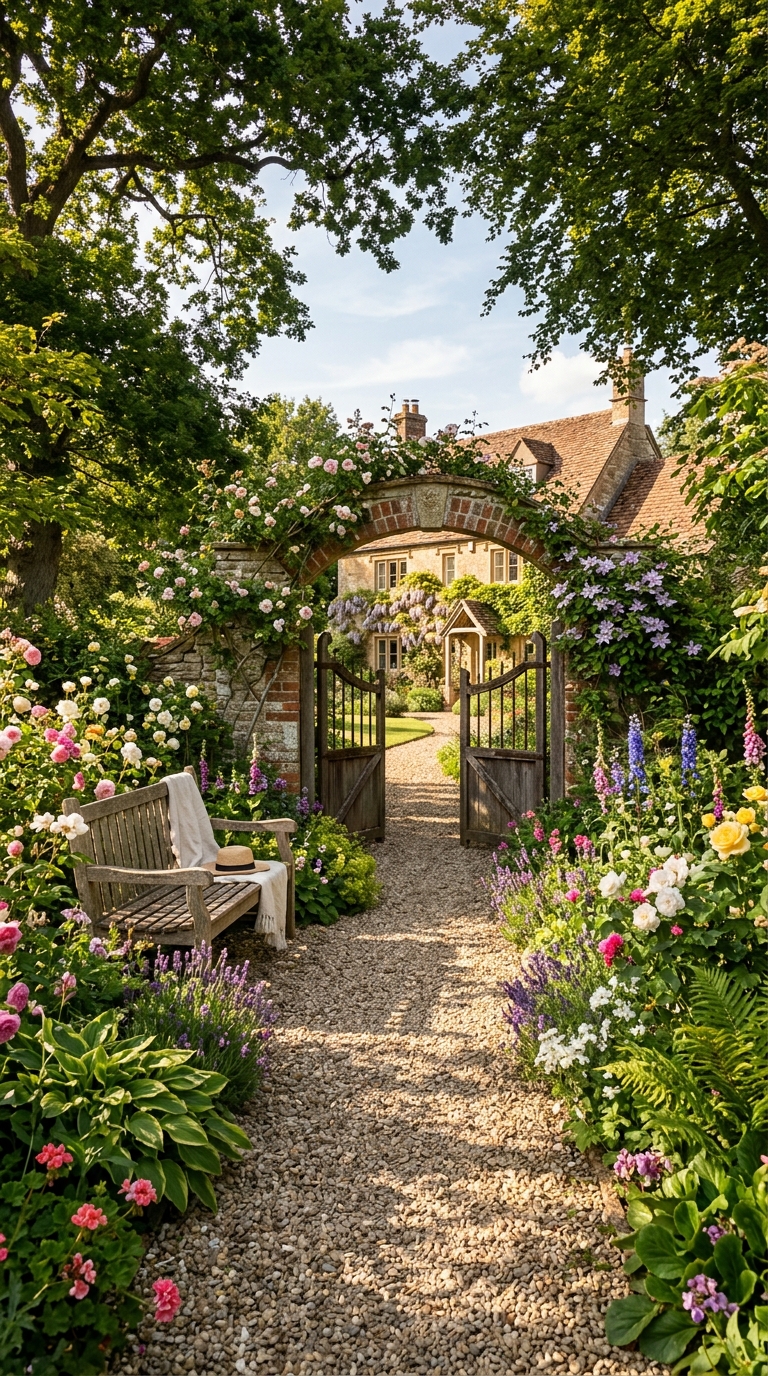
The shape of the path dictates the mood. Curved gravel garden path lines feel more natural and inviting. They encourage slow walking and exploration. This suits cottage gardens and informal landscapes. Straight lines feel formal and direct. They guide the eye quickly to a focal point like a front door or a statue. This suits modern or colonial styles.
Mixing Materials
You do not have to use only gravel. Incorporating stepping stones within the gravel garden path provides solid footing every few steps. This is practical for carrying groceries or trays. It also adds visual interest. Large flagstones set into the gravel break up the monotony of the small stones.
Lighting and Plants
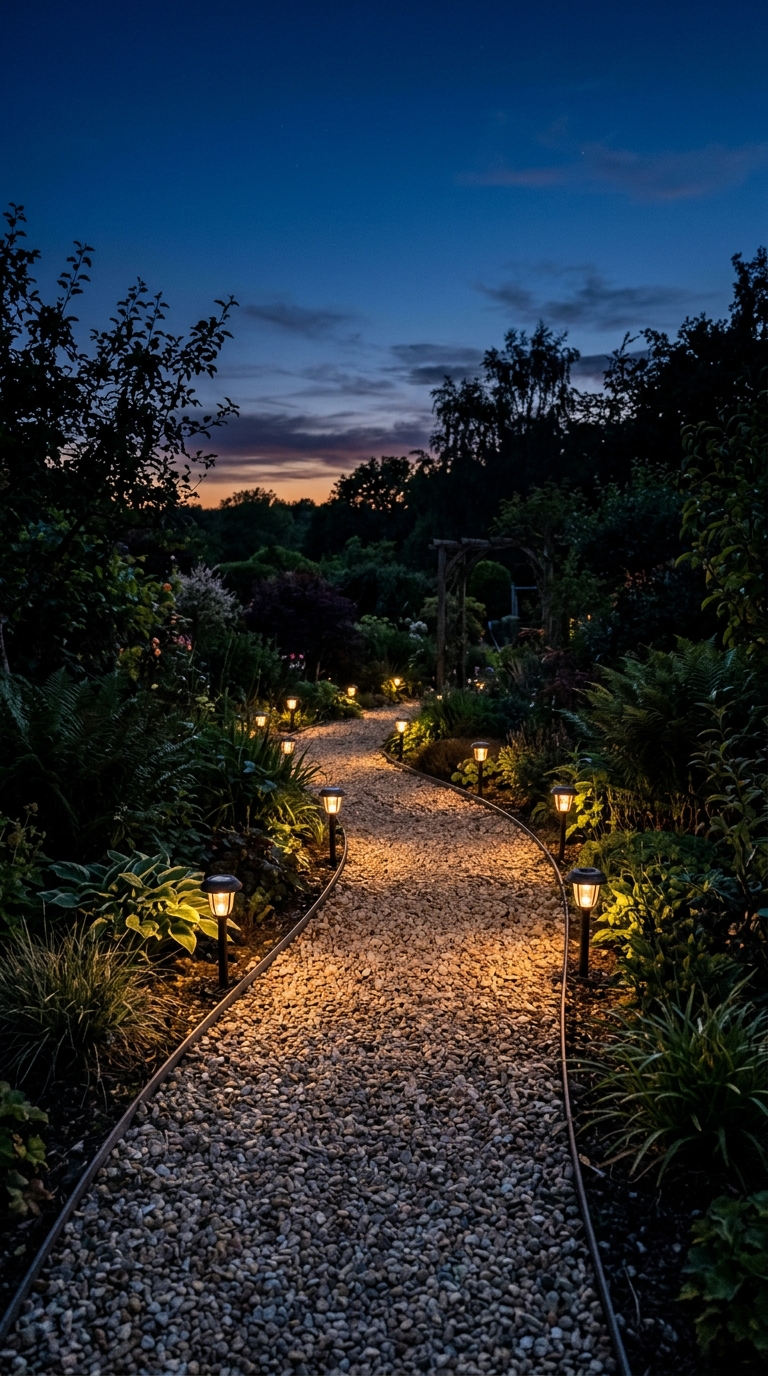
Lighting is crucial for safety and ambiance. Solar path lights along the gravel walkway highlight the texture of the stone at night. Place them low so they graze the surface of the gravel. This creates shadows and depth.
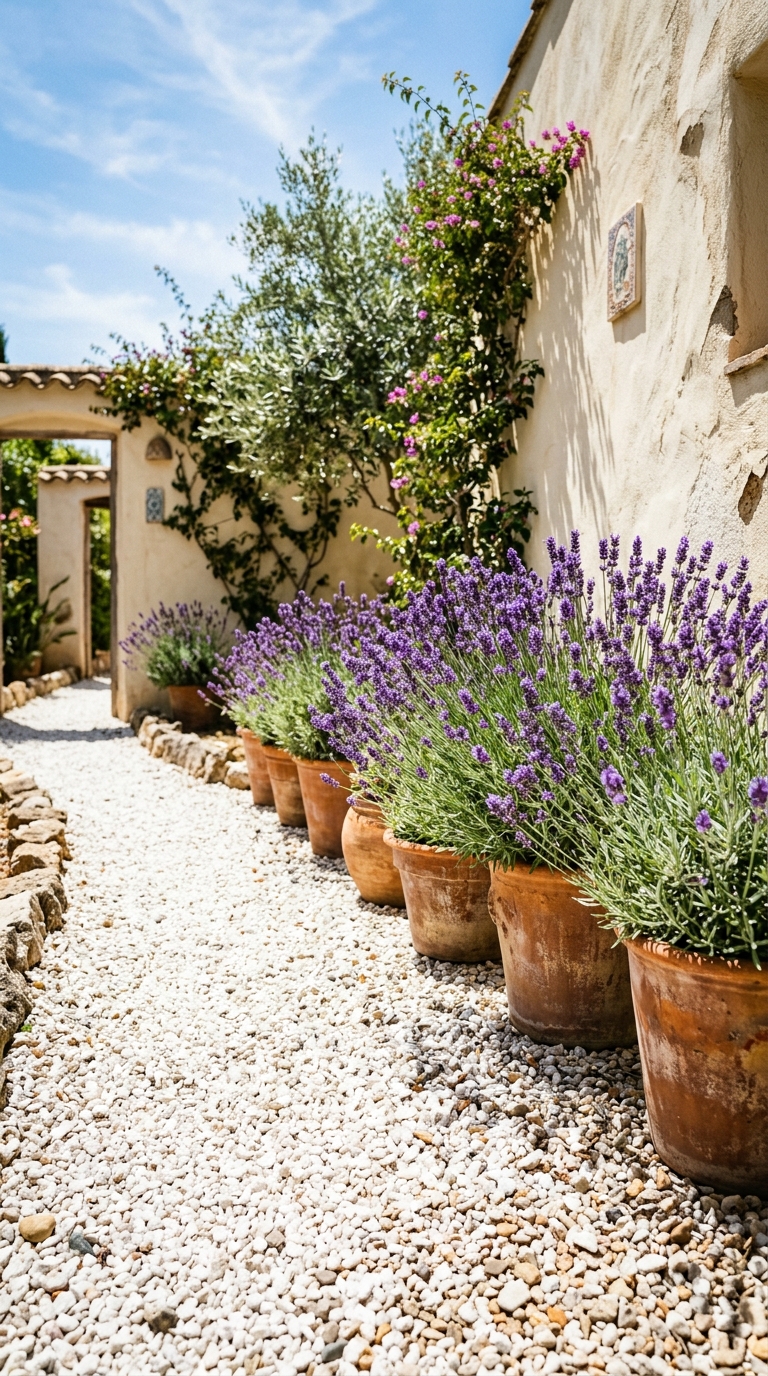
Plant pairings are equally important. For a Mediterranean look, pair terracotta pots and lavender with a white gravel path. The silver foliage of the lavender complements the light stone. For a modern look, use clean lines, ornamental grasses, and a dark stone gravel path. The contrast is striking. For a woodland look, surround the path with ferns and hostas. Use natural crushed granite that blends with the forest floor. These gravel path ideas help integrate the path into the existing landscape so it feels like it belongs there.
Upkeep
Even the best-built path requires some care. Maintenance is minimal compared to lawn or solid pavers, but it is not zero. Weeds will eventually find a way. Seeds blow in and settle in the stone. Even with fabric, some weeds may root in the top layer of gravel. Hand-pulling is the easiest method. Avoid harsh chemicals if you have pets or children playing nearby.
Over time, foot traffic creates ruts. People tend to walk in the same spot, pushing the stone aside. You will need to occasionally rake the gravel walkway to level it out. This takes only a few minutes with a garden rake. Gravel also settles and disperses. Stones get kicked into the lawn or sink into the base. Recommend adding a fresh bag of stone once a year to keep the budget-friendly gravel path looking new. This top-up refreshes the color and depth.
Check the gravel path border annually. Ensure it has not shifted due to frost or heavy rain. Re-stake any loose sections immediately. If the edging fails, the stone will spill out and the path will lose its definition. Keeping the edges sharp keeps the garden looking tidy.
Stepping Into Success
Think back to the rainstorm from the beginning. Now picture that same scene with your new path in place. The rain falls, but the water drains through the stone. You walk out to close the window. Your feet stay dry. Your shoes stay clean. There is no slipping. The garden is once again a sanctuary.
A DIY gravel pathway is an investment in enjoying your outdoor space rain or shine. It solves the practical problem of mud while adding significant aesthetic value. It increases curb appeal and makes the yard usable year-round. The process is within reach for most homeowners. You do not need a contractor. You need a shovel, some stone, and a weekend.
Remember that the right garden pathways gravel changes the entire feel of the home’s exterior. It connects different areas of the yard. It guides visitors to your door. It provides a stable foundation for your gardening efforts. Grab a shovel and start marking out your line this weekend. The garden is waiting for you to step onto solid ground.