5 Creative Fire Pit Designs That Will Transform Your Backyard Space
A backyard fire pit can transform your outdoor space into a cozy retreat, perfect for relaxing evenings and lively gatherings. While building a fire pit might seem like a daunting task, it’s easier than you think. Our detailed guide on How to Build a DIY Backyard Fire Pit Quickly and Inexpensively provides all the steps you need to create your own.
Once you’ve mastered the basics, it’s time to get creative. In this article, we explore five unique fire pit designs that not only serve as functional features but also add a stylish flair to your backyard. From sunken fire pits to mosaic designs, these ideas will inspire you to elevate your outdoor space. Let’s dive into these innovative concepts and find the perfect fire pit design for your home.
Sunken Fire Pit
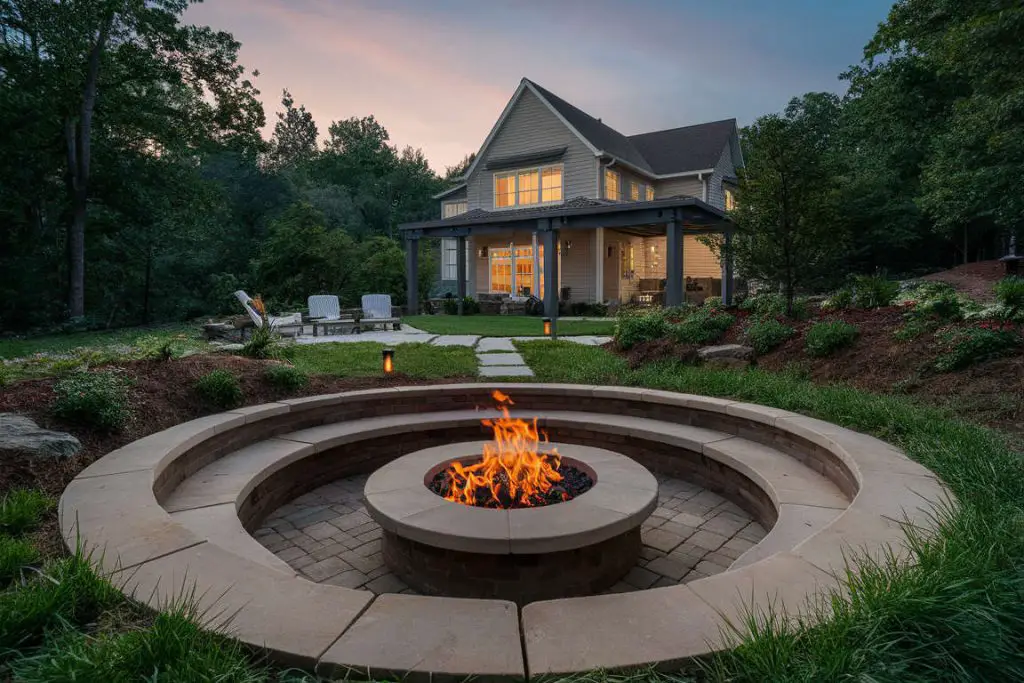
A sunken fire pit can create a cozy and intimate atmosphere in your backyard. Lowering the fire pit below ground level provides a natural windbreak and enhances the feeling of being gathered around a campfire. This design also adds a unique, stylish element to your outdoor space.
Design and Benefits:
- Enhanced Ambiance: A sunken fire pit offers a more intimate setting, perfect for close gatherings with family and friends.
- Wind Protection: The recessed design helps protect the fire from wind, ensuring a steady flame.
- Aesthetic Appeal: Incorporating a sunken fire pit can make your backyard look more sophisticated and well-designed.
Materials Needed:
- Fire-resistant bricks or stones
- Gravel or sand for the base
- Shovel and digging tools
- Level
- Metal fire ring (optional)
Construction Steps:
- Marking the Area:
- Choose a location that is free from overhanging branches and other flammable materials.
- Use stakes and string or spray paint to mark the circumference of your desired fire pit area.
- Digging the Pit:
- Dig down about 18 to 24 inches, depending on your preference for depth.
- Ensure the sides are straight and the base is level, using a shovel and a level for accuracy.
- Preparing the Base:
- Spread a 2-inch layer of gravel or sand evenly across the bottom of the pit to provide a stable and heat-resistant base.
- Compact the gravel or sand to create a firm foundation.
- Laying the Bricks or Stones:
- Arrange the first layer of fire-resistant bricks or stones around the edge of the pit, fitting them snugly together to form a circle.
- Continue layering the bricks or stones, ensuring each layer is staggered from the one below to enhance stability.
- Use a level to check each layer for evenness, adjusting as necessary.
- Adding a Metal Fire Ring (Optional):
- Place a metal fire ring inside the pit to protect the inner walls from heat damage and prolong the life of your fire pit.
- Ensure the ring fits securely and does not shift.
- Finishing Touches:
- Fill any gaps between the bricks or stones with sand to secure the structure and prevent movement.
- Smooth out the surrounding area to create a comfortable seating space around the fire pit.
Usage and Maintenance:
- Lighting the Fire: Use dry hardwoods like oak or maple for a longer-lasting, hotter fire. Start with smaller pieces of wood and gradually add larger logs as the fire grows.
- Cleaning: Regularly remove ashes and debris to maintain proper airflow and functionality. Inspect the structure for any signs of wear or damage, and make repairs as needed.
- Safety: Always have a fire extinguisher or water source nearby, and never leave the fire unattended. Ensure the fire is completely out before leaving the area or going to bed.
A sunken fire pit not only enhances the aesthetic appeal of your backyard but also provides a functional and enjoyable gathering spot. The intimate setting and natural wind protection make it a favorite choice for many homeowners.
Stone and Steel Combination

Combining natural stone with sleek steel creates a fire pit that blends rustic charm with modern elegance. This design offers durability and aesthetic appeal, making it a versatile choice for various backyard styles.
Design and Benefits:
- Modern Elegance: The contrast between natural stone and polished steel adds a sophisticated touch to your outdoor space.
- Durability: Steel provides excellent heat resistance and structural integrity, while stone offers timeless beauty.
- Versatility: This combination suits both contemporary and traditional backyard designs, seamlessly integrating with different landscaping elements.
Materials Needed:
- Natural stones (such as granite or fieldstone)
- Steel fire ring or steel panels
- Gravel or sand for the base
- Shovel and digging tools
- Level
Construction Steps:
- Marking the Area:
- Select a suitable location, ensuring it is free from flammable materials and has ample space for seating.
- Use stakes and string or spray paint to outline the circumference of your desired fire pit area.
- Preparing the Base:
- Dig down about 6 inches within the marked area to create a level base.
- Spread a 2-inch layer of gravel or sand evenly across the bottom, compacting it to provide a stable foundation.
- Laying the Stone Foundation:
- Arrange the first layer of natural stones around the edge of the pit, fitting them closely together to form a sturdy circle.
- Ensure the stones are level and stable, using a level to check for evenness.
- Installing the Steel Fire Ring:
- Place the steel fire ring or panels inside the stone circle, ensuring it fits snugly and provides a secure barrier between the fire and the stone walls.
- Adjust the placement of the steel to ensure it is centered and stable.
- Building Up the Stone Walls:
- Continue adding layers of stones, staggering each layer for enhanced stability.
- Use the level to maintain evenness as you build up the walls to the desired height.
- Fill any gaps between the stones with sand or smaller stones for added stability.
- Finishing Touches:
- Ensure the top layer of stones is securely in place and level.
- Smooth out the surrounding area to create a comfortable seating space.
Usage and Maintenance:
- Lighting the Fire: Start with small, dry pieces of wood and gradually add larger logs. Hardwoods like oak or maple burn longer and provide more heat.
- Cleaning: Regularly remove ashes and debris to maintain proper airflow and functionality. Inspect the steel ring and stone structure for any signs of wear or damage, and make necessary repairs.
- Safety: Keep a fire extinguisher or water source nearby at all times. Never leave the fire unattended and ensure it is completely out before leaving the area or going to bed.
The combination of stone and steel not only creates a durable and attractive fire pit but also provides a focal point that enhances the overall ambiance of your backyard. This design’s blend of materials adds both functionality and style, making it a popular choice for many homeowners.
Built-In Bench Seating
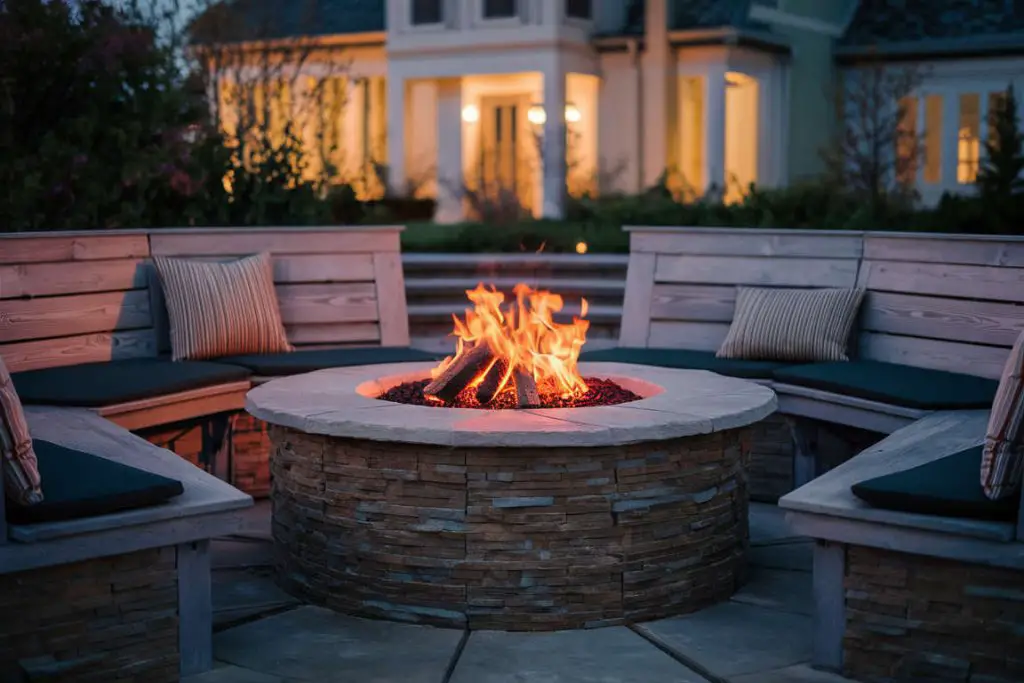
Integrating built-in bench seating around your fire pit creates a cohesive and inviting gathering space. This design maximizes comfort and convenience while adding a stylish and functional element to your backyard.
Design and Benefits:
- Maximized Space: Built-in benches provide ample seating without crowding the area with separate chairs.
- Enhanced Comfort: Add cushions and backrests for a comfortable and relaxing experience.
- Cohesive Look: Matching materials for the benches and fire pit create a unified and stylish outdoor feature.
Materials Needed:
- Fire-resistant bricks or stones for the fire pit
- Wood or stone for bench construction
- Cushions and weather-resistant fabric (optional)
- Screws, nails, and construction adhesive
- Shovel and digging tools
- Level
- Measuring tape
Construction Steps:
- Planning the Layout:
- Decide on the shape and size of the benches, ensuring they complement the fire pit and fit the available space.
- Use stakes and string to mark the layout of the benches around the fire pit area.
- Building the Fire Pit:
- Construct the fire pit according to your chosen design, ensuring it is level and stable.
- Use fire-resistant bricks or stones for the fire pit structure.
- Constructing the Bench Frames:
- Build the frames for the benches using durable wood or stone. Ensure the frames are sturdy and properly anchored to the ground.
- Use a level to make sure the frames are even and aligned with the fire pit.
- Adding Seating Surfaces:
- Attach wooden planks or stone slabs to the frames to create the seating surfaces. Ensure they are securely fastened and level.
- If using wood, consider treating it with a weather-resistant finish to prolong its lifespan.
- Incorporating Cushions and Backrests:
- Add cushions made from weather-resistant fabric for added comfort. Secure them in place to prevent shifting.
- Install backrests if desired, attaching them securely to the bench frames.
- Finishing Touches:
- Smooth out the surrounding area to create a comfortable and inviting space.
- Add decorative elements like pillows or blankets to enhance the coziness of the seating area.
Usage and Maintenance:
- Comfort: Ensure cushions and backrests are made from weather-resistant materials to withstand outdoor conditions. Remove them during harsh weather to prolong their life.
- Cleaning: Regularly clean the bench surfaces and cushions to keep them looking fresh and inviting. Inspect the structure for any signs of wear or damage and make necessary repairs.
- Safety: Ensure the benches are securely anchored and stable. Keep flammable materials away from the fire pit area and always monitor the fire.
Built-in bench seating not only enhances the aesthetic appeal of your fire pit area but also provides a practical solution for outdoor gatherings. The unified design creates a welcoming space where family and friends can comfortably enjoy the warmth and ambiance of the fire pit.
Mosaic Fire Pit
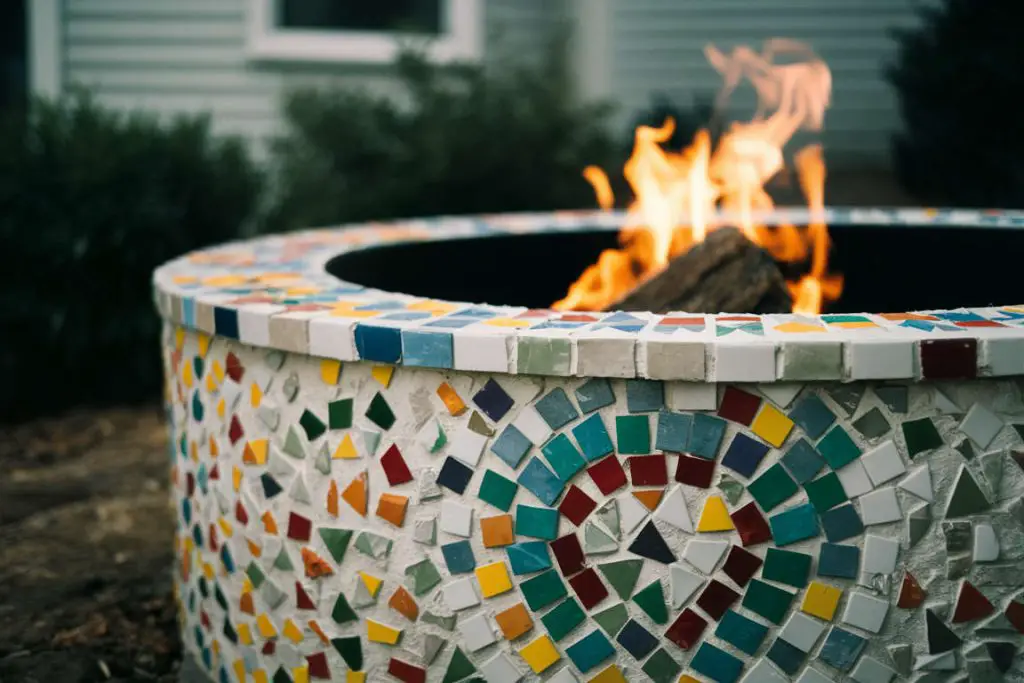
A mosaic fire pit adds a vibrant and artistic touch to your backyard. Incorporating colorful tiles into the design can make your fire pit a unique focal point that reflects your personal style and creativity.
Design and Benefits:
- Artistic Appeal: A mosaic fire pit serves as a stunning piece of art in your outdoor space.
- Customization: Choose colors and patterns that match your backyard decor.
- Durability: Mosaic tiles are heat-resistant and can withstand outdoor elements.
Materials Needed:
- Fire-resistant bricks or stones for the fire pit structure
- Heat-resistant mosaic tiles
- Tile adhesive suitable for outdoor use
- Grout
- Shovel and digging tools
- Level
- Tile cutter or nippers
- Grout float and sponge
Construction Steps:
- Planning the Design:
- Decide on the color scheme and pattern for your mosaic. Sketch your design to have a clear plan.
- Choose a location for your fire pit that complements the mosaic design.
- Building the Fire Pit:
- Construct the fire pit using fire-resistant bricks or stones, ensuring the structure is level and stable.
- Build the fire pit to the desired height, maintaining an even and secure construction.
- Preparing the Surface:
- Clean the surface of the fire pit thoroughly to remove any dust or debris.
- Ensure the surface is dry before applying the tile adhesive.
- Applying the Mosaic Tiles:
- Spread a layer of tile adhesive on a small section of the fire pit.
- Press the mosaic tiles into the adhesive, following your planned pattern.
- Use a tile cutter or nippers to trim tiles as needed to fit the design.
- Grouting the Mosaic:
- Allow the tile adhesive to dry completely, following the manufacturer’s instructions.
- Apply grout over the tiles using a grout float, pressing it into the gaps between the tiles.
- Wipe away excess grout with a damp sponge, cleaning the tile surfaces while ensuring the grout lines are smooth.
- Sealing the Mosaic (Optional):
- Consider applying a sealant to the grout to protect it from moisture and stains.
- Follow the manufacturer’s instructions for application and drying times.
Usage and Maintenance:
- Lighting the Fire: Use hardwoods like oak or maple for a longer-lasting fire. Start with small pieces and gradually add larger logs.
- Cleaning: Regularly clean the mosaic surface to maintain its vibrant appearance. Inspect the tiles and grout for any damage or wear, and make repairs as needed.
- Safety: Ensure the fire pit is used responsibly, keeping flammable materials away and never leaving the fire unattended. Have a fire extinguisher or water source nearby.
A mosaic fire pit not only enhances the beauty of your backyard but also provides a unique and personalized touch. The colorful and artistic design can transform your fire pit into a centerpiece that draws attention and admiration from all who see it.
Tabletop Fire Pit
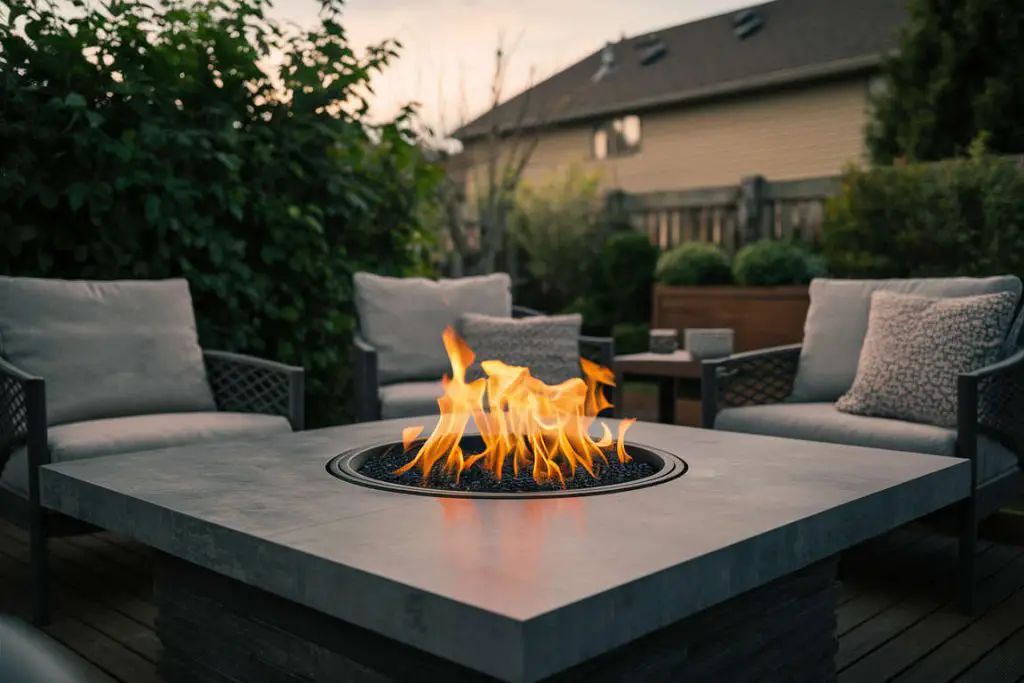
A tabletop fire pit combines functionality and elegance, making it a perfect addition to your outdoor dining or lounging area. Integrating a fire pit into the center of a table creates a warm and inviting space for meals and gatherings.
Design and Benefits:
- Space-Saving: A tabletop fire pit maximizes the use of space, combining a fire feature with a functional table.
- Versatility: Suitable for small patios, balconies, or larger backyard setups.
- Aesthetic Appeal: Adds a sophisticated and cozy ambiance to your outdoor living space.
Materials Needed:
- Metal fire bowl or insert
- Heat-resistant tabletop (stone, metal, or treated wood)
- Table frame and legs
- Fire glass or lava rocks (optional)
- Propane tank or natural gas line (if using gas)
- Fire-resistant adhesive
- Drill and screws
- Level
- Measuring tape
Construction Steps:
- Planning the Design:
- Choose the shape and size of your table based on your outdoor space and needs.
- Decide on the type of fire bowl or insert you will use, ensuring it fits comfortably in the table’s center.
- Building the Table Frame:
- Construct the frame and legs of the table using sturdy materials like treated wood or metal.
- Ensure the frame is level and stable, using a level to check alignment.
- Preparing the Tabletop:
- Cut an opening in the center of the tabletop to fit the fire bowl or insert.
- Smooth the edges of the opening to prevent any rough spots or splinters.
- Installing the Fire Bowl or Insert:
- Place the fire bowl or insert into the opening, ensuring it sits securely.
- Use fire-resistant adhesive to seal any gaps between the bowl and the tabletop.
- Adding Decorative Elements:
- Fill the fire bowl with fire glass or lava rocks if desired, enhancing the visual appeal.
- Arrange these elements evenly around the burner to ensure proper airflow and combustion.
- Connecting the Fuel Source:
- For gas fire pits, connect the propane tank or natural gas line according to the manufacturer’s instructions.
- Ensure all connections are secure and leak-free before lighting the fire.
Usage and Maintenance:
- Lighting the Fire: Follow the manufacturer’s instructions for lighting your specific type of fire pit. Use a long lighter or match to ensure safety.
- Cleaning: Regularly clean the fire bowl and tabletop to remove ash, debris, and dirt. Inspect the structure for any signs of wear or damage, making necessary repairs.
- Safety: Always use the fire pit in a well-ventilated area. Keep flammable materials away and never leave the fire unattended. Ensure the fire is completely out before leaving the area.
A tabletop fire pit not only adds warmth and ambiance to your outdoor space but also serves as a functional centerpiece for dining and socializing. This design seamlessly integrates a fire feature into your table, creating a cozy and inviting environment for all your gatherings.
Final Thoughts
Creating a fire pit that combines style, functionality, and safety can transform your backyard into a warm and inviting space. Whether you choose a sunken design, a blend of stone and steel, built-in bench seating, a vibrant mosaic, or a versatile tabletop fire pit, each option offers unique benefits that cater to different needs and preferences.
Careful planning and attention to detail ensure that your fire pit becomes a beloved feature for years to come. Regular maintenance and adherence to safety guidelines will keep it in top condition, allowing you to enjoy countless cozy evenings with family and friends.
Exploring these creative designs not only enhances the aesthetic appeal of your outdoor space but also provides practical solutions for various backyard setups. Enjoy the opportunity to personalize your fire pit, making it a true reflection of your style and creativity. Enjoy the warmth and ambiance it brings to your gatherings, creating lasting memories around the fire.