DIY Hand Painted Flower Pots That Actually Survive The Seasons
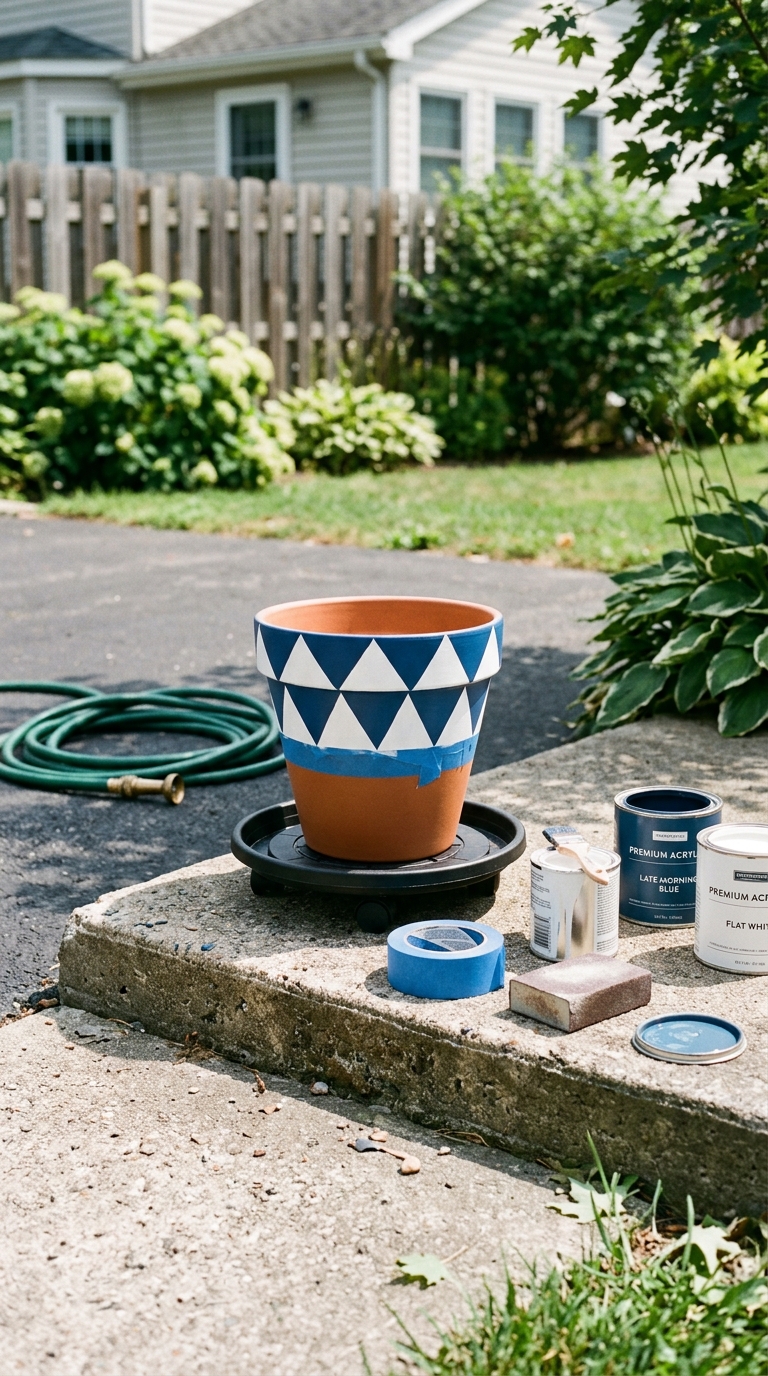
The brush catches the rough rim. A thick streak of cobalt blue slides down the curved side and pools on the patio stone. You freeze. You grab a paper towel. You smear it worse. Then you step back and notice something. That accidental drag looks like a rain streak. It looks alive. You leave it alone.
Most painted planters fail because we treat clay like canvas. We slap on thick craft paint. We seal it like a decoupage box. We set it outside in July and watch it blister by August. Garden containers face brutal conditions. Soil stays damp. Roots push outward. Sun bakes the exterior while water chills the interior. Paint needs to bend with that reality. This guide skips perfect finishes and gallery expectations. We will focus on techniques that handle weather, forgive clumsy hands, and keep your plants breathing. You will learn how to prep porous clay, choose pigments that hold up, and apply designs that age gracefully alongside your tomatoes and petunias. Grab a stiff brush. Clear a spot on the driveway. We are making pots that look good long after the soil goes in.
Hand Painted Terracotta Pots And Why Clay Demands A Different Approach
Terracotta Pot Makeover Ideas That Work With The Material
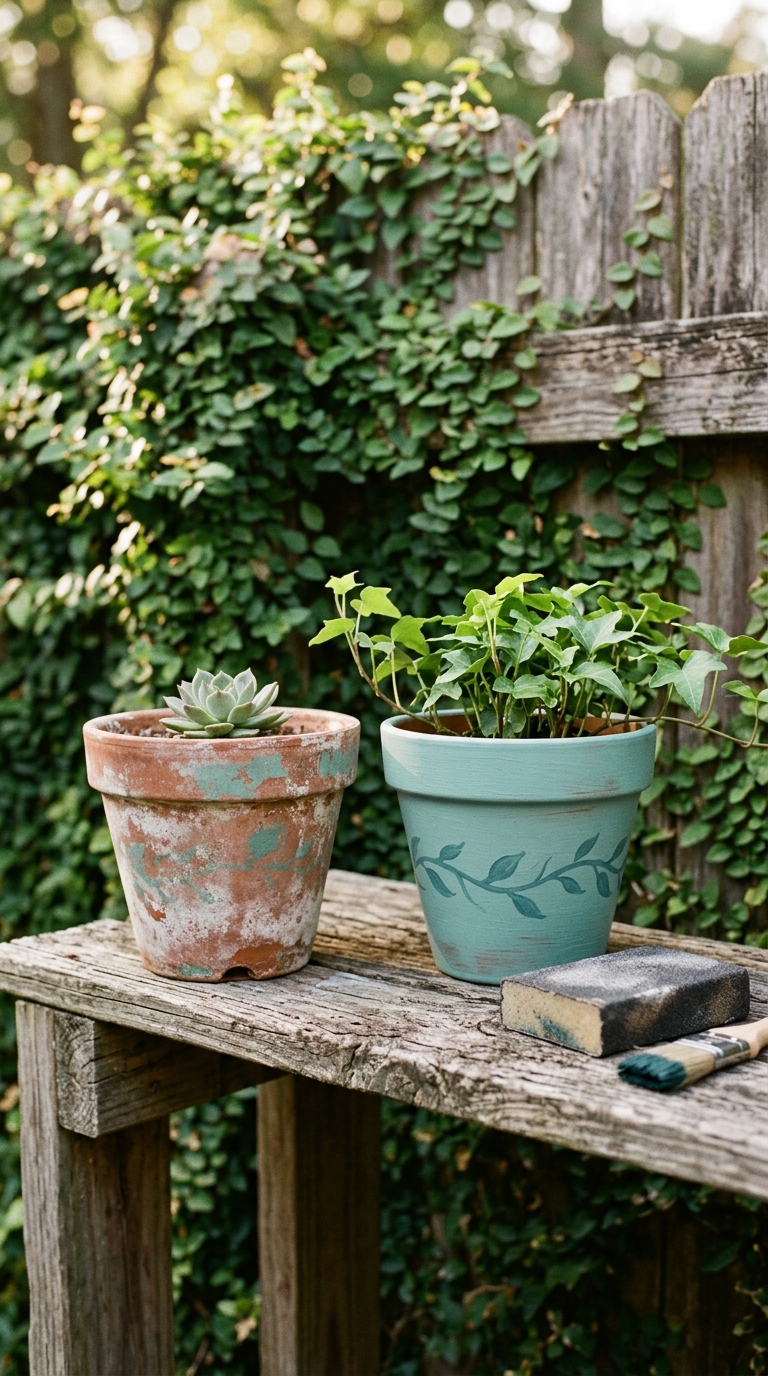
Unglazed clay drinks water. That is its job. The material pulls moisture from the soil and releases it through the walls. This keeps roots cool and prevents rot. When you cover those walls with heavy paint, you block the exchange. The pot swells. The finish cracks. You can avoid this by working with the clay instead of fighting it. Start with a washed stain approach. Thin your paint with water until it looks like weak tea. Brush it on in uneven sweeps. Let the terracotta show through in patches. The result looks sun faded and grounded. It also leaves enough bare surface for moisture to escape.
If you prefer solid color, stick to thin layers. Two light coats beat one heavy coat every time. Heavy applications trap water against the clay. They also chip when the pot expands during temperature swings. Cheap garden decor ideas often fail because they ignore material behavior. Upcycled plant container crafts work best when you respect the original surface. Scrub off dust and old mineral deposits before you touch a brush. Plain water and a nylon scrub pad do the job. Skip harsh chemicals. They leave a film that repels paint and guarantees peeling later.
Sealing Painted Clay Pots Without Suffocating The Roots
Sealer protects your work from rain and UV damage. It also creates a plastic shell if you apply it wrong. Never spray or brush sealant inside the pot. The interior needs to stay porous. Roots require air exchange. A sealed interior turns your planter into a swamp. Focus your outdoor pot painting tips on the exterior walls and the top rim only. Leave the drainage hole completely bare. Water needs a clear exit path.
Choose a water based exterior varnish or a clear acrylic spray rated for outdoor use. Matte finishes hide brush marks and look more natural in garden settings. Gloss finishes reflect harsh sunlight and show every fingerprint. Apply the sealer in light passes. Hold the can twelve inches away. Move steadily. Stop when the surface looks slightly damp. Let it dry completely before adding another coat. Two thin layers provide solid protection without building a thick plastic barrier. Handmade garden gifts last longer when you seal them correctly. Seasonal flower pot crafts survive winter storage when moisture can still move through the clay walls.
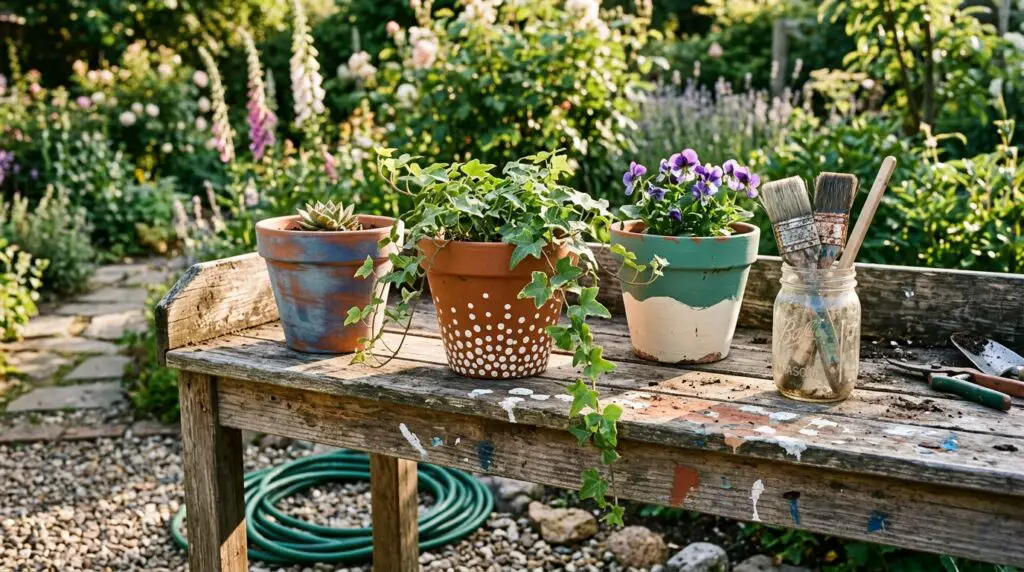
Easy Painted Plant Pot Designs For Quick Weekend Garden Crafts
Simple Pot Painting Patterns That Forgive Shaky Hands

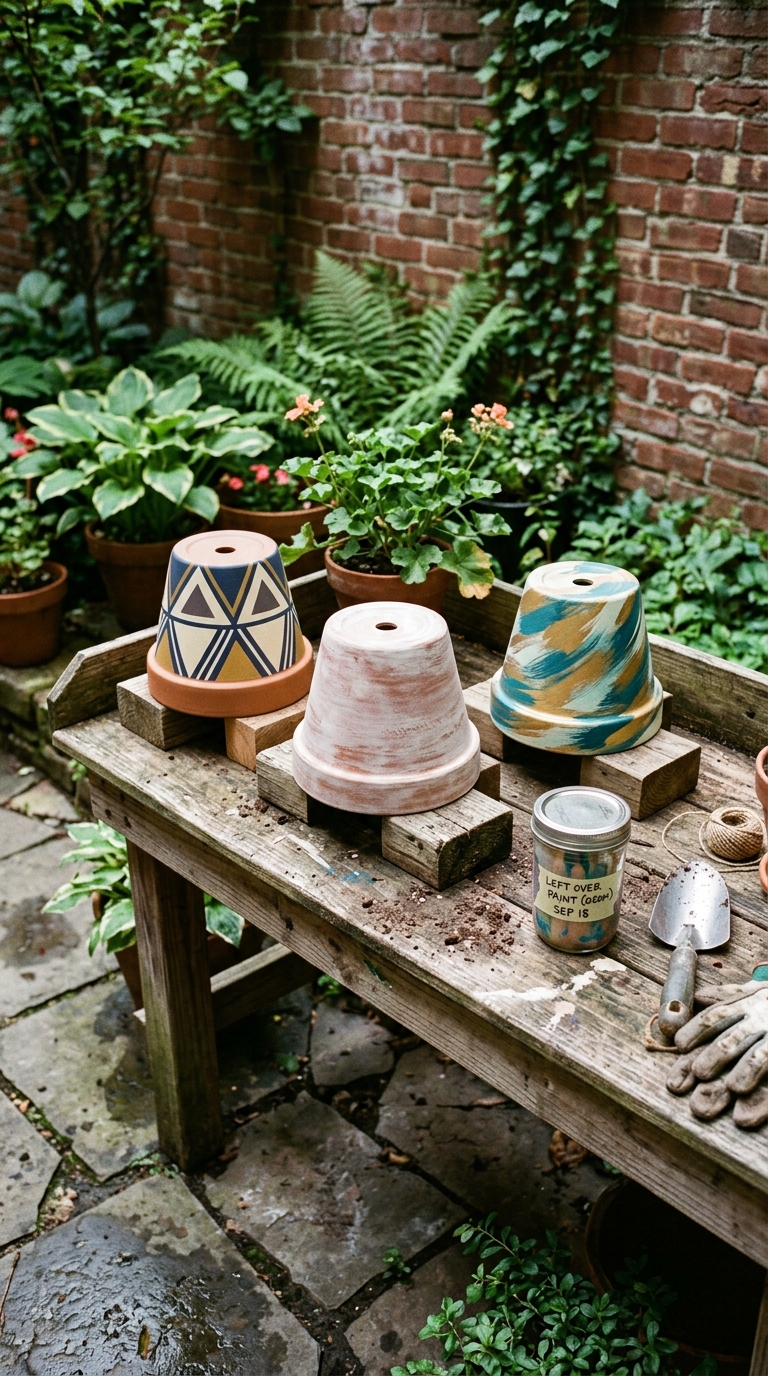
Precision kills momentum. You do not need a steady hand to make a pot look custom. You need a pattern that welcomes variation. Dots work beautifully for this. Load a round brush or the eraser end of a pencil. Press it against the clay. Lift straight up. Repeat around the circumference. Space them unevenly. Cluster a few near the bottom. Leave gaps near the rim. The eye reads this as organic. It reads perfect spacing as machine made.
Staggered dashes offer the same forgiveness. Drag a flat brush sideways. Stop. Move down an inch. Drag again. Offset the next row. The pattern builds rhythm without requiring measurement. Crosshatch textures hide wobbles even better. Lay down vertical lines. Let them dry. Add horizontal lines on top. Where the strokes intersect, the paint darkens naturally. The variation creates depth. Quick weekend garden crafts should feel loose. Tight designs demand perfect conditions and steady nerves. Loose designs survive wind, distractions, and impatient drying times. Keep your simple pot painting patterns relaxed. Your pots will look better for it.
Beginner Pot Painting Projects That Dry Before Dinner
Short sessions prevent mistakes. Long painting marathons lead to overworking. You start fixing small flaws. You add extra coats. You trap moisture. The finish turns gummy. Stick to projects that move fast. Pick two colors. One for the base. One for the pattern. Use a single medium flat brush for everything. Fewer tools mean fewer cleanup breaks and less hesitation.
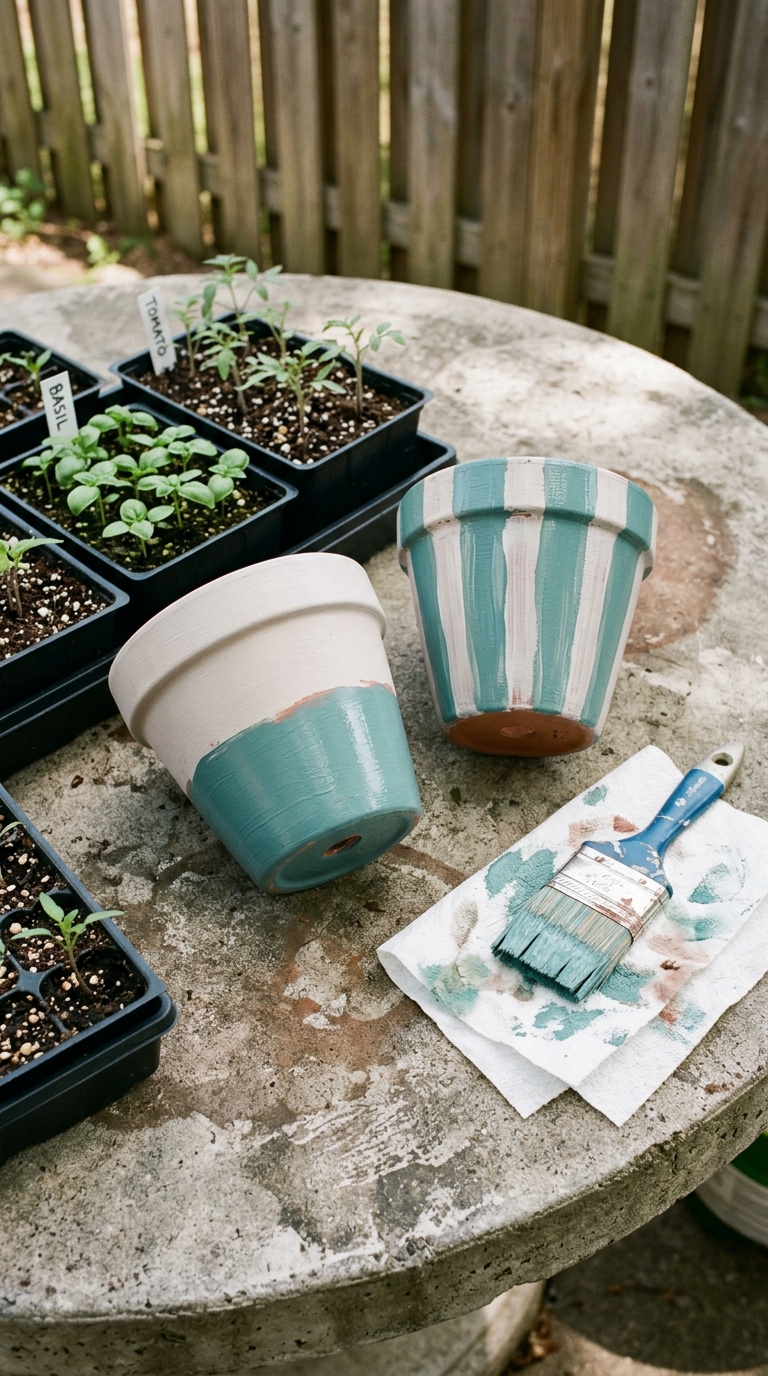
Start with a color block design. Paint the lower third of the pot. Stop at a rough line. Let the edge stay uneven. Turn the pot. Paint the upper third in your second color. Leave the middle band bare. The exposed clay breaks up the color and grounds the design. Try a vertical stripe layout next. Drag your brush from rim to base. Skip measuring. Vary the width. Step back three feet. Adjust only if one side looks completely empty. Fast DIY outdoor decor relies on speed and restraint. Beginner friendly planter art succeeds when you quit while the surface still looks slightly unfinished. Dot painting flower pots and striped plant container ideas both follow this rule. Paint fast. Step away. Let the sun do the rest.
Acrylic Painted Flower Pots That Handle Sun And Sudden Rain
Best Paint For Outdoor Planters That Won’t Peel By July
Craft aisle acrylics look bright on the shelf. They fade fast under direct sun. The binder breaks down. The pigment chalks. You brush your hand across the rim and come away with blue dust. Outdoor rated formulas solve this. They contain stronger acrylic polymers and UV stabilizers. The paint stays flexible. It expands with the clay. It resists fading through August heat.
Check the label for exterior use or patio safe claims. Avoid interior wall paint. It lacks the flexibility needed for curved containers. Stick to one brand per pot. Different manufacturers use different binder ratios. Mixing them causes curing conflicts. The top layer dries faster than the bottom layer. The finish splits. Vibrant garden pot colors require proper pigment load. Cheap paint uses fillers to stretch volume. The color looks weak after one season. Long lasting planter paint costs slightly more upfront. It saves you from repainting every spring. Craft paint garden projects work fine for indoor shelves. Outdoor planters need tougher formulas. Buy the exterior grade. Your future self will skip the scraping and sanding next year.
Acrylic Pot Painting Tutorial For Layering Without Cracking
Thick paint cracks. Thin paint bends. This rule never changes. Apply your base coat in a light sweep. Cover about seventy percent of the clay. Let the brush run dry in spots. Wait until the surface feels cool to the touch. Warm paint still holds moisture. Cool paint has released it. Add your second coat only after the first passes the touch test.
Pattern layers follow the same timing. Load less paint than you think you need. Wipe the brush on a paper towel before touching the pot. Dry brush techniques grip the textured surface better. They also dry faster. Thick glops sit on top of the clay. They trap water underneath. The trapped moisture pushes upward as the sun heats the pot. The surface bubbles. The bubble pops. You get a crater. Sealing acrylic on terracotta works only when the layers cure properly. Rushing the process ruins the finish. An acrylic pot painting tutorial succeeds when it teaches patience between coats. Paint thin. Wait. Paint thin again. The result stays smooth through rain and heat.
Step By Step Painted Pots From Dusty Shelf To Patio Ready
Pot Painting Guide For Beginners That Skips The Fluff
Order matters. Skip a step and the paint lifts. Follow the sequence and the finish holds. Start with a dry pot. Never paint damp clay. Moisture pushes outward as it evaporates. It breaks the bond between paint and surface. Scrub the exterior with a stiff brush and plain water. Remove white mineral crust. Rinse. Let the pot sit in full sun for two hours. Bone dry clay accepts paint evenly.
Apply your base coat. Use long vertical strokes. Rotate the pot as you work. Keep the brush moving. Stop before the paint builds up. Let it dry completely. Add your design layer. Work in sections. Complete one side. Turn the pot. Complete the next. This prevents accidental smudges from your grip. Apply sealer last. Use light passes. Cover the exterior walls and rim. Avoid the interior. Avoid the drainage hole. Let the pot cure before adding soil. A complete pot painting walkthrough fails when it rushes the drying stages. Layered paint techniques for pots succeed when you respect the timeline. Stencil painting flower containers follows the same rules. Secure the stencil. Dab paint lightly. Lift straight up. Remove the stencil while the paint is still tacky. Clean edges come from quick removal. Drying time for painted planters varies with humidity. Plan around the weather.
How To Paint Planters Outside Without Wind Ruining The Finish
Outdoor painting saves cleanup time. It also introduces wind, dust, and bugs. Pick a shaded spot. Direct sun flashes the surface dry before the paint levels. You get brush marks and rough patches. Shade gives the acrylic time to settle. Keep a damp cloth nearby. Wipe dust off the pot before it sticks to wet paint. Turn the container instead of reaching around it. Reaching stretches your arm. Your hand shakes. The line wobbles. Turning keeps your wrist steady.
Check the forecast. High humidity keeps acrylic tacky for hours. Dust settles into the sticky surface. You get a gritty finish. Paint on dry days with light breeze. Wind helps curing. Heavy wind blows leaves and dirt onto wet paint. Work in short bursts. Twenty minutes on. Ten minutes off. This rhythm prevents fatigue and keeps your strokes clean. How to paint planters outside comes down to environment control. You cannot stop the weather. You can work around it. Pot painting guide for beginners advice always includes this reality. Adapt to the day. Your finish stays smooth.
Creative Painted Pot Ideas That Break The Matching Set Rule
Nature Inspired Planter Designs That Echo Your Garden Beds
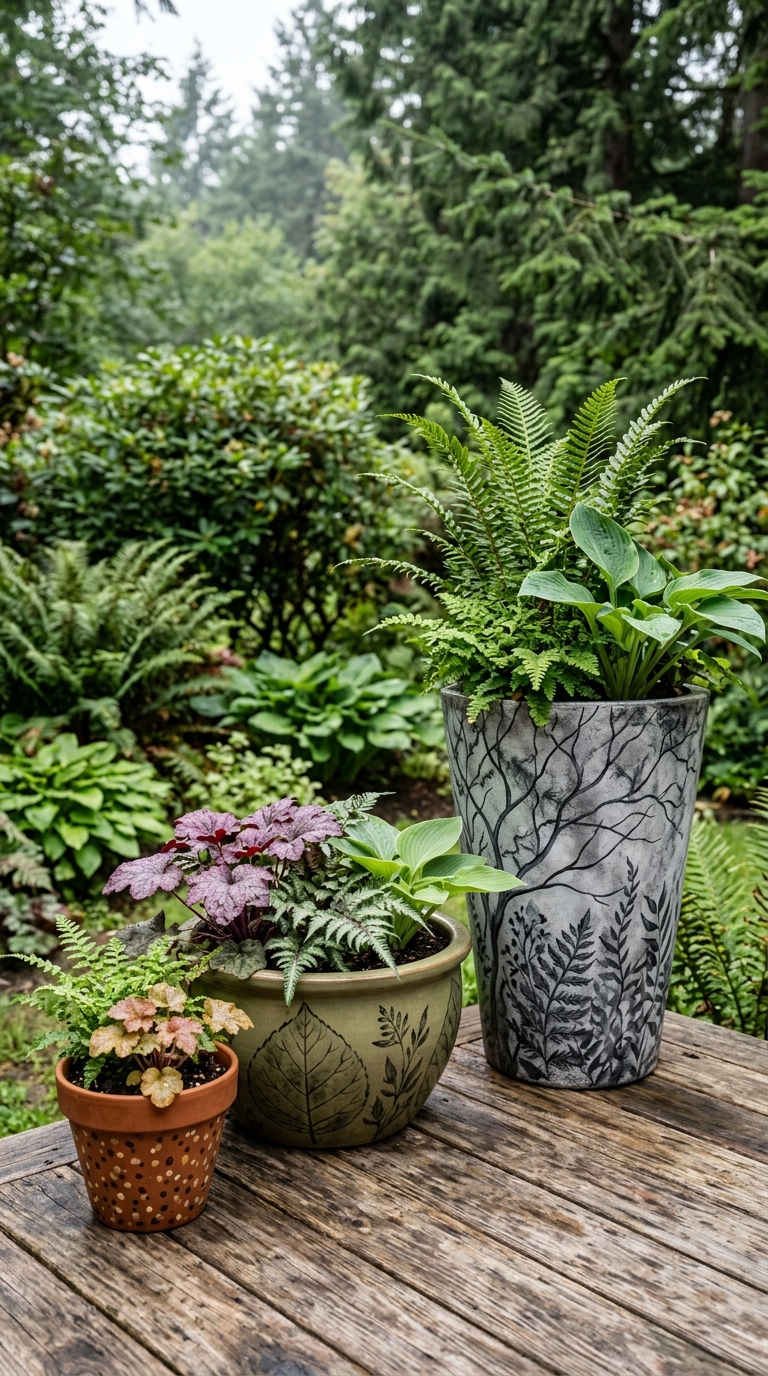
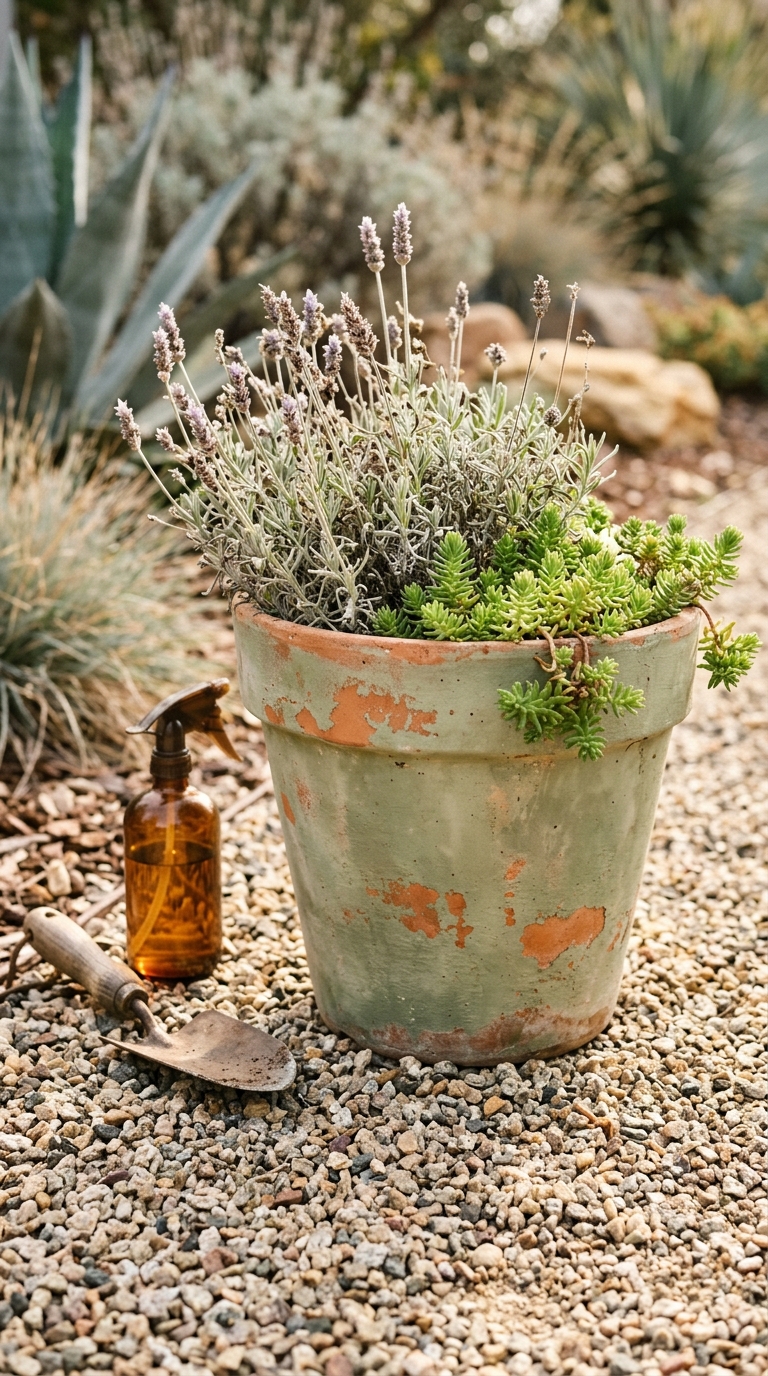
Matching pots look staged. Coordinated pots look planted. Pull your colors from the garden instead of the paint rack. Look at the foliage near your patio. Notice the gray green of sage. The deep purple of basil stems. The rust tone of dried ornamental grass. Mix your paint to echo those shades. The pots blend into the landscape. They stop competing with the flowers.
Use leaf veins as pattern guides. Paint thin branching lines that follow the pot curve. Vary the thickness. Real veins do not stay uniform. Add small dots near the base to suggest soil speckle. Keep the palette tight. Three colors maximum. Too many shades read as clutter. Nature inspired planter designs work because they borrow from surroundings. They feel grounded. Outdoor plant styling ideas improve when containers support the plants instead of shouting for attention. Handmade planter decoration succeeds when it looks like it belongs in the dirt.
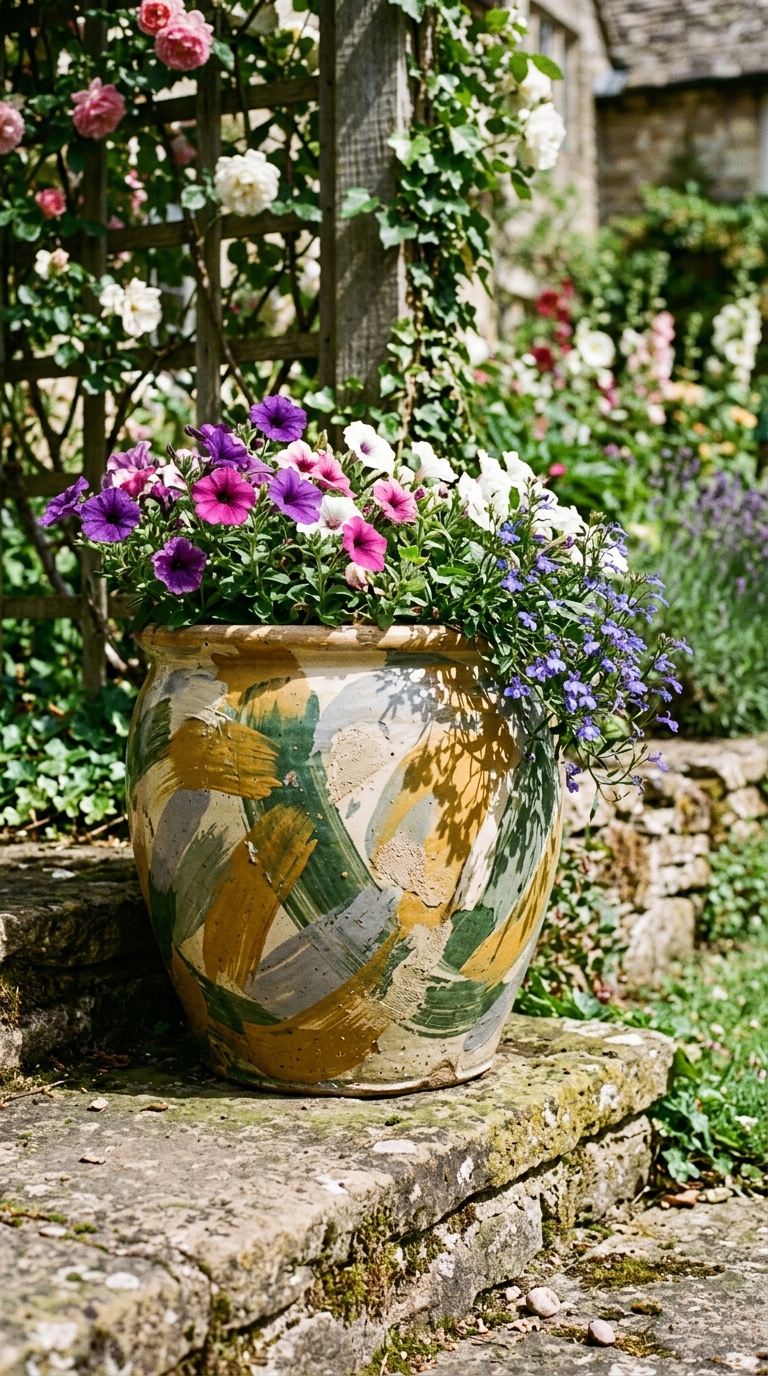
Abstract Flower Pot Art That Looks Expensive But Costs Pennies
Abstract designs hide mistakes and reward loose brushwork. You do not need a plan. You need a direction. Start with a wide flat brush. Load two colors on the same bristles. Do not mix them completely. Drag the brush down the pot side. The colors streak and blend naturally. Rotate. Repeat. Step back. Check the balance. Add a contrasting swipe where the surface looks empty. Stop before it looks finished.
Geometric painted containers follow a similar approach. Use painter tape for hard edges. Press the tape firmly. Burnish the edge with a fingernail. Paint away from the tape line. This prevents bleed. Peel the tape while the paint is still wet. Clean lines appear. Hand painted succulent pots benefit from abstract treatments. Succulents have sharp architectural forms. Loose paint softens the contrast. Whimsical garden pot crafts often try too hard. Abstract flower pot art works because it leaves room for the eye to wander. Unique planter makeover ideas cost almost nothing when you rely on brush drag and color overlap. Paint fast. Walk away. Let the pot dry in the sun.
Modern Painted Flower Pots DIY With Sharp Lines And Quiet Colors
Minimalist Planter Painting That Relies On Negative Space
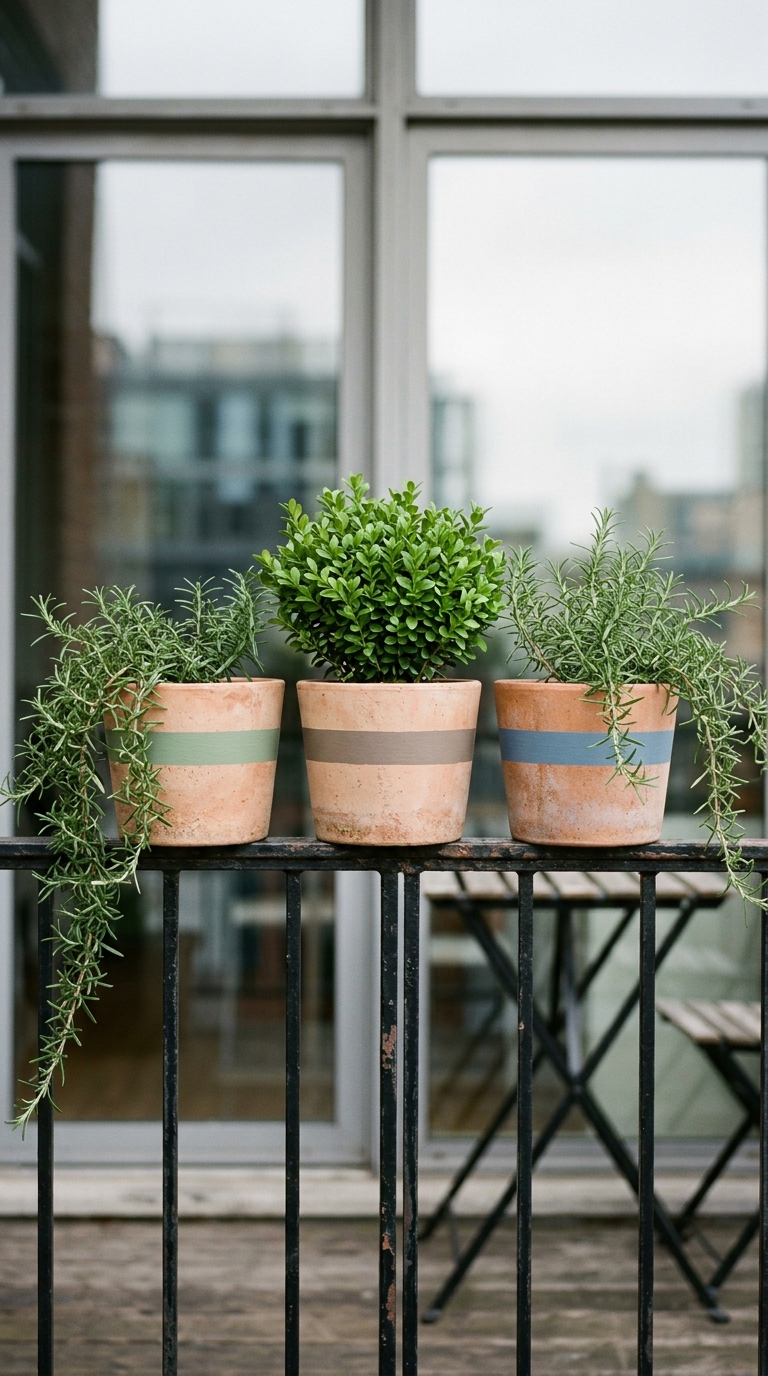
Coverage does not equal quality. Leaving clay bare often looks stronger than painting the entire surface. Minimalist designs use negative space as a feature. Paint a single horizontal band two inches below the rim. Keep the edge slightly rough. Let the terracotta show above and below. The contrast draws the eye. The bare clay grounds the color.
Try a vertical split next. Mask half the pot with paper. Paint the exposed side. Remove the paper. The sharp division reads as custom. Clean line pot art ideas succeed when you resist the urge to add more. One shape carries more weight than five. Sleek outdoor planter makeover projects fail when they crowd the surface. Modern patio decor crafts look best when they breathe. Minimalist planter painting teaches restraint. Paint less. Step back. Trust the empty space.
Contemporary Garden Pot Designs That Fit Small Balconies
Small spaces need visual relief. Heavy patterns shrink a balcony. Quiet colors expand it. Choose neutral tone painted containers for tight areas. Warm grays. Muted greens. Soft clay whites. These shades reflect light without glaring. They keep the focus on the plants. Narrow pots benefit from vertical lines. They draw the eye upward. They make the container look taller. Wide bowls need horizontal breaks. They stop the shape from looking squat.
Layout rules stay simple. Keep patterns near the top third. Leave the lower two thirds plain. Soil splashes the bottom anyway. Darker base colors hide those marks. Contemporary garden pot designs work when they respect scale. Balcony garden container art succeeds when it complements the architecture instead of fighting it. Painted pot drainage tips matter here too. Small spaces trap humidity. Good airflow keeps paint and roots healthy. Modern painted flower pots DIY projects shine when they match the space they occupy.
Hand Painted Garden Planters Built For Real Weather And Real Plants
Large Painted Pot Ideas That Anchor A Flower Border
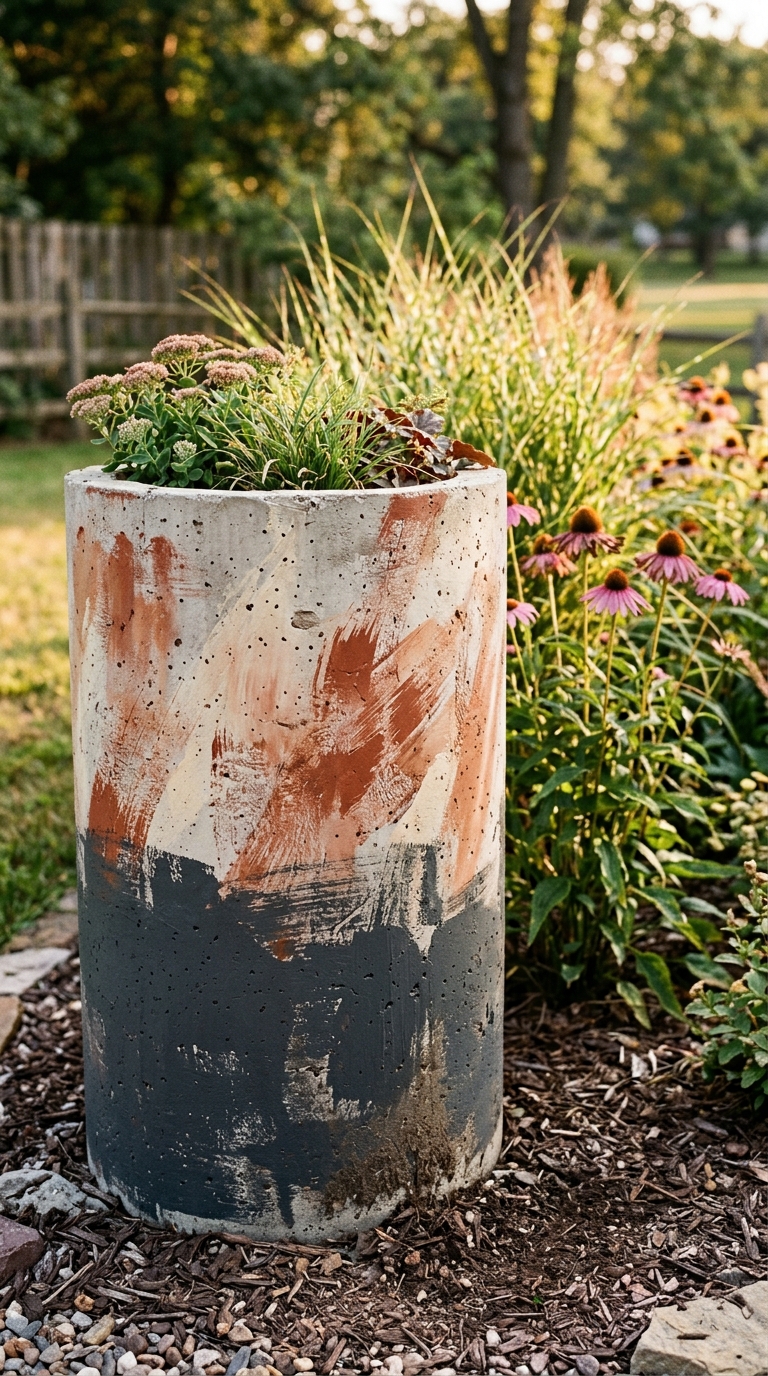
Big containers carry visual weight. They also face more stress. Thick walls hold more soil. More soil holds more water. More water pushes harder against the paint. Large pots need tougher prep and smarter design. Scrub the exterior thoroughly. Mineral buildup hides in the rough texture. Miss a spot and the paint lifts there first. Apply three thin base coats instead of two. The extra layer handles the extra moisture pressure.
Design placement matters on large surfaces. Ground splash stains the lower six inches during rain. Plan for it. Paint the bottom section in a darker shade. Let the color transition upward. The stain blends into the design instead of ruining it. Large painted pot ideas succeed when they anticipate wear. Hand painted garden planters look best when they age with the border. Painted pot drainage tips become critical at this scale. Add extra holes if the manufacturer only drilled one. Water needs multiple exit paths. Standing water rots roots and blisters paint. Custom garden container designs last longer when you build for real conditions.
Painted Pot Drainage Tips That Keep Roots And Paint Happy
Drainage saves plants. It also saves your finish. Water trapped against sealed paint creates pressure. The pressure forces bubbles. The bubbles pop. The paint flakes. Clear the drainage hole before you paint. Run a screwdriver through it. Remove clay dust and manufacturing debris. Mask the hole with painter tape during painting. Peel the tape before the paint dries. This keeps the opening clean.
Never seal the interior bottom. Moisture needs to escape downward. Saucers help protect decks. They also trap water against the pot base. Empty saucers after rain. Lift the pot slightly with pot feet or broken tile shards. Airflow dries the bottom. Painted pot drainage tips are non negotiable. Healthy roots mean healthy plants. Healthy plants mean less repotting. Less repotting means less paint damage. Hand painted garden planters thrive when you prioritize function first. The aesthetics follow naturally.
The Last Coat Before The Dirt Hits The Rim
Curing Schedules That Protect The Finish
Dry and cured are different states. Dry means the surface feels firm. Cured means the binder has fully cross linked. Acrylic reaches dry in hours. It reaches cure in days. Planting too soon traps soil moisture against soft paint. The finish clouds. It peels near the soil line. Follow a realistic timeline. Wait twenty four hours before handling the pot. Wait seven days before adding soil. Wait fourteen days before placing it in full sun or heavy rain.
Temperature affects curing. Cool air slows the process. Heat speeds it up. High humidity stalls it completely. Check the weather before you start. Plan your painting around a dry week. Curing schedules that actually protect the finish require patience. Rushing ruins the work. Let the pot sit on a shelf. Turn it daily. Air reaches all sides. The binder hardens evenly. Your paint stays put when the first storm hits.
Seasonal Touch Ups That Keep Colors Bright Year After Year
Paint fades. Clay cracks. Gardens change. Expect wear and plan for it. Keep a small jar of your original mix. Label it with the date and pot location. When spring arrives, inspect the containers. Look for chalky patches near the rim. Check for chips near the drainage hole. Lightly sand faded areas with fine grit paper. Wipe away dust. Apply a thin refresh coat. Seal the patched section. The pot looks new again.
Touch ups take ten minutes. Repainting takes an afternoon. Small maintenance beats full redo work. Seasonal touch ups that keep colors bright year after year rely on consistent care. Store pots upside down in winter. Keep them off bare concrete. Moisture wicks upward and stains the finish. Lift them onto wood scraps or pallets. Your painted containers will outlast the plants they hold. The dirt goes in. The garden wakes up. The pots stand ready.